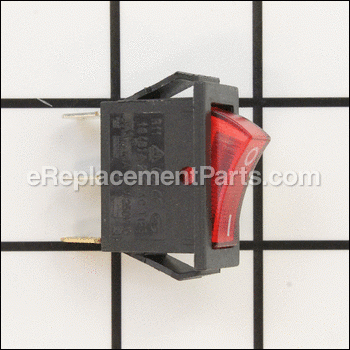
On-off Switch 3870001
Part Number: 3870001
Order within the next 9 hours
and your part ships today!
and your part ships today!
*This part replaces obsolete part #: 354.W001.
Product Information
Specifications
|
Description:
| Genuine Sunheat replacement part, this item is sold individually. This switch turns the power on and off on the models listed below. To remove this this press the two tabs on the side of the switch and pull it out. |
Frequently Purchased With

Compatibility
This part is compatible with the following machines:
Products Compatibility
This item works with the following types of products:
- • Fireplace
- • Heater
Questions & Answers for On-off Switch
No questions have been asked yet
Repair Instructions: Submitted by Customers Like You
30 of 39 people found this instruction helpful
Tool Type:
Heater
Parts Used:
Repair Difficulty:
Easy
Time Spent Repairing:
Less than 15 minutes
Tools Used:
Screwdriver, Nutdriver
Switch broke.
1. Removed the heater box from the wood frame.
2. Unplugged the wires to the switch.
3. Removed and replaced switch.
4. wiring diagram is white/red/black positions 3/2/1 on the switch.
5. Installed heater box into wood frame and secured it.
2. Unplugged the wires to the switch.
3. Removed and replaced switch.
4. wiring diagram is white/red/black positions 3/2/1 on the switch.
5. Installed heater box into wood frame and secured it.
Did you find this story helpful?
Thanks for voting and helping fellow customers!
8 of 10 people found this instruction helpful
Tool Type:
Heater
Parts Used:
Repair Difficulty:
Easy
Time Spent Repairing:
15-30 minutes
Tools Used:
Screwdriver, Pliers, Nutdriver
Bad on/off switch on sun heater
Remove the screws from the back of the heater that hold the heat box in the wood casing. Then remove the support brackets from the left and right sides that you can see on the back. Then remove the one long screw from each wheel bracket on the bottom. Flip the heater back up right and pull the whole metal heat box from the wood case. Lay the heat box on its left side and remove the screws holding the right side cover on. Note the location of the wires on the old switch and them remove them from the switch. Squeeze the upper and lower tabs together and push the switch out the front. The use of pliers may be required. Assembly is the same but in reverse. Use caution tightening screws as to not to over tighten them. The metal screws will strip very easily. Good luck and have fun.
Did you find this story helpful?
Thanks for voting and helping fellow customers!
6 of 7 people found this instruction helpful
Tool Type:
Heater
Parts Used:
Repair Difficulty:
Easy
Time Spent Repairing:
30-60 minutes
Tools Used:
Screwdriver, Pliers, Nutdriver
Defective on /off switch
Only problem I had was I put switch in up side down and wires code was wrong, just switch two wires around. Should of marked or remember that, other that that worked great,
Did you find this story helpful?
Thanks for voting and helping fellow customers!
2 of 2 people found this instruction helpful
Tool Type:
Heater
Parts Used:
Repair Difficulty:
Easy
Time Spent Repairing:
15-30 minutes
Tools Used:
Screwdriver, Power Drill
On off switch went bad,
Easy take as part, took out old switch,ordered new one. Put in easily n we were back in business. Was given further instructions if this did not fix prob, call back n have other ideas. Didn't have to
Did you find this story helpful?
Thanks for voting and helping fellow customers!
1 of 1 people found this instruction helpful
Tool Type:
Heater
Parts Used:
Repair Difficulty:
Easy
Time Spent Repairing:
15-30 minutes
Tools Used:
Power Drill, Adjustable Wrench
Switch melted
Take all screws off the bottom remove the inner case, take screws of side and replace switch.
Did you find this story helpful?
Thanks for voting and helping fellow customers!
Tool Type:
Heater
Parts Used:
Repair Difficulty:
Medium
Time Spent Repairing:
15-30 minutes
Tools Used:
Screwdriver, Pliers
Switch quit working
1.unplug heater....2.remove bottom cover..4screws....3. Unplug the 3wires from switch...push switch through front cover...4.push new switch through from front...plug wires back in....replace bottom cover...plug back in...and your go to go
Did you find this story helpful?
Thanks for voting and helping fellow customers!
Tool Type:
Heater
Parts Used:
Repair Difficulty:
Easy
Time Spent Repairing:
30-60 minutes
Tools Used:
Screwdriver, Nutdriver
My grand son played with the switch until it broke.
1. Took the inside heater out of the wood box by following the online instructions.
2. Unscrewed the metal side by removing 20 + or - screws were the switch was.
3. Found the switch that needed replacing
4. Ordered the switch and after one week it arrived
5. Unplugged to broke switch and replaced the wires on the new and pressed it into place
6. Reassembled the whole Heater.
7. Plugged it in and voila. It worked like new.
Thank you.
Did you find this story helpful?
Thanks for voting and helping fellow customers!
Tool Type:
Heater
Parts Used:
Repair Difficulty:
Easy
Time Spent Repairing:
15-30 minutes
Tools Used:
Screwdriver, Pliers
Switch broke.
Removed old switch and replaced it with new one.
Did you find this story helpful?
Thanks for voting and helping fellow customers!
Tool Type:
Heater
Parts Used:
Repair Difficulty:
Easy
Time Spent Repairing:
Less than 15 minutes
Tools Used:
Screwdriver
Power switch failure.
1. Removed the heat box from the cabinet.
2. Removed the side panel closest to the switch.
3. Squeezed both tables on the switch and pulled it out.
4. Disconnected three wires and installed the new switch connect wires.
5. Tested the power before screwing the side panel on.
2. Removed the side panel closest to the switch.
3. Squeezed both tables on the switch and pulled it out.
4. Disconnected three wires and installed the new switch connect wires.
5. Tested the power before screwing the side panel on.
Did you find this story helpful?
Thanks for voting and helping fellow customers!
Tool Type:
Heater
Parts Used:
Repair Difficulty:
Easy
Time Spent Repairing:
15-30 minutes
Tools Used:
Screwdriver, Pliers
Power switch was bad
Took case off the heater, took panel off side, took old switch out and Put new switch in and connected using the diagram we made. Most difficult step was putting new switch in....and we were probably being overly careful!
Did you find this story helpful?
Thanks for voting and helping fellow customers!
show more
Reviews
27 Reviews
Average Rating (out of 5):
Click to filter by ratings:
5 stars
21
4 stars
2
3 stars
2
2 stars
0
1 stars
2
< PREV
- 1
- 2
- 3
Quick delivery
Very pleased. It arrived quickly and was easy to install.
Guest -
March 5, 2024
Verified Purchase
Switch replacement
It works great but took some time to actually replace it. Thanks
Guest -
January 10, 2023
Verified Purchase
This part is slightly larger than the original.
This part is slightly larger than the original, so the rectangular hole needed modification with a file.
Russell -
January 6, 2023
Verified Purchase
What a deal
Switch works just like original. The fit was very snug, had to enlarge opening slightly. Better too tight than too loose. Price was good and the part came in a short amount of time. Satisfied customer
Guest -
February 11, 2022
Verified Purchase
fix my heater with trouble shooting
from the phone call to receiving the part was the best .part was reasonably priced and shipped fast. will use this site again. the advice was right on.
Guest -
November 27, 2021
Verified Purchase
Arrived quickly, easy install.
Switch works well again , love my sunheater.
Guest -
February 1, 2021
Verified Purchase
Exact replacement for Duraflame DFS-450-2 heater
Part arrived in good condition, well packaged. Perfect duplicate of the power switch on my Duraflame space heater. Original switch melted at the spade teminal due to an overheated jumper wire from thermostat to power switch which seems to be a recurring theme with the Duraflame heaters. I made a new jumper using 10 AWG wire with new spade connectors. The failed Duraflame factory jumper looked to be 14 AWG, too thin to handle the current. Note: this switch is listed as a 20 amp rating, but the one I got is a 15 amp at 125 volt, just like the factory switch. Heater is working fine again.
Guest -
January 19, 2021
Verified Purchase
great part
part arrived on time, fit well, and worked,
Guest -
January 6, 2021
Verified Purchase
Do it yourselfer best friend
Arrived Quickly. Saved heater!
Betty -
December 17, 2020
Verified Purchase
great just as ordered
switch worked fine. I used your instructions. The only problem was the price
I found 2 for less than the price of the 1 I purchased from you. sh 100 sight.
kenneth -
December 12, 2020
Verified Purchase
Verified Purchase
eReplacementParts Team
< PREV
- 1
- 2
- 3
Product Information