eReplacementParts.com
877-346-4815
Makita Parts
Repair Parts Home
  
Power Tool Parts
  
Makita Parts
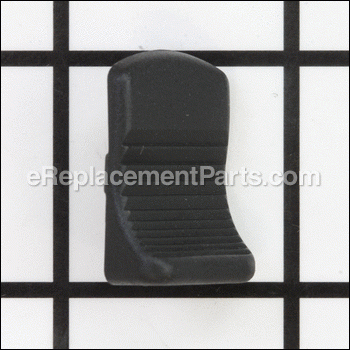
  419566-3 Switch Button

Switch Button 419566-3

OEM part for: Makita

Part Number: 419566-3


Install
Videos!
Grid squares measure 1x1 inch
In Stock
Order within the next 9 hours and your part ships today!
Easy Less than 15 minutes (6 rated repairs)?
OEM: Original Equipment Manufacturer ?
Makita
Does this d-block d-md-none fit my product?

Product Description ?

Genuine Makita replacement part, this item is sold individually.
When this Switch button is pushed forward it moves the Switch Lever to which it is attached, to activate the on/off switch.
It can be set to the locked on position by pressing down on the front of the Switch Button when the tool is on.
To unlock it and to turn the tool off press on the back of the Switch Button and it will release.

  • Classification: Part
  • Weight: 0.01 lbs.
  • Shipping: Ships Worldwide

Frequently Purchased Together ?

Compatibility

This part will fit the following 69 machines

Makita

9557NB Angle Grinder View Diagrams & Manuals
9554NB Angle Grinder View Diagrams & Manuals
9553NB Angle Grinder View Diagrams & Manuals
BGA452 Angle Grinder View Diagrams & Manuals
GA4030K 4" Angle Grinder View Diagrams & Manuals
BGA452Z 18V LXT Lithium-Ion Cordless 4-1/2" Cut-Off/Angle Grinder View Diagrams & Manuals
GA4530 4-1/2" Angle Grinder View Diagrams & Manuals
GD0601 1/4" Die Grinder View Diagrams & Manuals
LXDG01 18V LXT Lithium-Ion Cordless 1/4" Die Grinder View Diagrams & Manuals
LXDG01Z 18V LXT Lithium-Ion Cordless 1/4" Die Grinder View Diagrams & Manuals
PJ7000 Plate Joiner View Diagrams & Manuals
GA4030 4" Angle Grinder View Diagrams & Manuals
LXNJ01Z 18V LXT Lithium-Ion Cordless 16 Gauge Nibbler Tool Only View Diagrams & Manuals
XAG01 18V LXT Lithium-Ion Cordless Grinder Kit View Diagrams & Manuals
XAG01Z 18V LXT Lithium-Ion 4-1/2" Cut-Off/Angle Grinder View Diagrams & Manuals
XDG01Z 8V LXT Lithium-Ion Cordless 1/4" Die Grinder View Diagrams & Manuals
9553NBK Grinder View Diagrams & Manuals
9554NBK Grinder View Diagrams & Manuals
9555NB Grinder View Diagrams & Manuals
9555NBK Grinder View Diagrams & Manuals
9557NB2 Grinder View Diagrams & Manuals
9558HN Grinder View Diagrams & Manuals
BGA450Z (Type 1) Grinder View Diagrams & Manuals
BGA450Z (Type 2) Grinder View Diagrams & Manuals
BGA452F (Type 1) Grinder View Diagrams & Manuals
BGA452F (Type 2) Grinder View Diagrams & Manuals
BGA452F (Type 3) Grinder View Diagrams & Manuals
BGA452 (Type 2) Grinder View Diagrams & Manuals
BGA452 (Type 3) Grinder View Diagrams & Manuals
BGA452Z (Type 1) Grinder View Diagrams & Manuals
BGA452Z (Type 2) Grinder View Diagrams & Manuals
BGA452Z (Type 3) Grinder View Diagrams & Manuals
BJS161F (Type 1) Misc View Diagrams & Manuals
BJS161F (Type 2) Misc View Diagrams & Manuals
BJS161 (Type 1) Misc View Diagrams & Manuals
BJS161 (Type 2) Misc View Diagrams & Manuals
BJS161Z (Type 1) Misc View Diagrams & Manuals
BJS161Z (Type 2) Misc View Diagrams & Manuals
BO6050J Sander View Diagrams & Manuals
GA4530X Grinder View Diagrams & Manuals
GA5030K (Type 1) Grinder View Diagrams & Manuals
GA5030K (Type 2) Grinder View Diagrams & Manuals
GA5030K (Type 3) Grinder View Diagrams & Manuals
LXDG01 (Type 1) Grinder View Diagrams & Manuals
LXDG01 (Type 2) Grinder View Diagrams & Manuals
LXDG01Z1 (Type 1) Grinder View Diagrams & Manuals
LXDG01Z1 (Type 2) Grinder View Diagrams & Manuals
LXDG01Z (Type 1) Grinder View Diagrams & Manuals
LXDG01Z (Type 2) Grinder View Diagrams & Manuals
LXJP02 (Type 1) Misc View Diagrams & Manuals
LXJP02 (Type 2) Misc View Diagrams & Manuals
LXJP02Z (Type 1) Misc View Diagrams & Manuals
LXJP02Z (Type 2) Misc View Diagrams & Manuals
LXNJ01 (Type 1) Misc View Diagrams & Manuals
LXNJ01 (Type 2) Misc View Diagrams & Manuals
LXNJ01Z (Type 1) Misc View Diagrams & Manuals
LXNJ01Z (Type 2) Misc View Diagrams & Manuals
XDG01 Grinder View Diagrams & Manuals
XDG01T Grinder View Diagrams & Manuals
XDG02Z Grinder View Diagrams & Manuals
Show More Compatible Models
Don't see yours? Try searching our site for :

This item works with the following types of products:

  • Grinder Parts
  • Plate Joiner Parts
  • Nibbler Parts

This part replaces obsolete part #: 418769-6

Repair Videos ?

Watch the Repair Video for Switch Button
Articles:
Glitch in your switch? Learn how to quickly remove and install the switch button on your Makita grinder. Step-by-step in...
November 20, 2015

Customer Part Reviews ?

5
Average Rating (out of 5):
9 Reviews
Click to filter by ratings:
5 stars
9
4 stars
0
3 stars
0
2 stars
0
1 stars
0
  • Highest Rating
  • Most Recent
< PREV
  • 1
NEXT >
  • Great quick service
    Would always check them first for parts
    Guest - April 4, 2022 Verified Purchase
    Super easy repair
    Perfect part and fit and super fast shipping!
    Richard - April 16, 2021 Verified Purchase
    Easy repair, worked as expected
    Arrived quickly and fits perfectly
    Guest - February 24, 2021 Verified Purchase
    Makiita grinder switch
    Easy to use website, great exploded views of parts and fair prices. I’ve bought several parts over the year’s and they always take care of the problem.
    Guest - August 21, 2020 Verified Purchase
    This site has saved my a$$
    I'm a DIY kinda guy. So when my tools break at work, I'd rather try and repair them myself, then just buy a new one. Finding this site has saved me close to $300 so far just in repairing 2 tools. Thanks guys!!
    Guest - April 9, 2020 Verified Purchase
    fits perfect great service
    great condition thanks
    Guest - March 20, 2020 Verified Purchase
    Easy repair after I watched the utube video link provided by ereplacement parts.com
    Correct part first time, got here on time, and grinder back up to running, used it to make money that day. Thanks for the help. Turns out it was cheaper route and quicker then paying shipping for my warranty repair.
    Guest - February 12, 2020 Verified Purchase
    Excellent ordered on phone friendly knowledge service received product in days thx guys
    Excellent condition when received used service many times satisfied
    Guest - January 4, 2020 Verified Purchase
    Side grinder switch
    Switch was brand new, prompt delivery, fit as expected, grinding once again.
    Guest - November 12, 2019 Verified Purchase
    t
    t
    t - t days ago Verified Purchase
    eReplacementParts Team
    t

    Questions & Answers ?

    Our customer Service team is at the ready daily to answer your part and product questions.

    photo of team member
    Ask our Team

    We have a dedicated staff with decades of collective experience in helping customers just like you purchase parts to repair their products.

    Does this fit my product?

    Questions & Answers for Switch Button


    No questions have been asked yet

    Customer Repair Instructions ?

    All our customer repair instructions are solicited directly from other customers just like you who have purchased and replaced this exact part.

    Easy Less than 15 minutes (6 rated repairs)?

    Plastic button broke off.

    charlie - September 15, 2017
    👍 2 of 2 people found this instruction helpful
    Tool Type

    Grinder

    Difficulty

    Easy

    Time

    15-30 minutes

    Tools Used

    Screwdriver

    Followed your youtube and it was a snap. https://www.youtube.com/watch?v=NKO4I5RL2_4
    Did you find this story helpful?
    Thanks for voting and helping fellow customers!

    Power switch button and switch lever broke

    Thomas - September 9, 2016
    👍 3 of 4 people found this instruction helpful
    Tool Type

    Grinder

    Difficulty

    Easy

    Time

    Less than 15 minutes

    Tools Used

    Screwdriver

    1. Removed the rear motor housing shell.
    2. Slid the plastic switch lever out of the main motor housing.
    3. Cleaned the switch lever chanel with pipe cleaner.
    4. Inserted the compression spring in the switch lever.
    5. Lubed the switch lever with a silicon gel.
    6. Inserted the switch lever into the main motor housing.
    7. Pressed the power switch button into the switch lever.
    8. Attached the rear motor housing.
    9. Finished the grinding job that I started 4 days before when the switch broke.
    Did you find this story helpful?
    Thanks for voting and helping fellow customers!

    Plastic trigger broke

    Danny - August 22, 2016
    👍 1 of 1 people found this instruction helpful
    Tool Type

    Grinder

    Difficulty

    Easy

    Time

    Less than 15 minutes

    Tools Used

    Screwdriver, Pliers

    Unscrew angle head from grinder with 4 Phillips head screws, remove plastic housing between motor and head by 2 long screws, remove one phillips head screw on cord end to let the motor slide upward, insert new trigger from outside and slide inner switch connecting rod upward to connect the new outer trigger piece. ensure parts are locked in together at small square, reinsert into housing and install bottom screw near cord, reinstall plastic insert over motor housing with two long screws, reattach angle head with 4 screws.
    Did you find this story helpful?
    Thanks for voting and helping fellow customers!

    Start stop switch Button on Makitta Die grinder

    Robert - June 15, 2018
    Tool Type

    Grinder

    Difficulty

    Easy

    Time

    Less than 15 minutes

    Tools Used

    Screwdriver

    Grinder would not start disassembled end cap and slide , moved switch by hand several times , plugged it in and moved switch assembly by hand and grinder worked, inspected switch button and noticed button was worn at the section that make contact with the switch assembly. Ordered new button , replaced it . Works once again.
    Bob W.
    Watersound Fl. .
    Did you find this story helpful?
    Thanks for voting and helping fellow customers!

    Exterior switch button broke.

    Orvin - October 6, 2017
    Tool Type

    Grinder

    Difficulty

    Easy

    Time

    15-30 minutes

    Tools Used

    Screwdriver

    Removed the screws holding the grinder head on and the screw holding the back piece to the main body then just pulled the grinder apart. Replaced the switch parts and reversed the disassembly procedure. Only concern was holding the brushes away from the armature.
    Did you find this story helpful?
    Thanks for voting and helping fellow customers!

    Lost switch button in heavy debris (long story as to how I caused this)

    JONATHAN - March 9, 2017
    Tool Type

    Grinder

    Difficulty

    Easy

    Time

    Less than 15 minutes

    Tools Used

    Screwdriver

    Using phillips screw driver, remove the black housing cover at the end of the grinder where the electrical cord is located.
    Locate the black plastic piece that is the mechanism that turns on/off the grinder (it slides and is spring loaded).
    Push the mechanism up, and in turn you will see where the switch is located the 'notch' becomes accessible. This is the ON position.
    While holding mechanism up in the ON position, insert new switch so the switch 'hook' goes into the mechanism 'notch'
    Release mechanism while holding switch into position.
    Re-attached black housing cover.
    Boom goes the Dynamite!
    Did you find this story helpful?
    Thanks for voting and helping fellow customers!

    OEM stands for Original Equipment Manufacturer and means the part you’re buying is sourced directly from the manufacturer who made your product. At eReplacementParts, we sell only genuine OEM parts, guaranteeing the part you’re purchasing is of better design and of higher quality than aftermarket parts.

    Our product descriptions are a combination of data sourced directly from the manufacturers who made your product as well as content researched and curated by our content & customer service teams. This content is edited and reviewed internally before being made public to customers.

    Our customer service team are at the ready daily to answer your part and product questions. We have a dedicated staff with decades of collective experience in helping customers just like you purchase parts to repair their products.

    All our part reviews are solicited directly from other customers who have purchased this exact part. While we moderate these reviews for profanity, offensive language or personally identifiable information, these reviews are posted exactly as submitted and no alterations are made by our team.

    All our customer repair instructions are solicited directly from other customers just like you who have purchased and replaced this exact part. While we moderate these reviews for profanity, offensive language or personally identifiable information, these reviews are posted exactly as submitted and no alterations are made by our team.

    Based on data from past customer purchasing behaviors, these parts are most commonly purchased together along with the part you are viewing. These parts may be necessary or helpful to replace to complete your current repair.

    All our installation videos are created and produced in collaboration with our in-house repair technician, Mark Sodja, who has helped millions of eReplacementParts customers over the last 13 years repair their products. Mark has years of experience in selling and repairing both commercial and residential products with a specialty in gas-powered equipment.

    This data is collected from customers who submitted a repair instruction after replacing this exact part. Customers can rate how easy the repair was to complete and how long it took. We aggregate this data to provide a repair rating that allows customers to quickly determine the difficulty and time needed to perform their own repair.

    eReplacementParts.com
    7174 South 400 West
    Suite 5
    Midvale, UT 84047
    visa mastercard discover american express PayPal