
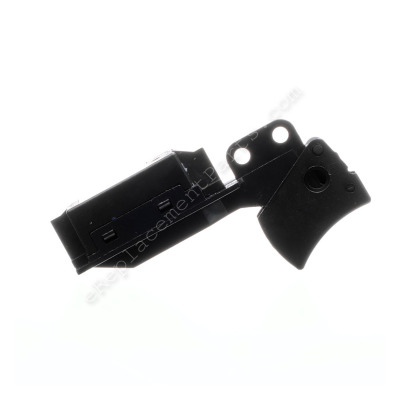


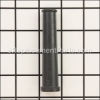
This switch is a genuine Makita replacement switch. It is commonly found in Makita circular saws. The switch features standard on/off operation and has terminals for four wires. Over time, a switch will degrade and eventually wear out, requiring replacement.
It is also able to run on Ac & Dc power.
This switch is compatible with the models listed below, but it is not guaranteed to fit any other power tool models.
Switch 651172-0
OEM part for: Makita
Part Number: 651172-0
$20.62
In Stock
Jump To:
Product Description ?
- Genuine O.E.M. Makita switch
- Features standard on/off operation
- Heavy duty construction for long service life
- Classification: Part
- Weight: 0.04 lbs.
- Shipping: Ships Worldwide
Frequently Purchased Together ?


Compatibility
This part will fit the following 14 machines
Makita
5007NB Circular Saw View Diagrams & Manuals
5008NB Circular Saw View Diagrams & Manuals
5007S Circular Saw View Diagrams & Manuals
5007FK Circular Saw View Diagrams & Manuals
5007NBK Type 1 7-1/4" 15A Heavy-Gauge Aluminium Base Circular Saw View Diagrams & Manuals
GA6010Z 10.5A 6" Cutoff / Angle Grinder View Diagrams & Manuals
GA5010Z 10.5A 5" Angle Grinder View Diagrams & Manuals
5057KB 7-1/4" Circular Saw View Diagrams & Manuals
5007F 7-1/4" Circular Saw with Brake View Diagrams & Manuals
5008NB (Type 2) Saw View Diagrams & Manuals
5008NB (Type 3) Saw View Diagrams & Manuals
GA5010 Grinder View Diagrams & Manuals
GA6010 Grinder View Diagrams & Manuals
GA6010ZX2 Grinder View Diagrams & Manuals
Show More Compatible Models
This item works with the following types of products:
- Circular Saw Parts
- Saw Parts
- Grinder Parts
This part replaces obsolete part #: 651121-7, 651168-1
Customer Part Reviews ?
Average Rating (out of 5):
Click to filter by ratings:
5 stars
19
4 stars
0
3 stars
2
2 stars
0
1 stars
0
< PREV
- 1
- 2
- 3
Easy replacement because it fit just like the original.
Exact replacement and quick shipping.
Guest -
September 6, 2023
Verified Purchase
Perfect fit
Perfect fit and arrived on time
Guest -
March 27, 2023
Verified Purchase
Perfect fit!
This switch was a perfect fit for my Makita 5007NB circular saw and works great. It arrived quickly in the time frame stated and the price was very reasonable. Note: just make sure you hook up the wires just like they were on the old switch.
Guest -
November 26, 2022
Verified Purchase
Worked perfectly
I never have a problem with ereplacementparts
john -
November 15, 2022
Verified Purchase
Very Easy Repair
Arrived 2 days earlier than expected got me going again Great product and service
Guest -
June 22, 2022
Verified Purchase
Makita 7-1/4” circular saw switch
Part fit perfectly and performed the same. Check YouTube for procedural video!
Guest -
March 9, 2022
Verified Purchase
Easy Repair
It was a simple fix that took about 10 minutes.
kim -
October 4, 2021
Verified Purchase
Working great.
It was easy to order, the part arrived in a timely way, fit perfectly, and fixed the problem. Thank you for your help.
Anonymous -
June 29, 2021
Verified Purchase
Great part
I got what I ordered fast and it was the correct part.
Guest -
June 14, 2021
Verified Purchase
Easy repair
Ordering process was easy. Arrived quickly.
Guest -
January 28, 2021
Verified Purchase
t
t
t -
t days ago
Verified Purchase
eReplacementParts Team
t
Questions & Answers ?
Our customer Service team is at the ready daily to answer your part and product questions.

Ask our Team
We have a dedicated staff with decades of collective experience in helping customers just like you purchase parts to repair their products.
Does this fit my product?Questions & Answers for Switch
No questions have been asked yet
Customer Repair Instructions ?
All our customer repair instructions are solicited directly from other customers just like you who have purchased and replaced this exact part.
Saw continued to run after switch was released
Lauren - September 30, 2017
👍 10 of 11 people found this instruction helpful
Tool Type
Circular Saw
Difficulty
Easy
Time
Less than 15 minutes
Tools Used
Screwdriver
Parts Used
1. Removed screws from saw handle and removed the cover.
2. Removed old switch from the handle.
3. Disconnected the wires from the old switch and attached each to the new switch (disconnecting and attaching the wires one at a time to insure their proper placement on the new switch).
4. Put the new switch back into the handle
5. Replaced cover on the handle and reattached the screws.
Did you find this story helpful?
Thanks for voting and helping fellow customers!
Saw would not start when trigger pressed.
Steven - June 26, 2016
👍 6 of 6 people found this instruction helpful
Tool Type
Circular Saw
Difficulty
Easy
Time
Less than 15 minutes
Tools Used
Screwdriver
Parts Used
The whole story: Makita circular saw. Initially, it would take several presses of the trigger to get it going. Over time it took more "trigger presses" and eventually it simply died. I took it apart in search of something obvious but found nothing. Upon reassembly, as soon as I plugged it in it would run (almost lost a finger or two) continuously until I unplugged it. I bought a new switch, replaced it, and it now functions like new. ereplacementParts is an awesome website as it guided me to the correct part quickly at a fair price.
I removed the handle cover and the cord clamp. Made a wiring diagram of the switch wires, then removed the wires. Connected the wires to the new switch, tightened down the cord clamp and installed the handle cover. Thank again!
I removed the handle cover and the cord clamp. Made a wiring diagram of the switch wires, then removed the wires. Connected the wires to the new switch, tightened down the cord clamp and installed the handle cover. Thank again!
Did you find this story helpful?
Thanks for voting and helping fellow customers!
Dropped a Part on Trigger,
LK - December 14, 2015
👍 5 of 5 people found this instruction helpful
Tool Type
Grinder
Difficulty
Easy
Time
Less than 15 minutes
Tools Used
Screwdriver
Parts Used
Pretty simple, I think it took longer to find the part on the web. Flat head screw drive or a phillips Take the screws out of handle around trigger. No need to take any other scews out until you pry the handle apart, it is slotted has come straight out, then unscrew the cord, pop the old trigger out Remove screws in electrical connections . then put it back together.
Did you find this story helpful?
Thanks for voting and helping fellow customers!
Switch not working
Kim - October 5, 2016
👍 4 of 5 people found this instruction helpful
Tool Type
Circular Saw
Difficulty
Easy
Time
15-30 minutes
Tools Used
Screwdriver, Pliers
Parts Used
1- Remove screws from handle half
2- Remove switch from housing
3- Remove cord clamp
4- Make a wiring diagram and remove the wires from the switch
5- Install the wires into the new switch
6- Screw switch into housing and install the cord clamp
7- Install the handle half
2- Remove switch from housing
3- Remove cord clamp
4- Make a wiring diagram and remove the wires from the switch
5- Install the wires into the new switch
6- Screw switch into housing and install the cord clamp
7- Install the handle half
Did you find this story helpful?
Thanks for voting and helping fellow customers!
the switch was bad and the electrical cord was broken
Michael - March 25, 2018
👍 1 of 1 people found this instruction helpful
Tool Type
Circular Saw
Difficulty
Easy
Time
15-30 minutes
Tools Used
Screwdriver, Pliers
Disassembled the handle.
Removed the swiitch.
Attached the new cord and cord guard.
Re-installed the switch.
Reassembled the handle.
Saw works perfect.
Removed the swiitch.
Attached the new cord and cord guard.
Re-installed the switch.
Reassembled the handle.
Saw works perfect.
Did you find this story helpful?
Thanks for voting and helping fellow customers!
Circular saw would not shut off except by unplugging it
Irving - July 5, 2017
👍 1 of 1 people found this instruction helpful
Tool Type
Circular Saw
Difficulty
Easy
Time
15-30 minutes
Tools Used
Screwdriver
Parts Used
1. Unscrewed saw handle to expose switch
2. Removed old switch
3. Installed new switch
4. Replaced saw handle.
I was amazed that ereplacement parts had the switch for my 30+ year old saw!
2. Removed old switch
3. Installed new switch
4. Replaced saw handle.
I was amazed that ereplacement parts had the switch for my 30+ year old saw!
Did you find this story helpful?
Thanks for voting and helping fellow customers!
Switch would not turn off ,cord was getting frayed
Marshall - April 16, 2016
👍 1 of 1 people found this instruction helpful
Tool Type
Circular Saw
Difficulty
Easy
Time
15-30 minutes
Tools Used
Screwdriver, Pliers, wire strippers
Remove screws in saw handle ,cord restraint, and last screws in switch. Remove screws from motor leads. I had to obtain terminal ends for the cord before proceeding. After reattaching motor leads and cord with new cord guard it was an easy job to reassemble switch and cord into saw handle.
Did you find this story helpful?
Thanks for voting and helping fellow customers!
Switch stuck on.
David - June 9, 2018
Tool Type
Circular Saw
Difficulty
Easy
Time
15-30 minutes
Tools Used
Screwdriver
Parts Used
Removed screws on handle (3 or 4), removed side of handle, one screw holding switch. Unscrew four wires and replace switch.
Did you find this story helpful?
Thanks for voting and helping fellow customers!
Switch didn't work
Matt - April 8, 2018
Tool Type
Circular Saw
Difficulty
Medium
Time
15-30 minutes
Tools Used
Screwdriver
Parts Used
1. Took apart the housing.
2. Disconnected and removed the old faulty switch.
3. Connected the wires to the new switch.
4. Secured the new switch in the housing.
5. Reassembled and tested.
2. Disconnected and removed the old faulty switch.
3. Connected the wires to the new switch.
4. Secured the new switch in the housing.
5. Reassembled and tested.
Did you find this story helpful?
Thanks for voting and helping fellow customers!
Switch was stuck in the on position and the cord was frayed
Robert - February 23, 2018
Tool Type
Circular Saw
Difficulty
Easy
Time
15-30 minutes
Tools Used
Screwdriver, wire stripper, crimp lugs and crimp tool
Parts Used
Remove the 4 screws that hold the switch cover on.
Remove the cover.
Remove the switch and detach the wires.
Remove the cord saving the tension cover
Reverse the operation.
Remove the cover.
Remove the switch and detach the wires.
Remove the cord saving the tension cover
Reverse the operation.
Did you find this story helpful?
Thanks for voting and helping fellow customers!
Load More Install Stories
OEM stands for Original Equipment Manufacturer and means the part you’re buying is sourced directly from the manufacturer who made your product. At eReplacementParts, we sell only genuine OEM parts, guaranteeing the part you’re purchasing is of better design and of higher quality than aftermarket parts.
Our product descriptions are a combination of data sourced directly from the manufacturers who made your product as well as content researched and curated by our content & customer service teams. This content is edited and reviewed internally before being made public to customers.
Our customer service team are at the ready daily to answer your part and product questions. We have a dedicated staff with decades of collective experience in helping customers just like you purchase parts to repair their products.
All our part reviews are solicited directly from other customers who have purchased this exact part. While we moderate these reviews for profanity, offensive language or personally identifiable information, these reviews are posted exactly as submitted and no alterations are made by our team.
All our customer repair instructions are solicited directly from other customers just like you who have purchased and replaced this exact part. While we moderate these reviews for profanity, offensive language or personally identifiable information, these reviews are posted exactly as submitted and no alterations are made by our team.
Based on data from past customer purchasing behaviors, these parts are most commonly purchased together along with the part you are viewing. These parts may be necessary or helpful to replace to complete your current repair.
All our installation videos are created and produced in collaboration with our in-house repair technician, Mark Sodja, who has helped millions of eReplacementParts customers over the last 13 years repair their products. Mark has years of experience in selling and repairing both commercial and residential products with a specialty in gas-powered equipment.
This data is collected from customers who submitted a repair instruction after replacing this exact part. Customers can rate how easy the repair was to complete and how long it took. We aggregate this data to provide a repair rating that allows customers to quickly determine the difficulty and time needed to perform their own repair.