


This is a genuine Makita replacement part, it is sold individually.
The 423142-7 Sponge pad can be used on either of the tools below.
If you would like to use this pad rather then the Hook and Loop or Felt pad, you can peel those pads off of the base and adhere the sponge pad to the base.
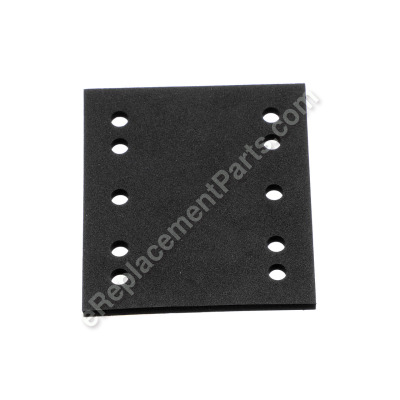
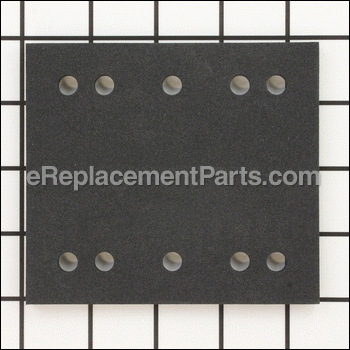
Rubber Sponge 423142-7
OEM part for: Makita
Part Number: 423142-7
$3.99
In Stock
Jump To:
Product Description ?
- Classification: Part
- Weight: 0.01 lbs.
- Also Known As: Sander Cushion, Backing Pad, Conversion Pad, Sanding Shoe, Base Plate
- Shipping: Ships Worldwide
Frequently Purchased Together ?


Compatibility
This part will fit the following 3 machines
Makita
BO4552 Finishing Sander View Diagrams & Manuals
BO4550 Finishing Sander View Diagrams & Manuals
This item works with the following types of products:
- Sander Parts
Customer Part Reviews ?
Average Rating (out of 5):
Click to filter by ratings:
5 stars
50
4 stars
6
3 stars
2
2 stars
0
1 stars
1
< PREV
- 1
- 2
- 3
Great service
Super service great ship time an just like OEM replacement
Guest -
March 3, 2024
Verified Purchase
Easily found what i was looking for
Easily found and ordered what i was looking for (altho i ordered the wrong part it was close - lol) i easily sent it back and ended up buying the correct part.
Guest -
September 25, 2023
Verified Purchase
Sponge replacement
Perfect fit, easy to replace, inexpensive. Fast delivery.
Guest -
September 4, 2023
Verified Purchase
Good quick service
The pads were exactly what I needed for my sander! Thanks for making it so easy to get parts!
Guest -
April 11, 2023
Verified Purchase
Great Replacement Part
I had an old sander that needed a new pad. I was able to find the exact part and this vendor shipped it fast. Wonderful experience.
Guest -
March 31, 2023
Verified Purchase
Replacement pad for makita sander
Worked perfectly
Chris -
March 14, 2023
Verified Purchase
Perfect
This part installed easily and is as if it were new. I can't remember the sander working this smoothly
Alan Grenier -
February 14, 2023
Verified Purchase
Quick & easy fix
Received the part quickly and it fit perfectly. Replaced the rubber pad on my Makita finish sander and got it working like new again.
Guest -
January 6, 2023
Verified Purchase
Perfect fit
Arrived in reasonable time, fit perfectly, and priced right. Sander is back in use after a long hiatus. Thank you!
Christopher -
February 22, 2022
Verified Purchase
Perfect fit
The part was easy to find on the site, arrived quickly, and was an easy install.
Guest -
November 30, 2021
Verified Purchase
t
t
t -
t days ago
Verified Purchase
eReplacementParts Team
t
Questions & Answers ?
Our customer Service team is at the ready daily to answer your part and product questions.

Ask our Team
We have a dedicated staff with decades of collective experience in helping customers just like you purchase parts to repair their products.
Does this fit my product?Questions & Answers for Rubber Sponge
No questions have been asked yet
Customer Repair Instructions ?
All our customer repair instructions are solicited directly from other customers just like you who have purchased and replaced this exact part.
Rubber base was heavily worn and uneven.
Theodore - June 22, 2016
👍 51 of 53 people found this instruction helpful
Tool Type
Sander
Difficulty
Easy
Time
Less than 15 minutes
Tools Used
Screwdriver
Parts Used
1. Removed 4 holding screws.
2. Cleaned old base and reapplied screws.
3. Installed new rubber base on old discontinued model.
(Actually, only tool needed was a scraper. The pad is self stick & not retained by the screws)
2. Cleaned old base and reapplied screws.
3. Installed new rubber base on old discontinued model.
(Actually, only tool needed was a scraper. The pad is self stick & not retained by the screws)
Did you find this story helpful?
Thanks for voting and helping fellow customers!
Sanding pad worn out
Robert - February 18, 2016
👍 23 of 26 people found this instruction helpful
Tool Type
Sander
Difficulty
Easy
Time
Less than 15 minutes
Tools Used
, putty knife, mineral spirits
Parts Used
Was not even sure this part was still available (30 yr. old) sander. Wish I had known how easy and quick it was to get the part-would have done this years ago.
Did you find this story helpful?
Thanks for voting and helping fellow customers!
Rubber pad reduced to size (through usage) that allowed paper to incorrectly position during use.
Geoffrey - May 1, 2017
👍 14 of 15 people found this instruction helpful
Tool Type
Sander
Difficulty
Medium
Time
Less than 15 minutes
Tools Used
Power Drill, Sharp Chisel, sand paper, steel wool
Parts Used
Removed 4 phillips head screws from base, which turned out to be unnecessary. Replacement of rubber pad requires only removal of old pad remnants, cleaning of metal plate with chisel, sandpaper and/or steel wool, aligning new rubber pad, remove paper on new pad to expose adhesive surface, align new rubber pad, (note phillips head screw positions for proper alignment, the screws must show) and place pad on steel plate. Place sander on bench and if available place weight on top of sander to apply pressure for adhesion. Done!
Did you find this story helpful?
Thanks for voting and helping fellow customers!
Normal wear and tear.
Tom - April 15, 2016
👍 11 of 14 people found this instruction helpful
Tool Type
Sander
Difficulty
Easy
Time
15-30 minutes
Tools Used
Screwdriver, Pliers, nonCompressed air
Parts Used
1. Removed the old self stick pad.
2. Unscrewed the base plate
3. Disassembled the hold down clampers.
4. Blew out the dust.
5. Installed new clampers and base plate.
6. Install new sponge rubber pad.
2. Unscrewed the base plate
3. Disassembled the hold down clampers.
4. Blew out the dust.
5. Installed new clampers and base plate.
6. Install new sponge rubber pad.
Did you find this story helpful?
Thanks for voting and helping fellow customers!
Pad worn out
Richard - December 15, 2016
👍 7 of 8 people found this instruction helpful
Tool Type
Sander
Difficulty
Easy
Time
15-30 minutes
Tools Used
Screwdriver
It's a square pad. Remove 4 recessed screws from bottom. Lift off worn part. Install sandpaper hold down clips on new pad. Align new pad/backing plate on sander, tighten 4 screws. Attach sandpaper and get back to work. I replaced it with the felt pad/backing plate assembly, but also ordered the self adhesive sponge rubber pad only to have as a backup replacement.
1 X Sander Pad - Felt (Includes Felt and Backing Plate) (151427-8)
1 X Sponge Rubber (423142-7)
1 X Sander Pad - Felt (Includes Felt and Backing Plate) (151427-8)
1 X Sponge Rubber (423142-7)
Did you find this story helpful?
Thanks for voting and helping fellow customers!
Foam base wore out
thomas - August 12, 2016
👍 5 of 5 people found this instruction helpful
Tool Type
Sander
Difficulty
Easy
Time
Less than 15 minutes
Tools Used
Screwdriver, Scraper
Parts Used
1. Removed 4 screws
2. Popped off the sanding base plate
3. Used a heavy scraper to remove old sponge rubber base, and clean it up
4. Stuck the new sponge rubber pad on
5. Popped the base back on making sure the sand paper retainer mechanisms were in alignment
6. Reinstalled 4 screws
2. Popped off the sanding base plate
3. Used a heavy scraper to remove old sponge rubber base, and clean it up
4. Stuck the new sponge rubber pad on
5. Popped the base back on making sure the sand paper retainer mechanisms were in alignment
6. Reinstalled 4 screws
Did you find this story helpful?
Thanks for voting and helping fellow customers!
The pad was worn out
William - November 23, 2016
👍 4 of 4 people found this instruction helpful
Tool Type
Sander
Difficulty
Easy
Time
15-30 minutes
Tools Used
, Scraper
Parts Used
Removed old pad. Prepared surface for new pad. Installed the new pad.
Did you find this story helpful?
Thanks for voting and helping fellow customers!
Pad on palm sander needed replacement...
Bobbie - October 9, 2018
👍 2 of 2 people found this instruction helpful
Tool Type
Sander
Difficulty
Easy
Time
Less than 15 minutes
Tools Used
, Gasket scrapper...
Parts Used
1. Remove old pad by pulling it off... It is on with adhesive... Now hard at all to do...
2. Clean old adhesive from sander...
3. Stick new pad on and if you have it place some kind of weight on it... I let mine sit overnight...
2. Clean old adhesive from sander...
3. Stick new pad on and if you have it place some kind of weight on it... I let mine sit overnight...
Did you find this story helpful?
Thanks for voting and helping fellow customers!
Sponge was old and deteriorated, needed a new replacement
Richard - October 9, 2018
👍 1 of 1 people found this instruction helpful
Tool Type
Sander
Difficulty
Easy
Time
Less than 15 minutes
Tools Used
Parts Used
Slowly peel off the damage sponge
Scrape any residue with a paint scraper
Clean the metal plate
Remove the paper from the new sponge
Center the sponge into the sander bottom
Applied the sponge and squeeze it against the floor
So that it adhere properly at all sides
Scrape any residue with a paint scraper
Clean the metal plate
Remove the paper from the new sponge
Center the sponge into the sander bottom
Applied the sponge and squeeze it against the floor
So that it adhere properly at all sides
Did you find this story helpful?
Thanks for voting and helping fellow customers!
Inherited Makita 4550 Sander - pad "rubber sponge" was damaged
MICHAEL - September 11, 2018
👍 1 of 1 people found this instruction helpful
Tool Type
Sander
Difficulty
Easy
Time
Less than 15 minutes
Tools Used
Screwdriver, Alcohol, compressed air
Parts Used
1. Pealed off old pad.
2. Used 90% isopropyl to clean plastic plate.
3. Align and adhere replacement pad.
---
While I had the pad off, I decided to removed the plastic plate and clean the motor & chassis with compressed air. Not required for the pad replacement, but since I was servicing the sander, spent another 30 minutes for a thorough cleaning.
Did you find this story helpful?
Thanks for voting and helping fellow customers!
Load More Install Stories
OEM stands for Original Equipment Manufacturer and means the part you’re buying is sourced directly from the manufacturer who made your product. At eReplacementParts, we sell only genuine OEM parts, guaranteeing the part you’re purchasing is of better design and of higher quality than aftermarket parts.
Our product descriptions are a combination of data sourced directly from the manufacturers who made your product as well as content researched and curated by our content & customer service teams. This content is edited and reviewed internally before being made public to customers.
Our customer service team are at the ready daily to answer your part and product questions. We have a dedicated staff with decades of collective experience in helping customers just like you purchase parts to repair their products.
All our part reviews are solicited directly from other customers who have purchased this exact part. While we moderate these reviews for profanity, offensive language or personally identifiable information, these reviews are posted exactly as submitted and no alterations are made by our team.
All our customer repair instructions are solicited directly from other customers just like you who have purchased and replaced this exact part. While we moderate these reviews for profanity, offensive language or personally identifiable information, these reviews are posted exactly as submitted and no alterations are made by our team.
Based on data from past customer purchasing behaviors, these parts are most commonly purchased together along with the part you are viewing. These parts may be necessary or helpful to replace to complete your current repair.
All our installation videos are created and produced in collaboration with our in-house repair technician, Mark Sodja, who has helped millions of eReplacementParts customers over the last 13 years repair their products. Mark has years of experience in selling and repairing both commercial and residential products with a specialty in gas-powered equipment.
This data is collected from customers who submitted a repair instruction after replacing this exact part. Customers can rate how easy the repair was to complete and how long it took. We aggregate this data to provide a repair rating that allows customers to quickly determine the difficulty and time needed to perform their own repair.