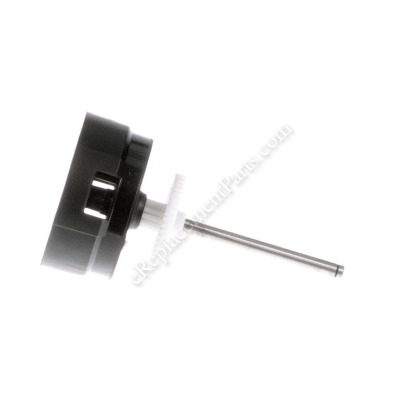


This is an authentic replacement part manufactured for cordless trimmers. The spindle shaft assembly fits into the bracket on the motor assembly, and is driven directly by the gear on the motor. The assembly includes the spool housing, and gear, the assembly is sold individually.
Additional recommended parts:
• Lever, part number: 806474-00
• Cover, part number: 385022-03
• Spool and Line, part number: 242885-01
Spindle Shaft Assembly 90522788SV
OEM part for: DeWALT, Black and Decker
Part Number: 90522788SV
$21.54
In Stock
Jump To:
Product Description ?
- Classification: Part
- Weight: 0.23 lbs.
- Shipping: Ships Worldwide
Frequently Purchased Together ?

Compatibility
This part will fit the following 7 machines
Black and Decker
NST2018 Type 1 18 Volt 12" Cordless GRASSHOG Trimmer / Edger View Diagrams & Manuals
CST1100 Type 1 9" Cordless Trimmer Edger View Diagrams & Manuals
CST1100 Type 2 9" Cordless Trimmer Edger View Diagrams & Manuals
CST1200 12 Volt 10" Cordless Trimmer / Edger View Diagrams & Manuals
CST2000 Type 1 12 Inch Cless String Trimmer View Diagrams & Manuals
CST1200 (Type 1) Grass Trimmer Power Tool View Diagrams & Manuals
CST1200 (Type 2) Grass Trimmer Power Tool View Diagrams & Manuals
Show More Compatible Models
This item works with the following types of products:
- Grass Trimmer Parts
- Trimmer Parts
- Edger Parts
This part replaces obsolete part #: 90522788, 243245-00, 243245-02
Customer Part Reviews ?
Average Rating (out of 5):
Click to filter by ratings:
5 stars
3
4 stars
0
3 stars
0
2 stars
0
1 stars
0
< PREV
- 1
easy repair
worked nice
Guest -
July 8, 2022
Verified Purchase
worked like a charm
I had a different model but just needed to do a few adjustments but works great.
Guest -
October 17, 2019
Verified Purchase
Spindle
Great otem
Guest -
June 18, 2019
Verified Purchase
t
t
t -
t days ago
Verified Purchase
eReplacementParts Team
t
Questions & Answers ?
Our customer Service team is at the ready daily to answer your part and product questions.

Ask our Team
We have a dedicated staff with decades of collective experience in helping customers just like you purchase parts to repair their products.
Does this fit my product?Questions & Answers for Spindle Shaft Assembly
No questions have been asked yet
Customer Repair Instructions ?
All our customer repair instructions are solicited directly from other customers just like you who have purchased and replaced this exact part.
Trimmer motor did not engage the Teflon sprocket wheel due to wear.
Gene - July 3, 2017
👍 3 of 4 people found this instruction helpful
Tool Type
Grass Trimmer
Difficulty
Medium
Time
30-60 minutes
Tools Used
Screwdriver
Parts Used
Unscrewed and opened the lower housing containing the motor and sprocket drive wheel. Detached the sprocket and shaft assembly and spool, and replaced with the new one. Fitted into position and reattached all screws.
Did you find this story helpful?
Thanks for voting and helping fellow customers!
Stripped gear
R - August 19, 2017
👍 2 of 3 people found this instruction helpful
Tool Type
Grass Trimmer
Difficulty
Medium
Time
30-60 minutes
Tools Used
Screwdriver, Snap ring pliers
Parts Used
Opened trimmer head. Removed the spindle. Replaced spindle. Reassembled head.
Did you find this story helpful?
Thanks for voting and helping fellow customers!
just age it was sloppy
Kenneth - May 14, 2020
Tool Type
Grass Trimmer
Difficulty
Easy
Time
15-30 minutes
Tools Used
Screwdriver, battery operated screwdriver
Parts Used
took out all the screws, and replaced the part, put back together and tested, worked a lot quieter used it the next day trimming around the house garage and shed
Did you find this story helpful?
Thanks for voting and helping fellow customers!
Stripped the string head off of the shaft of my trimmer.
Glenn - August 28, 2016
👍 3 of 6 people found this instruction helpful
Tool Type
Grass Trimmer
Difficulty
Medium
Time
30-60 minutes
Tools Used
Screwdriver, Snap ring pliers
Parts Used
1. Remove the guard - three screws.
2. Remove the sleeve that allows the head to rotate. This should have been easy but it was not obvious that there was a screwdriver notch to release it and allow it to slide away from the head.
3. Undo several screws to part the two halves of the cover. If this is done carefully, the rest of the job is easy. If not, the large internal spring gets out of position and it's not obvious where it goes.
4. Partially remove the motor and shaft assembly (leave the motor wires intact).
5. Remove the snap ring to get the old shaft out. Be careful to get three parts off of the old shaft -- one of the washers is hard to see.
6. Put the shaft into the assembly with the motor using the parts from the old shaft.
7. Reassemble the two halves of the cover. Put the guard back on. Slide the sleeve back over the end of the cover.
Did you find this story helpful?
Thanks for voting and helping fellow customers!
Gear broke on spindle shaft assembly
James - October 16, 2018
👍 0 of 1 people found this instruction helpful
Tool Type
Grass Trimmer
Difficulty
Medium
Time
15-30 minutes
Tools Used
Screwdriver, Pliers, Snap ring pliers
Parts Used
Removed screws that held shield on head and removed shield. Removed screws that held the two sides of the cutter head assembly together and pulled apart. Kind of hard to pull halves out of head rotating ring. R&R spindle shaft assembly using old top bearing, washer and snap ring. Reverse procedure to assemble cutter head being careful to get the head rotating spring in it's proper place inside the head! A little tricky getting everything back inside the two halves of the cutter head in their proper places! Pay attention to how the two head halves come out and go back into the head rotation ring!!
Did you find this story helpful?
Thanks for voting and helping fellow customers!
OEM stands for Original Equipment Manufacturer and means the part you’re buying is sourced directly from the manufacturer who made your product. At eReplacementParts, we sell only genuine OEM parts, guaranteeing the part you’re purchasing is of better design and of higher quality than aftermarket parts.
Our product descriptions are a combination of data sourced directly from the manufacturers who made your product as well as content researched and curated by our content & customer service teams. This content is edited and reviewed internally before being made public to customers.
Our customer service team are at the ready daily to answer your part and product questions. We have a dedicated staff with decades of collective experience in helping customers just like you purchase parts to repair their products.
All our part reviews are solicited directly from other customers who have purchased this exact part. While we moderate these reviews for profanity, offensive language or personally identifiable information, these reviews are posted exactly as submitted and no alterations are made by our team.
All our customer repair instructions are solicited directly from other customers just like you who have purchased and replaced this exact part. While we moderate these reviews for profanity, offensive language or personally identifiable information, these reviews are posted exactly as submitted and no alterations are made by our team.
Based on data from past customer purchasing behaviors, these parts are most commonly purchased together along with the part you are viewing. These parts may be necessary or helpful to replace to complete your current repair.
All our installation videos are created and produced in collaboration with our in-house repair technician, Mark Sodja, who has helped millions of eReplacementParts customers over the last 13 years repair their products. Mark has years of experience in selling and repairing both commercial and residential products with a specialty in gas-powered equipment.
This data is collected from customers who submitted a repair instruction after replacing this exact part. Customers can rate how easy the repair was to complete and how long it took. We aggregate this data to provide a repair rating that allows customers to quickly determine the difficulty and time needed to perform their own repair.