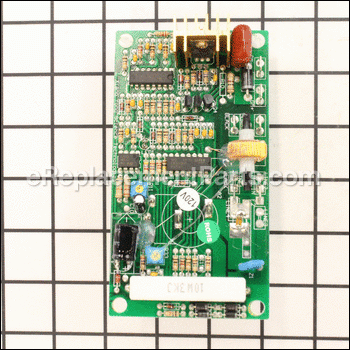

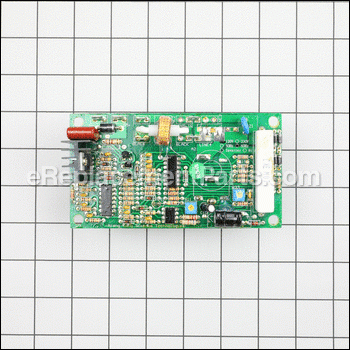
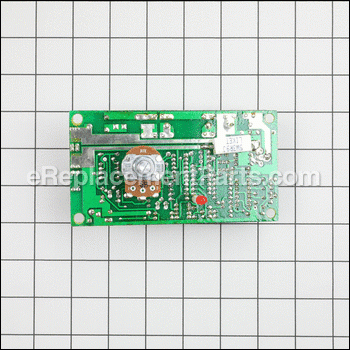

This sandsmart controller is supplied directly from the original equipment manufacturer. The control board is made for use with several Jet brand sanders, and is sold individually. This item is fitted into the controller housing assembly, providing and receiving electrical signals for the power tool. For the repair, you will need a screwdriver and pliers.
Sandsmart Controller 72-2250
OEM part for: Jet
Part Number: 72-2250
$600.10
In Stock
Compatibility
This part will fit the following 3 machines
Jet
16-32 Plus (629004K) Sander View Diagrams & Manuals
22-44 Plus Sander View Diagrams & Manuals
22-44OSC Oscillating Drum Sander View Diagrams & Manuals
This item works with the following types of products:
- Sander Parts
This part replaces obsolete part #: 72-2250E
Customer Part Reviews ?
Questions & Answers ?
Our customer Service team is at the ready daily to answer your part and product questions.

Ask our Team
We have a dedicated staff with decades of collective experience in helping customers just like you purchase parts to repair their products.
Does this fit my product?Questions & Answers for Sandsmart Controller
No questions have been asked yet
Customer Repair Instructions ?
All our customer repair instructions are solicited directly from other customers just like you who have purchased and replaced this exact part.
Control board
Stacey - March 14, 2016
👍 1 of 1 people found this instruction helpful
Tool Type
Sander
Difficulty
Easy
Time
Less than 15 minutes
Tools Used
Power Drill
Parts Used
Remove the old control board, and exchange the leads one at a time placing the leads from the old board on the same terminals of the new board. Then replace board.
Did you find this story helpful?
Thanks for voting and helping fellow customers!
Control board
Gary - December 29, 2023
Tool Type
Sander
Difficulty
Medium
Time
15-30 minutes
Tools Used
Screwdriver, Angle grinder with cutoff wheel
Parts Used
Cut one corner on the controller box so I could get into box without having to remove whole machine from mounting. After that it was pretty easy to complete the job. Bad design on the box!
Did you find this story helpful?
Thanks for voting and helping fellow customers!
sander conveyor motor control board was shot
Led - December 24, 2020
Tool Type
Sander
Difficulty
Medium
Time
30-60 minutes
Tools Used
Screwdriver, Allen wreches
Parts Used
First you need to get on your hands and knees and look under the control panel where the power switch is. The conveyor is coupled to the motor and this is where you need to use the Allen key to remove the coupling...otherwise you can't take the panel off hopefully the conveyor and motor stopped so you can SEE the Allen screws to remove them...if not then you'll need to take the entire conveyor assembly off so you can rotate the coupling
Once this is done then 6 screws are taken out of the box and you'll see the control board mounted to this box. Remove the board remember to take pictures of the wire connections and that is it
Once this is done then 6 screws are taken out of the box and you'll see the control board mounted to this box. Remove the board remember to take pictures of the wire connections and that is it
Did you find this story helpful?
Thanks for voting and helping fellow customers!
Control just burned out
John - August 16, 2018
Tool Type
Sander
Difficulty
Easy
Time
30-60 minutes
Tools Used
Screwdriver, Socket set
Parts Used
1. Removed old control
2 Followed the old wires and plug the new control in
3. Reinstall the drive belt
2 Followed the old wires and plug the new control in
3. Reinstall the drive belt
Did you find this story helpful?
Thanks for voting and helping fellow customers!
N power to outlet
wayne - March 30, 2017
👍 1 of 2 people found this instruction helpful
Tool Type
Sander
Difficulty
Medium
Time
1-2 hours
Tools Used
Screwdriver, Pliers
Parts Used
Remove control box
Take box apart
Removed circuit board
Reinstalled new board
Tested
Reinstalled control box
Take box apart
Removed circuit board
Reinstalled new board
Tested
Reinstalled control box
Did you find this story helpful?
Thanks for voting and helping fellow customers!
OEM stands for Original Equipment Manufacturer and means the part you’re buying is sourced directly from the manufacturer who made your product. At eReplacementParts, we sell only genuine OEM parts, guaranteeing the part you’re purchasing is of better design and of higher quality than aftermarket parts.
Our product descriptions are a combination of data sourced directly from the manufacturers who made your product as well as content researched and curated by our content & customer service teams. This content is edited and reviewed internally before being made public to customers.
Our customer service team are at the ready daily to answer your part and product questions. We have a dedicated staff with decades of collective experience in helping customers just like you purchase parts to repair their products.
All our part reviews are solicited directly from other customers who have purchased this exact part. While we moderate these reviews for profanity, offensive language or personally identifiable information, these reviews are posted exactly as submitted and no alterations are made by our team.
All our customer repair instructions are solicited directly from other customers just like you who have purchased and replaced this exact part. While we moderate these reviews for profanity, offensive language or personally identifiable information, these reviews are posted exactly as submitted and no alterations are made by our team.
Based on data from past customer purchasing behaviors, these parts are most commonly purchased together along with the part you are viewing. These parts may be necessary or helpful to replace to complete your current repair.
All our installation videos are created and produced in collaboration with our in-house repair technician, Mark Sodja, who has helped millions of eReplacementParts customers over the last 13 years repair their products. Mark has years of experience in selling and repairing both commercial and residential products with a specialty in gas-powered equipment.
This data is collected from customers who submitted a repair instruction after replacing this exact part. Customers can rate how easy the repair was to complete and how long it took. We aggregate this data to provide a repair rating that allows customers to quickly determine the difficulty and time needed to perform their own repair.