
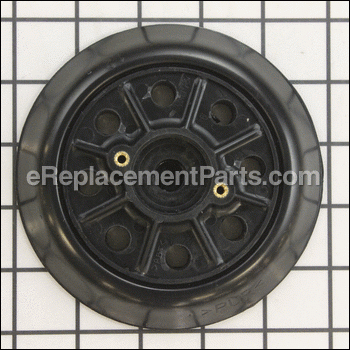
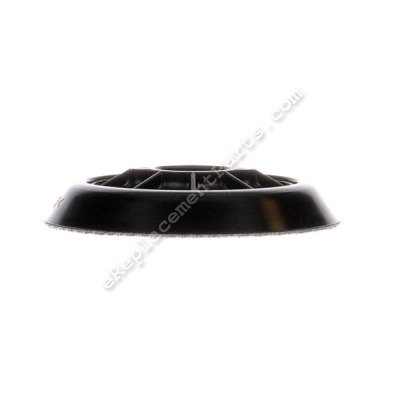


This 1-latch hook and loop backing pad is a genuine Makita replacement part. It has 8 vacuum holes and a 5" diameter.
rnrnThis pad is compatible with the tools listed below, and it is not guaranteed to fit any other power tools.
Hook And Loop Sander Pad 196905-1
OEM part for: Makita
Part Number: 196905-1
$60.73
In Stock
Jump To:
Product Description ?
- Classification: Part
- Weight: 0.25 lbs.
- Shipping: Ships Worldwide
Frequently Purchased Together ?


Compatibility
This part will fit the following 2 machines
Makita
BO5001 Random Orbit Sander View Diagrams & Manuals
BO5000 Sander View Diagrams & Manuals
This item works with the following types of products:
- Sander Parts
This part replaces obsolete part #: 743078-7, 743044-4, 193752-1, 743078-7X, 743047-8
Customer Part Reviews ?
Average Rating (out of 5):
Click to filter by ratings:
5 stars
9
4 stars
3
3 stars
0
2 stars
0
1 stars
0
< PREV
- 1
- 2
Easy to repair, exactly what I needed
Was even a note to tell how part is getting old
Guest -
May 23, 2023
Verified Purchase
The right part
I found my late husbands orbital palm sander in the garage. It’s a Makita and dates back to the 1970s. It’s by far the strongest/fastest sander we’ve ever had. The sander pad had deteriorated over the last 40+ years so I couldn’t use it, but everything else worked. I called Makita and the sander was no longer being made.They didn’t have any replacement parts. I found eReplacements online and even though I didn’t have a part number, their pictures are clear and they had what appeared to be the right replacement part. I ordered the part based on their return policy and took a chance it would work. The part shipped fairly quick and it fit perfectly. I definitely would recommend checking this company out before pitching your item. It might save you a lot of grief, time and money in the end. Their site is user friendly too. If you have a question, pick up the phone and call them. You’ll get a real person to talk to and not a Bot! They are my go to company now when I need a missing part and not the whole tool.
Linda -
March 25, 2022
Verified Purchase
Sander pad
Parts fit exactly. great job, thank you
Guest -
March 10, 2021
Verified Purchase
Great service worked as described . unfornunately the dollar difference made the part very expensive for me but not the fault of your company
arrived promptly and fitted perfectly it was a part I couldn't find in NewZealand.
iGlobal -
September 2, 2020
Verified Purchase
Worked like the original
My sander was so old that parts of the foam pad were flying off. The replacement part arrived promptly (considering COVID-19) and was an exact match for the original. Replacement was fairly easy. I had to use a stubby screwdriver and a lot of pressure to avoid stripping the screws. The bearing unit did not want to come out, so I had to invert it in the vice and use a metal rod and mallet to pop it out. After I cleaned off some corrosion, I needed to use a mallet to seat it again. The replacement of the pad cost about half the cost of replacing the entire sander, but I would have hated to discard a Makita tool that was otherwise still good.
Guest -
April 27, 2020
Verified Purchase
Easy repair
Arrived quickly. Great part replacement.
Guest -
April 9, 2020
Verified Purchase
Fit & worked like original!
My sander works like new!
Thanks
Guest -
November 30, 2019
Verified Purchase
Worked as expected
OEM replacement part. Worked as expected
Guest -
November 12, 2019
Verified Purchase
Very easy replacement. Might suggest ONLY a drop or two of Liquid Wrench to aid in old pad removal.
Great part! Going to work better than old pad.
Felipe -
April 22, 2019
Verified Purchase
Quick and easy to replace!
The replacement disk arrived quickly and was easy to install. Remember to check the bearing and the mounting screws before you order this part, just in case!
Guest -
December 29, 2023
Verified Purchase
t
t
t -
t days ago
Verified Purchase
eReplacementParts Team
t
Questions & Answers ?
Our customer Service team is at the ready daily to answer your part and product questions.

Ask our Team
We have a dedicated staff with decades of collective experience in helping customers just like you purchase parts to repair their products.
Does this fit my product?Questions & Answers for Hook And Loop Sander Pad
No questions have been asked yet
Customer Repair Instructions ?
All our customer repair instructions are solicited directly from other customers just like you who have purchased and replaced this exact part.
Sandpaper would no longer stick to the hook and loop sander pad. Need to replace sander pad.
David - January 19, 2016
👍 39 of 40 people found this instruction helpful
Tool Type
Sander
Difficulty
Medium
Time
15-30 minutes
Tools Used
Screwdriver, Allen wrench
Parts Used
Used Allen wrench to remove screw holding the sanding pad in place. Had to use a small screwdriver in the cooling vanes to hold the pad while removing the Allen screw. Removed two Phillips-head screws holding a sealed ball bearing in place in the back of the pad. One of the screws twisted off leaving part in the pad. Manufacturer had used some loctite type of material to prevent the screws from vibrating loose, which was the reason it was so tight that it twisted off when I tried to remove it. Also noted that the sealed ball bearing felt dry. Decided to go back to eReplacement parts and order a replacement ball bearing and a new screw for the one I twisted off. Next time I will do a complete disassembly before ordering parts so that I can have them all on hand to start and finish the repair in one session. Also, and I think this may be very important, be sure to sure to use loctite or equivalent on the replacement screw threads as the vibration form the sander will surely loosen them up if I don't.
Did you find this story helpful?
Thanks for voting and helping fellow customers!
The sander pad on my random orbit sander started throwing solid rubber segments. It was obvious I needed a new pad.
Gage - April 28, 2016
👍 13 of 13 people found this instruction helpful
Tool Type
Sander
Difficulty
Easy
Time
Less than 15 minutes
Tools Used
Screwdriver, Allen wrench
Parts Used
I ordered the new pad from eReplacementParts, and in three days it arrived. It was a simple procedure to stabilize the motor shaft with a screwdriver, remove an allen head screw and remove the old pad. It had a bearing and retaining plate with two screws
that had to be transferred to the new pad, then install the pad back on the sander. The new pad seems to be better quality than the original. I am very happy with this repair. It certainly saved purchasing a new Random Orbit Sander.
that had to be transferred to the new pad, then install the pad back on the sander. The new pad seems to be better quality than the original. I am very happy with this repair. It certainly saved purchasing a new Random Orbit Sander.
Did you find this story helpful?
Thanks for voting and helping fellow customers!
Sand discs were not staying on the pad
Ric - January 15, 2016
👍 7 of 7 people found this instruction helpful
Tool Type
Sander
Difficulty
Easy
Time
Less than 15 minutes
Tools Used
Screwdriver, small hex wrench.
Parts Used
One small hex head screw in the middle of the pad. Remove the old pad and install the new pad. Simple repair, good to go!
Did you find this story helpful?
Thanks for voting and helping fellow customers!
My sander pad rubber tore off
jim - December 3, 2015
👍 8 of 9 people found this instruction helpful
Tool Type
Sander
Difficulty
Easy
Time
Less than 15 minutes
Tools Used
, hex wrench
Parts Used
Remove 1 screw and remove the old pad. Put new pad on post and install screw. Done.
Did you find this story helpful?
Thanks for voting and helping fellow customers!
The sanding pad was old and broke apart
Ron - July 25, 2016
👍 3 of 3 people found this instruction helpful
Tool Type
Sander
Difficulty
Easy
Time
Less than 15 minutes
Tools Used
Nutdriver
Parts Used
Removed old pad from sander and replaced with the new one. Everything is working fine.
Did you find this story helpful?
Thanks for voting and helping fellow customers!
Orbital sander pad self destructed
Daniel - April 22, 2016
👍 3 of 3 people found this instruction helpful
Tool Type
Sander
Difficulty
Easy
Time
Less than 15 minutes
Tools Used
Screwdriver
Parts Used
Unplug the sander Locate plug in the center of the bottom of the old pad. Lift or pry out plug. Use a screwdriver to remove the screw under plug. Lift the pad off sander motor shaft. Place new pad onto end of motor shaft. You may have to manually turn the new pad assembly while looking for the screw hole to be exposed. The osculating motion of the internal parts cover the screw hole during part of the pad rotation. Once the screw hole is located insert the pad retaining screw and tighten firmly. Replace the plug into the center of the new pad. Put on safety glasses and plug the sander in. Grasp sander firmly while turning the switch on. If for any reason the sander is vibrating more than it normally used to, shut it off immediately and seek help from a mechanically advanced friend or send the sander to a factory service center for repair. It took me longer to type these instructions than it did to replace the pad on my sander.
Did you find this story helpful?
Thanks for voting and helping fellow customers!
Pad seperated and fragmented into several pieces
Mical - July 17, 2016
👍 2 of 2 people found this instruction helpful
Tool Type
Sander
Difficulty
Easy
Time
15-30 minutes
Tools Used
Screwdriver, Wrench Set
Parts Used
I removed the old pad assembly and replaced with the new one. Great replacement and sander is like new.
Did you find this story helpful?
Thanks for voting and helping fellow customers!
Replacing a worn out sanding pad
Sy - December 18, 2015
👍 3 of 4 people found this instruction helpful
Tool Type
Sander
Difficulty
Easy
Time
Less than 15 minutes
Tools Used
, metric allen wrench
Parts Used
Using a metric allen wrench, remove the old pad and replace with new. Apply blue thread loctite to the screw so it won't loosen on it's own. A really simple job.
Did you find this story helpful?
Thanks for voting and helping fellow customers!
Pad worn out
edwin - January 20, 2016
👍 1 of 1 people found this instruction helpful
Tool Type
Sander
Difficulty
Easy
Time
Less than 15 minutes
Tools Used
Screwdriver
Parts Used
Remove one screw form the middle of the worn pad, remove old pad. Install new pad with the screw.
Did you find this story helpful?
Thanks for voting and helping fellow customers!
Worn pad
Robert - December 18, 2015
👍 1 of 1 people found this instruction helpful
Tool Type
Sander
Difficulty
Medium
Time
15-30 minutes
Tools Used
Screwdriver, Hack saw, air compressor
Parts Used
Removed single screw in the middle of the worn pad. Used compressed air gun to clean electrical parts. Installed the new pad with the screw.
Did you find this story helpful?
Thanks for voting and helping fellow customers!
Load More Install Stories
OEM stands for Original Equipment Manufacturer and means the part you’re buying is sourced directly from the manufacturer who made your product. At eReplacementParts, we sell only genuine OEM parts, guaranteeing the part you’re purchasing is of better design and of higher quality than aftermarket parts.
Our product descriptions are a combination of data sourced directly from the manufacturers who made your product as well as content researched and curated by our content & customer service teams. This content is edited and reviewed internally before being made public to customers.
Our customer service team are at the ready daily to answer your part and product questions. We have a dedicated staff with decades of collective experience in helping customers just like you purchase parts to repair their products.
All our part reviews are solicited directly from other customers who have purchased this exact part. While we moderate these reviews for profanity, offensive language or personally identifiable information, these reviews are posted exactly as submitted and no alterations are made by our team.
All our customer repair instructions are solicited directly from other customers just like you who have purchased and replaced this exact part. While we moderate these reviews for profanity, offensive language or personally identifiable information, these reviews are posted exactly as submitted and no alterations are made by our team.
Based on data from past customer purchasing behaviors, these parts are most commonly purchased together along with the part you are viewing. These parts may be necessary or helpful to replace to complete your current repair.
All our installation videos are created and produced in collaboration with our in-house repair technician, Mark Sodja, who has helped millions of eReplacementParts customers over the last 13 years repair their products. Mark has years of experience in selling and repairing both commercial and residential products with a specialty in gas-powered equipment.
This data is collected from customers who submitted a repair instruction after replacing this exact part. Customers can rate how easy the repair was to complete and how long it took. We aggregate this data to provide a repair rating that allows customers to quickly determine the difficulty and time needed to perform their own repair.