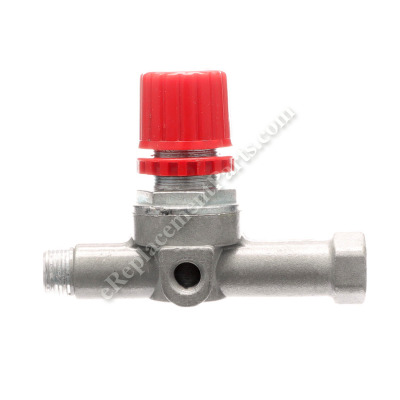


Pressure Reducer AB-9415883
Part Number: AB-9415883
Order within the next 6 hours
and your part ships today!
and your part ships today!
Product Information
Description:
| This is a genuine Bostitch replacement part, it is sold individually. The purpose of the AB-9051116 Pressure Reducer is to control the amount of air pressure coming out of the compressor tank. This is helpful when inflating items to specified pressure. Also some pneumatic tools use different air pressure specifications to make them operate properly. |
Frequently Purchased With

Compatibility
Products Compatibility
This item works with the following types of products:
- • Compressor
Questions & Answers for Pressure Reducer
No questions have been asked yet
Repair Instructions: Submitted by Customers Like You
29 of 30 people found this instruction helpful
Tool Type:
Compressor
Parts Used:
Repair Difficulty:
Medium
Time Spent Repairing:
30-60 minutes
Tools Used:
Screwdriver, Socket set, Adjustable Wrench
Pressure reducer threads were stripped
Look up the repair on the internet and there are several videos concerning the removal of the two bottom screws on the compressor plastic cover. Once you get past that with the help of the videos the repair is very basic. The removal of the two bottom screws is not difficult, they're just difficult to see.
Did you find this story helpful?
Thanks for voting and helping fellow customers!
11 of 11 people found this instruction helpful
Tool Type:
Compressor
Parts Used:
Repair Difficulty:
Medium
Time Spent Repairing:
30-60 minutes
Tools Used:
Screwdriver, Socket set, Wrench Set, Teflon tape
Regulator failed
The pressure regular failed.the repair was not difficult. Remove the existing parts that are on the failed regulator. The one thing you need to do is hold the housing it threads into. The factory uses a epoxy sealer on the threads. Use Teflon tape on the replacement regular so it will seal and to get it in the correct position. Install all of the parts you removed from the old one.
Did you find this story helpful?
Thanks for voting and helping fellow customers!
10 of 10 people found this instruction helpful
Tool Type:
Compressor
Parts Used:
Repair Difficulty:
Easy
Time Spent Repairing:
15-30 minutes
Tools Used:
Screwdriver, Socket set, Adjustable Wrench
Can now adjust air pressure
Take screws out of casing and then unscrew the desired air pressure gauge and then unscrew the broken adjustable air pressure part. Then replace it with the new one and be sure to use Teflon tape on the treads to avoid any air leaks.
Did you find this story helpful?
Thanks for voting and helping fellow customers!
7 of 7 people found this instruction helpful
Tool Type:
Compressor
Repair Difficulty:
Medium
Time Spent Repairing:
15-30 minutes
Tools Used:
Screwdriver, Pliers, Wrench Set, Adjustable Wrench
The threads stripped out of the pressure reducer
Simply replaced the regulator and a defective pressure guage.
Did you find this story helpful?
Thanks for voting and helping fellow customers!
4 of 4 people found this instruction helpful
Tool Type:
Compressor
Parts Used:
Repair Difficulty:
Medium
Time Spent Repairing:
15-30 minutes
Tools Used:
Screwdriver, Socket set, Wrench Set, Nutdriver, Propane torch
Replace pressure regulator valve.
The factory valve is installed with epoxy on the threads. Use the torch to heat the old valve until the epoxy releases. Use standard thread tape to seal the new unit.
Did you find this story helpful?
Thanks for voting and helping fellow customers!
2 of 2 people found this instruction helpful
Tool Type:
Compressor
Parts Used:
Repair Difficulty:
Medium
Time Spent Repairing:
30-60 minutes
Tools Used:
Screwdriver, Adjustable Wrench, small pipe wrench & 7/16 open end wrench
Pressure Reducer or Regulator Defective could not adjust or regulate pressure to tools....
1.Unplug electric supply to compressor and drain air from tank.
2.Removed all Phillips head screws that support plastic cover above tank area & gauge face cover screws. (one side of the plastic is all that is required to remove on this type compressor)..
3. Gently pry apart & remove plastic cover not to damage gauges or plastic... Recommend starting at the handle area.
4.Removed quick connect for air supply while using a back up pipe wrench.
5.Remove pressure regulator gauge with a 7/16' open end wrench. Proceed cautiously not to damage gauge.
6. Remove defective pressure regulator & nipple with a adjustable wrench while using a back up pipe wrench on the positive compressor side of the pump. This is very soft metal so be smart and don't force anything to move.
7. Clean area around compressor side of nipple and make sure that no debris falls inside of open fittings.
8.Use threaded pipe tape to on new replacement fitting per normal pipe fitting specs.
9. Gently reapply the pipe nipple into the compressor positive side were the old part was removed from.
10.Possition fitting to make sure that it is not over tightened and is inline with how the replace part was positioned prior to removing it... This has to be correctly installed to make sure that all of the plastic and gauges are in place to allow the plastic covers to fit correctly.
11.Reapply quick connection fitting and make sure to use the threaded pipe tape on this fitting too.
12. Leak test the fittings that replace by plugging in the cord to electric and allowing the compressor to pressure up to 20 psi and turning it off .. Unplug electric supply cord from the compressor and use test solution or some dish washing liquid... Ten to 15 minutes should be along enough dwell time
13. After the leak test is successful release the air pressure stored in the tank and start the reassembly of the plastic cover...
14. Plug the compressor into the electric source, turn it on and monitor the pressure as it build up in ten PSI increments to make sure that everything is operating correctly before leaving it unattended...
Good luck with your replacement project! This replacement may not be 100% per the book but it worked for me.... The right tools for the job do make the difference...
Did you find this story helpful?
Thanks for voting and helping fellow customers!
2 of 2 people found this instruction helpful
Tool Type:
Compressor
Parts Used:
Repair Difficulty:
Easy
Time Spent Repairing:
15-30 minutes
Tools Used:
Socket set, Adjustable Wrench
The pressure reducer got stripped and could not control the air
Insert long flat screw driver on one side of the plastic cover and a 1/4 socket on the opposite side. Remove cover and use an adjustable wrench to remove the pressure gauge, once that's done, remove the whole pressure reducer. Make sure to put plenty of Teflon tape ( yellow) type to Insure tight seal and install everything back slowly and don't get frustrated, that just makes time seem longer.
Did you find this story helpful?
Thanks for voting and helping fellow customers!
1 of 1 people found this instruction helpful
Tool Type:
Compressor
Parts Used:
Repair Difficulty:
Medium
Time Spent Repairing:
30-60 minutes
Tools Used:
Screwdriver, Wrench Set, Adjustable Wrench
Air pressure reducer threads were stripped,
Removed the 8 screws that hold the two halves of the plastic cover in place, the 2 long bolts that act as the attachment to the lower part of the cover, that bear the weight of the compressor, , take a long flat blade screwdriver and place in the slot in the nut on one side, and turn counter clock wise to remove it off the bolt, and at this time also remove the male hose connection from the reducer that is on the compressor, so you can remove the cover... the hard part is installing the new reducer, the round adjuster knob hits the bracket that is welded to the tank to hold the reducer and gauges, this should have been designed about 1/2 inch shorter, so the knob did not hit, , but it is a project that anyone with a little mechanical ability can handle with a just a few ''naughty'' words spoken
Did you find this story helpful?
Thanks for voting and helping fellow customers!
1 of 1 people found this instruction helpful
Tool Type:
Compressor
Parts Used:
Repair Difficulty:
Easy
Time Spent Repairing:
15-30 minutes
Tools Used:
Screwdriver, Pliers, Adjustable Wrench
Bought used and needed parts to protect piston
There was nothing to it. Parts fit perfect and item looks just like new
Did you find this story helpful?
Thanks for voting and helping fellow customers!
1 of 1 people found this instruction helpful
Tool Type:
Compressor
Parts Used:
Repair Difficulty:
Easy
Time Spent Repairing:
15-30 minutes
Tools Used:
Screwdriver, Wrench Set, Adjustable Wrench
Broken pressure adjuster and broken gauges.
1. Removed the cover.
2. Removed the quick coupler, both pressure gauges, and the pressure adjuster body.
3. Installed the new pressure adjuster.
4. Installed the new gauges.
5. Installed the quick coupler and the cover.
2. Removed the quick coupler, both pressure gauges, and the pressure adjuster body.
3. Installed the new pressure adjuster.
4. Installed the new gauges.
5. Installed the quick coupler and the cover.
Did you find this story helpful?
Thanks for voting and helping fellow customers!
show more
Reviews
16 Reviews
Average Rating (out of 5):
Click to filter by ratings:
5 stars
15
4 stars
0
3 stars
1
2 stars
0
1 stars
0
< PREV
- 1
- 2
Great
The part that I ordered was correct and fitted well. Ordering was difficult. I found it difficult which area to look at to actual find the part we needed. Even difficult to find right part number but once found ordering was easy
Guest -
July 18, 2023
Verified Purchase
Works great
Installed in a few minutes and started using it immediately
Guest -
November 23, 2022
Verified Purchase
Was exactly the part needed
I was able to install the part and test. My compressor is working again. Thank you.
Guest -
October 5, 2022
Verified Purchase
New replacement pressure regulator for BOSTITCH Pancake Compressor
Received what I ordered, on time----maybe even a day early. Installed it. Works just fine. As usual, it was great to do business with EReplacement Parts. They haven't let me down yet!
Guest -
December 7, 2021
Verified Purchase
Fast and always have what I need
Parts are in good condition and on time
Guest -
October 30, 2020
Verified Purchase
Easy repair, correct part listed in manual & received on time.
New pressure reducer fit my Bostitich air compressor, working great now.
Guest -
July 6, 2020
Verified Purchase
Super easy
I received the product ahead of schedule. It was exactly as advertised and is working perfectly.
Guest -
June 1, 2020
Verified Purchase
Easy repair
it arrived on time. Was the correct part and now my air compressor works perfectly.
Elizabeth -
May 3, 2020
Verified Purchase
Justy Like New
The regulator portion of this assembly is known for failure. I unscrewed the regulator from the 'T' pipe assembly, used it to replace my defective part, and everything worked just like new. Easy fix.
Guest -
November 22, 2019
Verified Purchase
Fit well
Easy repair exactly as discribed
Guest -
October 9, 2019
Verified Purchase
Verified Purchase
eReplacementParts Team
< PREV
- 1
- 2
Product Information