
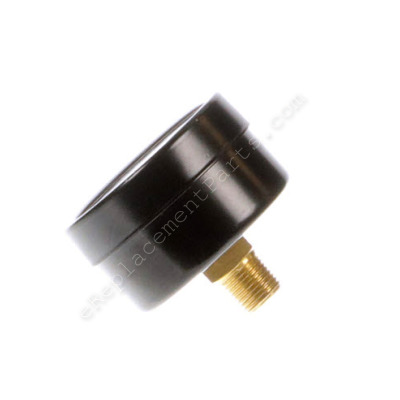


The pressure gauge attaches to the pressure reducer and displays the amount of air pressure in the tank. It is made of plastic and metal and is sold individually. It is a genuine OEM sourced part which is specifically designed for use with Bostitch compressors. If the gauge starts to leak air it will need to be replaced. During installation, a wrench may be needed to replace this part.
Pressure Gauge 40 AB-9414745
OEM part for: Bostitch
Part Number: AB-9414745
$10.35
In Stock
Jump To:
Frequently Purchased Together ?


Compatibility
This part will fit the following 6 machines
Bostitch
CAP2000P-OF Type 0 Air Compressor View Diagrams & Manuals
CAP2060P Air Compressor View Diagrams & Manuals
BTFP02006 Compressor View Diagrams & Manuals
BTFP02006 (Type 1) Air Compressor Power Tool View Diagrams & Manuals
CAP2000P-OF (Type 1) Air Compressor Power Tool View Diagrams & Manuals
CAP2060P (Type 0) Air Compressor Power Tool View Diagrams & Manuals
Show More Compatible Models
This item works with the following types of products:
- Compressor Parts
Customer Part Reviews ?
Average Rating (out of 5):
Click to filter by ratings:
5 stars
2
4 stars
1
3 stars
0
2 stars
0
1 stars
0
< PREV
- 1
Good item
Perfect
Guest -
June 24, 2022
Verified Purchase
air compressor parts
part worked perfect. Fast delivery
Guest -
July 22, 2021
Verified Purchase
Gauges
So far they work as they should, good fit.
Guest -
December 2, 2021
Verified Purchase
t
t
t -
t days ago
Verified Purchase
eReplacementParts Team
t
Questions & Answers ?
Our customer Service team is at the ready daily to answer your part and product questions.

Ask our Team
We have a dedicated staff with decades of collective experience in helping customers just like you purchase parts to repair their products.
Does this fit my product?Questions & Answers for Pressure Gauge 40
No questions have been asked yet
Customer Repair Instructions ?
All our customer repair instructions are solicited directly from other customers just like you who have purchased and replaced this exact part.
10 year + old Compressor was leaking air at main stem, tried to tighten fittings entire pressure reducer broke off compressor
Brian - April 14, 2016
👍 1 of 1 people found this instruction helpful
Tool Type
Compressor
Difficulty
Easy
Time
Less than 15 minutes
Tools Used
Wrench Set
Removed entire pressure reducer from compressor, reinstalled with one new gauge, one existing gauge, and hose connector. This was done in 15 minutes
Used two wrenches, plumbers tape, very easy to do, extremely pleased that the parts were still available!!!
Used two wrenches, plumbers tape, very easy to do, extremely pleased that the parts were still available!!!
Did you find this story helpful?
Thanks for voting and helping fellow customers!
could not adjust pressure
Rob - May 4, 2019
Tool Type
Compressor
Difficulty
Medium
Time
30-60 minutes
Tools Used
Screwdriver, Socket set, Wrench Set, Adjustable Wrench, hex key
Parts Used
Had to take too parts off to get to place where you could get the pressure control mechanism to unscrew from air pressure line.
Did you find this story helpful?
Thanks for voting and helping fellow customers!
Adjustment knob in pressure reducer failed, turned without effect.
Wendell - March 16, 2018
Tool Type
Compressor
Difficulty
Medium
Time
30-60 minutes
Tools Used
Screwdriver, Socket set, Wrench Set, Adjustable Wrench
1. Removed air outlet hose quick connect part.
2. Removed plastic shell covering.
3. Removed old pressure gauge and pressure reducer parts.
4. Installed new pressure reducer with vinyl tape on threads.
5. Installed new pressure gauge with vinyl tape on threads.
6. Installed plastic shell covering.
7. Installed air outlet quick connect part with vinyl tape on threads.
I am adept mechanically, but inexperienced in this operation. Had to back up a time or two causing delays.
Did you find this story helpful?
Thanks for voting and helping fellow customers!
Would not pump up.
MIKE - November 18, 2017
Tool Type
Compressor
Difficulty
Medium
Time
30-60 minutes
Tools Used
Pliers, Socket set, Wrench Set, Adjustable Wrench
Put both gauges on & safety valve. Had to fix broken air pipe inside which I did not know was broken. Works great now.
Did you find this story helpful?
Thanks for voting and helping fellow customers!
Broken handle and gauges
Michael - October 30, 2017
Tool Type
Compressor
Difficulty
Easy
Time
Less than 15 minutes
Tools Used
Socket set, Wrench Set
Removed and replaced broken parts.
Did you find this story helpful?
Thanks for voting and helping fellow customers!
Broken pressure adjuster and broken gauges.
Robert - August 3, 2017
Tool Type
Compressor
Difficulty
Easy
Time
15-30 minutes
Tools Used
Screwdriver, Wrench Set, Adjustable Wrench
1. Removed the cover.
2. Removed the quick coupler, both pressure gauges, and the pressure adjuster body.
3. Installed the new pressure adjuster.
4. Installed the new gauges.
5. Installed the quick coupler and the cover.
2. Removed the quick coupler, both pressure gauges, and the pressure adjuster body.
3. Installed the new pressure adjuster.
4. Installed the new gauges.
5. Installed the quick coupler and the cover.
Did you find this story helpful?
Thanks for voting and helping fellow customers!
Leaks and broken gauges
Lynn - July 25, 2017
Tool Type
Compressor
Difficulty
Medium
Time
1-2 hours
Tools Used
Power Drill, Socket set, Wrench Set, Adjustable Wrench
Removed shroud with two 8mm sockets and two 1/4 inch extensions. One on each end of shroud bolts. Changed all connections. Retaped all connections with Teflon. Replaced both broken gauges. It's a 10 year old Stanley Bostich and it works great now. My wife and I install floors for a living so our tools have to work. Thanks!
Did you find this story helpful?
Thanks for voting and helping fellow customers!
Pressure gauge assembly. Cracked
James - August 4, 2016
Tool Type
Compressor
Difficulty
Easy
Time
Less than 15 minutes
Tools Used
Wrench Set
Parts Used
Removed broken pressure gauge from regulator, and installed the new one.
Did you find this story helpful?
Thanks for voting and helping fellow customers!
I lent my air compressor to a friend and he brought it back with a different pressure gauge on it
Terry - April 24, 2016
Tool Type
Compressor
Difficulty
Easy
Time
Less than 15 minutes
Tools Used
Wrench Set, two wrenches and teflon tape
Unscrewed the bad quick disconnect and pressure gauges and replaced with the correct parts that were ordered.The repair was easy using the correct parts and following the use instruction sheet. I would recommend Replacement parts because they were easy to order from and they sent the right parts the first time with no problems. If I can do it anyone can. T. Foster
Did you find this story helpful?
Thanks for voting and helping fellow customers!
The threads stripped out of the pressure reducer
rickey - March 18, 2016
Tool Type
Compressor
Difficulty
Medium
Time
15-30 minutes
Tools Used
Screwdriver, Pliers, Wrench Set, Adjustable Wrench
Simply replaced the regulator and a defective pressure guage.
Did you find this story helpful?
Thanks for voting and helping fellow customers!
OEM stands for Original Equipment Manufacturer and means the part you’re buying is sourced directly from the manufacturer who made your product. At eReplacementParts, we sell only genuine OEM parts, guaranteeing the part you’re purchasing is of better design and of higher quality than aftermarket parts.
Our product descriptions are a combination of data sourced directly from the manufacturers who made your product as well as content researched and curated by our content & customer service teams. This content is edited and reviewed internally before being made public to customers.
Our customer service team are at the ready daily to answer your part and product questions. We have a dedicated staff with decades of collective experience in helping customers just like you purchase parts to repair their products.
All our part reviews are solicited directly from other customers who have purchased this exact part. While we moderate these reviews for profanity, offensive language or personally identifiable information, these reviews are posted exactly as submitted and no alterations are made by our team.
All our customer repair instructions are solicited directly from other customers just like you who have purchased and replaced this exact part. While we moderate these reviews for profanity, offensive language or personally identifiable information, these reviews are posted exactly as submitted and no alterations are made by our team.
Based on data from past customer purchasing behaviors, these parts are most commonly purchased together along with the part you are viewing. These parts may be necessary or helpful to replace to complete your current repair.
All our installation videos are created and produced in collaboration with our in-house repair technician, Mark Sodja, who has helped millions of eReplacementParts customers over the last 13 years repair their products. Mark has years of experience in selling and repairing both commercial and residential products with a specialty in gas-powered equipment.
This data is collected from customers who submitted a repair instruction after replacing this exact part. Customers can rate how easy the repair was to complete and how long it took. We aggregate this data to provide a repair rating that allows customers to quickly determine the difficulty and time needed to perform their own repair.