
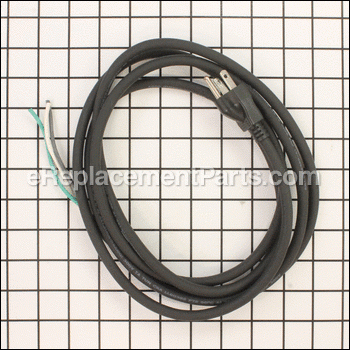


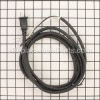
Power Cord - 8, 16 Gauge, 3-w 664723-0
Part Number: 664723-0
Ships within 1 business day
Product Information
Specifications
| Length: 8' Gauge: 16 Wires: 3 Type: Bare Wire |
Description:
| This cord is a genuine Makita replacement part and is sold individually. It is constructed with tough, thick outer rubber insulation for a long service life. Power Cord Specifications: |
Frequently Purchased With


Compatibility
Products Compatibility
This item works with the following types of products:
- • Drill
- • Jointer
- • Planer
- • Saw
- • Table Saw
Repair Guides
![]()

Watch the Repair Video for
Power Cord - 8, 16 Gauge, 3-w

Articles:
|
This article contains tips and basic steps for replacing power cords for most types of power tools, machines, and other ...
September 18, 2009
|

Questions & Answers for Power Cord - 8, 16 Gauge, 3-w
No questions have been asked yet
Repair Instructions: Submitted by Customers Like You
5 of 5 people found this instruction helpful
Tool Type:
Table Saw
Parts Used:
Repair Difficulty:
Easy
Time Spent Repairing:
15-30 minutes
Tools Used:
Screwdriver, terminal crimper
The power cord needed to be replace, the outer insulating rubber was cracked and split exposing the three inside wires.
Turn the saw upside down, remove the switch box and disconnect the cord by removing the terminal screws. Be sure to note the location for each of the three wires by color. Cut the new cord ends to length and strip enough for new terminals. Push the cord through all fittings before crimping the terminals then crimp and attach to the terminals in the switch box. Give everything a good cleaning before replacing the switch box. I gave mine a cleaning with contact cleaner. Works like new, good to go until needed again, approximately 10 years.
Did you find this story helpful?
Thanks for voting and helping fellow customers!
2 of 2 people found this instruction helpful
Tool Type:
Chop Saw
Repair Difficulty:
Easy
Time Spent Repairing:
Less than 15 minutes
Tools Used:
Screwdriver, Power Drill
Power cord and guard were cracked and broken
1. Removed screws from the handle
2. Pulled the handle apart
3. Disconnected the the switch module from the handle pieces and disconnected the cable terminals from the switch module.
4. Stripped approximately a quarter of an inch of shielding from the cables, then added a round terminal connector.
5. Then reconnected everything in reverse order
Did you find this story helpful?
Thanks for voting and helping fellow customers!
Tool Type:
Table Saw
Parts Used:
Repair Difficulty:
Easy
Time Spent Repairing:
15-30 minutes
Tools Used:
Screwdriver, Wire cutter
Power cord cracked
1. Removed existing power cord
a) Open connector box with screwdriver
b) Unscrewed existing wire connectors
2) Replaced with new power cord
a) Had to purchase Ring terminals to connect to each wire
b) Screwed new wire/terminals on power box
c) Closed power box
d) Screwed wire holders
3) Successfully tested
a) Open connector box with screwdriver
b) Unscrewed existing wire connectors
2) Replaced with new power cord
a) Had to purchase Ring terminals to connect to each wire
b) Screwed new wire/terminals on power box
c) Closed power box
d) Screwed wire holders
3) Successfully tested
Did you find this story helpful?
Thanks for voting and helping fellow customers!
0 of 1 people found this instruction helpful
Tool Type:
Chop Saw
Repair Difficulty:
Medium
Time Spent Repairing:
30-60 minutes
Tools Used:
Screwdriver, Pliers
Cord had been cut multiple times
Disasimbeled handle, removed power cord and guard. Installed new cord and guard and assembled handle.
Did you find this story helpful?
Thanks for voting and helping fellow customers!
Reviews
5 Reviews
Average Rating (out of 5):
Click to filter by ratings:
5 stars
4
4 stars
1
3 stars
0
2 stars
0
1 stars
0
< PREV
- 1
Quick delivery! Quality product!
No one in town could repair my table saw plug for 3 months. Easily found the part needed on ereplacementparts.com! Received it in less than a week! Bada bing....repair DIY for 1/3 rd the repair cost and in an hour!
Thanks for making this SO easy!!!
Anonymous -
October 20, 2021
Verified Purchase
Easy repair
I knew nothing about how to do this repair. I ordered the recommended part, watched the video link, and easily replaced the power cord on my table saw. Highly recommended
Bruce -
January 11, 2021
Verified Purchase
Parts worked perfectly and had my planer fixed in no time.
These were the parts I needed and they fixed my planer.
Guest -
November 11, 2020
Verified Purchase
Power cord replacement
The cord was relatively easy to replace and works fine.
Guest -
May 23, 2020
Verified Purchase
worked good
Product is good! The only thing is I needed to also buy ring terminals as well to install it for my saw.
Guest -
September 8, 2020
Verified Purchase
Verified Purchase
eReplacementParts Team
< PREV
- 1
Product Information
Repair Guides
![]()
Watch the Repair Video for
Power Cord - 8, 16 Gauge, 3-w
Articles:
|
This article contains tips and basic steps for replacing power cords for most types of power tools, machines, and other ...
September 18, 2009
|