*This part replaces obsolete part #: 664234-5.
Product Information
Specifications
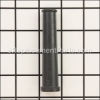
| Length: 8' Gauge: 16 Wires: 2 Type: Bare Wire |
Description:
| This is a genuine Makita replacement power tool cord. It is constructed with thick insulation for long service life and a strong two-prong plug. The connection end of the cord comes pre stripped for easy installation. The cord is eight feet long with sturdy 16 gauge wires. This cord will fit the Makita tools listed below. It can work for other applications and for other tools as well, but compatibility is not guaranteed. |
Frequently Purchased With


Compatibility
the 111 compatible machines
This part is compatible with the following machines:
Makita
5007NB Circular Saw
5007NB Circular Saw
5740NB Circular Saw
5740NB Circular Saw
LS1011 Compound Miter Saw
LS1011 Compound Miter Saw
LS1020 Miter Saw
LS1020 Miter Saw
LS1030 Miter Saw
LS1030 Miter Saw
9015B Grinder
9016B Grinder
5008NB Circular Saw
5008NB Circular Saw
9015DB Angle Grinder
9565CV Angle Grinder
5007NBA Circular Saw
5007NBA Circular Saw
9016DB Angle Grinder
9563CV Grinder
9564CV Angle Grinder
9564CVL Angle Grinder
6922NB Shear Wrench
5007S Circular Saw
5007S Circular Saw
5077B Hypoid Saw
DA4031 Angle Drill
9015A Angle Grinder
9566CV Cut Off Angle Grinder
JR3060T Reciprocating Saw
JR3060T Reciprocating Saw
TW1000 Impact Wrench
LS1000 10 inch Miter Saw
LS1000 10 inch Miter Saw
5007NBK Type 1 7-1/4" 15A Heavy-Gauge Aluminium Base Circular Saw
5007NBK Type 1 7-1/4" 15A Heavy-Gauge Aluminium Base Circular Saw
GA6010Z 10.5A 6" Cutoff / Angle Grinder
GA5020 10.5A 5" SJS Angle Grinder
GA5010Z 10.5A 5" Angle Grinder
9566PC 6" SJS Cutoff / Angle Grinder
9565PC 5" SJS Angle Grinder
9564PC 4-1/2" SJS Angle Grinder
2401B 10" Miter Saw
2401B 10" Miter Saw
DA4030 1/2" Angle Drill
LS1430 14" Miter Saw
LS1430 14" Miter Saw
LS1400 14" Miter Saw
LS1400 14" Miter Saw
SP6000K1 6-1/2" Plunge Circular Saw with 55" Guide Rail
SP6000K1 6-1/2" Plunge Circular Saw with 55" Guide Rail
GA5020Y Super Joint Angle Grinder
GA6020 6" Angle Grinder
GA4542C 4-1/2" SJS II High-Power Angle Grinder
4100KB Saw
4100NH2ZX1 (Type 1) Saw
4100NH2ZX1 (Type 2) Saw
4100NH2ZX1 (Type 3) Saw
4100NH2ZX (Type 2) Saw
4100NH2ZX (Type 3) Saw
4100NSZX1 (Type 1) Saw
4100NSZX1 (Type 2) Saw
4100NSZX1 (Type 3) Saw
4100NSZX (Type 1) Saw
4100NSZX (Type 2) Saw
4100NSZX (Type 3) Saw
5007NBA-K Saw
5008NBA Saw
5008NBA (Type 2) Saw
5008NBA (Type 3) Saw
5008NB (Type 2) Saw
5008NB (Type 3) Saw
5008NB (Type 4) Saw
9564P Grinder
9566PCX1 Grinder
CA5000X Saw
GA4542C01 Grinder
GA5010 Grinder
GA5040 Grinder
GA5040X1 Grinder
GA5042C Grinder
GA5042C01 Grinder
GA5042CX1 Grinder
GA6010 Grinder
GA6010ZX2 Grinder
GA6020YX1 Grinder
HG1100 (Type 2) Misc
HS7600 (Type 1) Saw
HS7600 (Type 2) Saw
JR3050T (Type 3) Saw
JR3050TX (Type 2) Saw
JR3050TX (Type 3) Saw
JR3050TY (Type 2) Saw
JR3050TY (Type 3) Saw
JR3050TZ Saw
SP6000 Saw
SP6000J Saw
SP6000J1 Saw
SP6000K Saw
SP6000 (Type 1) Saw
SP6000 (Type 2) Saw
SP6000 (Type 3) Saw
SP6000 (Type 4) Saw
SP6000X1 (Type 1) Saw
SP6000X1 (Type 2) Saw
SP6000X1 (Type 3) Saw
SP6000X1 (Type 4) Saw
SP6000X2 (Type 1) Saw
SP6000X2 (Type 2) Saw
SP6000X2 (Type 3) Saw
SP6000X2 (Type 4) Saw
Products Compatibility
List
This item works with the following types of products:
- • Circular Saw
- • Drill
- • Grinder
- • Impact Wrench
- • Miter Saw
- • Reciprocating Saw
- • Saw
- • Shear
Repair Guides
![]()

Watch the Repair Video for
Power Cord

Articles:
|
This article contains tips and basic steps for replacing power cords for most types of power tools, machines, and other ...
September 18, 2009
|

|
Step-by-step instructions for removing and installing the power cord on your Makita angle drill....
February 27, 2018
|

Questions & Answers for Power Cord
will this cord fit a Makita circular saw 5007 NB
Eddie
for model number 5007nb
asked on 2023-04-29
Hello Eddie, Thank you for writing. The Power Cord for this model would be Power Cord Part Number: 664265-4. We hope this helps!
eReplacementParts Team April 29, 2023
Repair Instructions: Submitted by Customers Like You
19 of 19 people found this instruction helpful
Tool Type:
Circular Saw
Parts Used:
Repair Difficulty:
Easy
Time Spent Repairing:
Less than 15 minutes
Tools Used:
Screwdriver, stuff to put ends on wire
Someone had cut plug wire near saw end
1. Removed 4 or 5 Philips screws from handle (nuts stayed in removed handle piece)
2. Removed 2 screws holding tension on cords end the one holding switch to saw
3. Un-screwed wire from switch (black wire white wire) remember which wire goes where
(white wire was on side of switch with part #s or something
BACK TOGETHER
1. Attach new cord to switch remembering wirers have to be in the same place as removed
2. Replace restraining clip and 2 screws and tuck all wires in to saw
3. Replace handle part watch that nuts stayed in place
4. Inspect job should look just like it did but with shinny new cord
PLUG IT IN, PULL TRIGGER (remember it IS a SAW and be careful )
Did you find this story helpful?
Thanks for voting and helping fellow customers!
5 of 5 people found this instruction helpful
Tool Type:
Miter Saw
Parts Used:
Repair Difficulty:
Medium
Time Spent Repairing:
More than 2 hours
Tools Used:
Screwdriver, Wrench Set, wire stripper and cutter
Power cord was frayed and needed replacement
1. Removed 4 phillips head screws to remove handle assembly from saw.
2. Removed 5 phillips head screws to open handle assembly and provide access to wiring
3. Removed power cord and its connection to a connector component and the switch.
4. Cut new wires as needed to make connections
5. Noted that the new strain relief was not the correct size. Discovered that this was due to the labeling on the miter saw which indicated that it was a model LS 1030 when it was actually a model LS 1030N. Was able to determine this from drawings which were accurate.
6. Used old strain reliever which was in good condition
7. Then disaster: One of the handle assembly screws fell into the armature casing. The armature unit could not be removed as it appeared to be stuck in the casing. This condition has been reported by others. After a couple of days trying magnets, shaking the casing, using wires, etc. I finally was able to see where the screw was stuck with a flashlight shining on the casing air vents. Once seeing the screw I was then able to remove it.
8. Then took a little time to discover how a retention spring functioned together with the safety release button on the unit.
9. Voila! Repair complete and the saw started and has been resurrected from the dead!!
Did you find this story helpful?
Thanks for voting and helping fellow customers!
3 of 3 people found this instruction helpful
Tool Type:
Grinder
Repair Difficulty:
Easy
Time Spent Repairing:
Less than 15 minutes
Tools Used:
Screwdriver, Wire Crimping tool
Needed a new cord
Remove the screws from the housing
Remove the cord clamp
Remove the cord wires from the switch
Put strain relief on the new cord
Connect the wire the switch
Install the cord clamp
Put the housing back together
Remove the cord clamp
Remove the cord wires from the switch
Put strain relief on the new cord
Connect the wire the switch
Install the cord clamp
Put the housing back together
Did you find this story helpful?
Thanks for voting and helping fellow customers!
3 of 3 people found this instruction helpful
Tool Type:
Circular Saw
Parts Used:
Repair Difficulty:
Easy
Time Spent Repairing:
30-60 minutes
Tools Used:
Screwdriver, Pliers, Power Drill
cord worn out after 30 years
Remove the handle cover to expose the cord, remove the two screws from the cord hold. Remove the cord leads from switch. It is easier if you remove the switch too. Slide off the cord relief and place it on the new cord. The cord does not include terminals for the switch. Attach cord to switch, replace switch and cord hold with the two screws. Attach handle half
Did you find this story helpful?
Thanks for voting and helping fellow customers!
2 of 2 people found this instruction helpful
Tool Type:
Circular Saw
Parts Used:
Repair Difficulty:
Easy
Time Spent Repairing:
15-30 minutes
Tools Used:
Screwdriver, wire crimpers
Repaired power cord, brushes and replaced flange nuts
Removed half of the switch handle, Remove two screws from cord holder, removed the the cord wires from the switch, cut the cord leads to the correct length, had to locate two terminals to put on the end of the cord leads. Attached cord leads to switch.don't for get to put the old cord relief back onto the new cord. reattached the cord holder with the two screws. Then replace the handle half. For the brush set, I removed the brush caps, then removed the old brush set and installed the new set and the brush caps. I also replaced the inner and outer flanges, and the blade bolt.
Did you find this story helpful?
Thanks for voting and helping fellow customers!
1 of 1 people found this instruction helpful
Tool Type:
Circular Saw
Parts Used:
Repair Difficulty:
Medium
Time Spent Repairing:
30-60 minutes
Tools Used:
Screwdriver
Brother in law sawed through my power cord.
1. Started figuring it out.
2. Removed a couple more screws than necessary, removed the cover piece of shell.
3. Took a good look at how the damaged cord was attached.
4. Detached it.
5. Fed in the new cord, using the attaching rings from the old cord (wish the new cord came with those rings already attached.
6. Put the pieces back together.
7. Actually, I had to do two saws - one circular and one reciprocating, so I repeated this process. Despite them both being Makita, the routing and attachment process was different. A very pleasant couple of hours one evening.
Did you find this story helpful?
Thanks for voting and helping fellow customers!
1 of 1 people found this instruction helpful
Tool Type:
Circular Saw
Repair Difficulty:
Easy
Time Spent Repairing:
15-30 minutes
Tools Used:
Screwdriver
Needed new cord
Take off the handle, take off the cord holder, take off the cord wires to the switch.
Slide the new strain relieve onto the new cord. Cut the cord wires to the correct length. connect the cord wires to the switch. Screw the cord holder on. Screw the handle on.
Slide the new strain relieve onto the new cord. Cut the cord wires to the correct length. connect the cord wires to the switch. Screw the cord holder on. Screw the handle on.
Did you find this story helpful?
Thanks for voting and helping fellow customers!
1 of 1 people found this instruction helpful
Tool Type:
Impact Wrench
Parts Used:
Repair Difficulty:
Easy
Time Spent Repairing:
15-30 minutes
Tools Used:
Screwdriver
Power cord worn out
Remove on half of the switch handle
Remove the cord clamp
Disconnect the cord wires
Remove the cord relief from the old cord to the new cord
Connect the cord wires
Attach the cord clamp
Replace the handle half
Remove the cord clamp
Disconnect the cord wires
Remove the cord relief from the old cord to the new cord
Connect the cord wires
Attach the cord clamp
Replace the handle half
Did you find this story helpful?
Thanks for voting and helping fellow customers!
1 of 1 people found this instruction helpful
Tool Type:
Circular Saw
Repair Difficulty:
Easy
Time Spent Repairing:
15-30 minutes
Tools Used:
Screwdriver, Wire stripper and connectors.
Wire old, cracked and exposed.
Separated handle and trigger section. This required removal of 5 screws. This exposed the wire connections. Removed old wire. It had a wire connector, sleeve type from a previous repair. This had to be reconnected. Threaded the wire thru the rubber wire protector. Made all connections, reassembled and tested. I put this off for ages. I had tried to fix it with electrical tape. Doing it right is always best!
Did you find this story helpful?
Thanks for voting and helping fellow customers!
1 of 1 people found this instruction helpful
Tool Type:
Circular Saw
Repair Difficulty:
Easy
Time Spent Repairing:
15-30 minutes
Tools Used:
Screwdriver, Pliers, Nutdriver
Saw would not start
I already had removed my old parts while waiting for my new parts to arrive. There are 2 screws on the switch and 2 for the cord. Both parts were installed within 15 minutes. My favorite saw is new again.
Did you find this story helpful?
Thanks for voting and helping fellow customers!
show more
Reviews
44 Reviews
Average Rating (out of 5):
Click to filter by ratings:
5 stars
41
4 stars
2
3 stars
1
2 stars
0
1 stars
0
< PREV
- 1
- 2
- 3
Works as it should
Came in a timely manner, does not come with ends on cord. Had too get some
Guest -
September 12, 2023
Verified Purchase
Got the right parts.
I have never gotten the wromg part from this website. They ars a great resource and reliable. Helps me run my business with ease.
David -
August 12, 2023
Verified Purchase
Makita replacement parts
Cord worked perfectly
Guest -
August 1, 2023
Verified Purchase
Everything was exactly as promised, including timely delivery!
All good!
Guest -
May 24, 2023
Verified Purchase
Easy repair same as original part.
Arrived quickly
Guest -
May 10, 2023
Verified Purchase
Replacement power cord
Fast delivery and good price. Should have it installed shortly.
Guest -
March 6, 2023
Verified Purchase
Easy repair, correct part.
Power saw is fixed, don't have to worry about being electrocuted.
Gary -
December 17, 2022
Verified Purchase
Great Company
My Makita circular saw cord was shot after 15 years of work. Replacement cord was in shock, easy to order, reasonable price and fast delivery allowed me to get it back in action. Thank you!
Guest -
November 19, 2022
Verified Purchase
thanks
all parts arrived at once - four power tools have new life!
Guest -
July 28, 2022
Verified Purchase
Right part
This is a very old Makita saw that I love. I was glad to find original cord to fix it
Guest -
April 16, 2022
Verified Purchase
Verified Purchase
eReplacementParts Team
< PREV
- 1
- 2
- 3
Product Information
Repair Guides
![]()
Watch the Repair Video for
Power Cord
Articles:
|
This article contains tips and basic steps for replacing power cords for most types of power tools, machines, and other ...
September 18, 2009
|
|
Step-by-step instructions for removing and installing the power cord on your Makita angle drill....
February 27, 2018
|