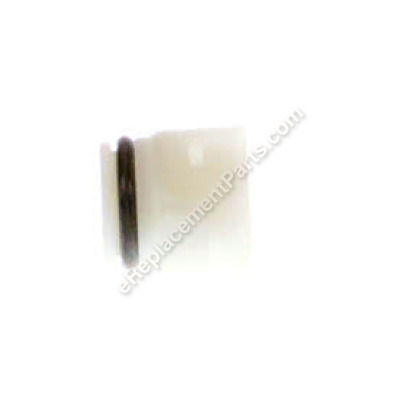
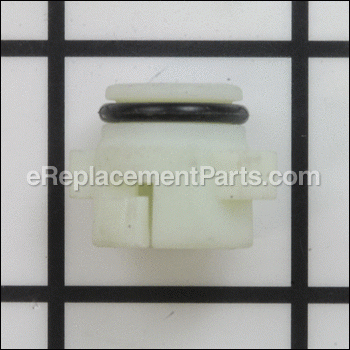


This cylinder head plug, also referred to as an outer valve plug, is a genuine OEM replacement part used in pressure washers. It is a plastic cap with one O-ring and locking tabs around the body for added security. It is used to seal the cylinder head to maintain the correct pressure levels, and to prevent water from escaping. Over time it is common for the plug to become brittle and break, or the locking tabs may wear down. If the plug is faulty it will need to be replaced to avoid leaking and uncontrolled spraying during operation. To remove the plug, twist it until the locking tabs disengage and pull it out. You may need to use a pair of pliers or a wrench to pry the plug out if there is a buildup of debris around the mounting hole. Each plug is sold individually.
Valve Plug 6.964-030.0
OEM part for: Karcher
Part Number: 6.964-030.0
Jump To:
Frequently Purchased Together ?

Compatibility
This part will fit the following 22 machines
Karcher
This item works with the following types of products:
- Pressure Washer Parts
This part replaces obsolete part #: 063-252, 4.132-009.0
Customer Part Reviews ?
- 1
Questions & Answers ?
Our customer Service team is at the ready daily to answer your part and product questions.

Ask our Team
We have a dedicated staff with decades of collective experience in helping customers just like you purchase parts to repair their products.
Does this fit my product?Questions & Answers for Valve Plug
Customer Repair Instructions ?
All our customer repair instructions are solicited directly from other customers just like you who have purchased and replaced this exact part.
Pressure washer leaks
Tool Type
Pressure Washer
Difficulty
Easy
Time
30-60 minutes
Tools Used
Screwdriver, Socket set, Torx long handle
Parts Used
Removed old plug, installed new plug.
Reassembled.
Easy repair, just needed to look at parts diagrams to determine fix.
Parts delivery was fast. Thanks
Locking tabs on plug broke. Plug with O- ring began to leak and valve did not function well relating to very low pressure.
Tool Type
Pressure Washer
Difficulty
Easy
Time
15-30 minutes
Tools Used
, 3/8 Allen wrench
Parts Used
Pump leaking under pressure
Tool Type
Pressure Washer
Difficulty
Easy
Time
Less than 15 minutes
Tools Used
Screwdriver, Pliers
Parts Used
Simply twist plugs a quarter turn to release then pull out with needle nose pliers. Reverse procedure to install new valves. From a scale of 1 to 10, 10 being difficult it was a 2.
Plastic plugs in pressure washer pump assembly cracked and failed causing a major leak.
Tool Type
Pressure Washer
Difficulty
Medium
Time
30-60 minutes
Tools Used
Screwdriver, Pliers, Wrench Set, Nutdriver, Allen wrench
Parts Used
Once they were removed, the power switch/starting capacitor housing assembly had to be removed with two torx head screws to obtain access to the failed plastic plugs.
The plugs have ears on them so that they are installed and retained with a classic "bayonet" style twist to lock in place feature.
I twisted the original ones to the right angular location, but had to use needle nose pliers to extract them from the bores that they are installed. This was quite difficult due to the years of crud buildup.
I lubricated the seals on the replacement parts and pressed them into the bores and twist and locked them into place. Then, I had to fight with the pump assembly to get it nested backing into the two housing halves properly and re-assembled the power switch and capacitor housing and the housing halves.
I got to take the housing apart again when I found out that the pump motor armature had frozen up from sitting unused so long.
I freed it, then re-assembled, then it worked.
Lost water pressure
Tool Type
Pressure Washer
Difficulty
Medium
Time
1-2 hours
Tools Used
Screwdriver, Socket set, Wrench Set
removed pump; disassembled to identify parts that needed to be replaced;
ordered parts and pump oil. cleaned all the pieces of the pump and readied them foe assembly.
received ordered parts; completed reassembly; machine works as it is supposed to.
plug was missing
Tool Type
Pressure Washer
Difficulty
Easy
Time
Less than 15 minutes
Tools Used
, Allen wrench
Parts Used
Plastic plug leaking
Tool Type
Pressure Washer
Difficulty
Easy
Time
30-60 minutes
Tools Used
Screwdriver, Pliers, Allen wrench
Parts Used
Leaking
Tool Type
Pressure Washer
Difficulty
Easy
Time
Less than 15 minutes
Tools Used
Socket set
Parts Used
OEM stands for Original Equipment Manufacturer and means the part you’re buying is sourced directly from the manufacturer who made your product. At eReplacementParts, we sell only genuine OEM parts, guaranteeing the part you’re purchasing is of better design and of higher quality than aftermarket parts.
Our product descriptions are a combination of data sourced directly from the manufacturers who made your product as well as content researched and curated by our content & customer service teams. This content is edited and reviewed internally before being made public to customers.
Our customer service team are at the ready daily to answer your part and product questions. We have a dedicated staff with decades of collective experience in helping customers just like you purchase parts to repair their products.
All our part reviews are solicited directly from other customers who have purchased this exact part. While we moderate these reviews for profanity, offensive language or personally identifiable information, these reviews are posted exactly as submitted and no alterations are made by our team.
All our customer repair instructions are solicited directly from other customers just like you who have purchased and replaced this exact part. While we moderate these reviews for profanity, offensive language or personally identifiable information, these reviews are posted exactly as submitted and no alterations are made by our team.
Based on data from past customer purchasing behaviors, these parts are most commonly purchased together along with the part you are viewing. These parts may be necessary or helpful to replace to complete your current repair.
All our installation videos are created and produced in collaboration with our in-house repair technician, Mark Sodja, who has helped millions of eReplacementParts customers over the last 13 years repair their products. Mark has years of experience in selling and repairing both commercial and residential products with a specialty in gas-powered equipment.
This data is collected from customers who submitted a repair instruction after replacing this exact part. Customers can rate how easy the repair was to complete and how long it took. We aggregate this data to provide a repair rating that allows customers to quickly determine the difficulty and time needed to perform their own repair.