


This is a genuine Porter Cable replacement part, it is sold individually.
Deteriorated O-rings that cause air leaks, a trigger valve that won’t fire, or a leaking cylinder seal or a Piston Stop, will prevents the gun from making a complete stroke.
You will notice the symptoms of this when the nails are not being driven into the material all the way.
You will need to tear down the nail gun and inspect this part to see if it is broken or has been worn down.
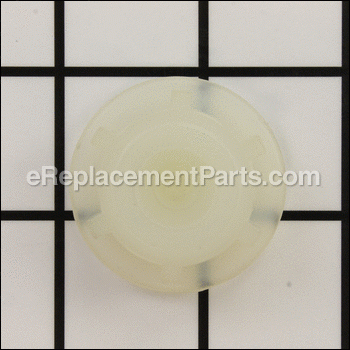
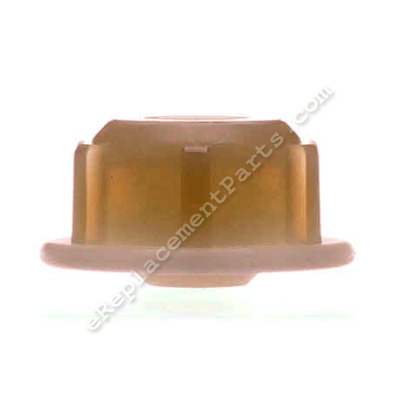
Piston Stop 886113
OEM part for: Porter Cable
Part Number: 886113
$25.84
In Stock
Jump To:
Product Description ?
- Classification: Part
- Weight: 0.01 lbs.
- Also Known As: Bumper
- Shipping: Ships Worldwide
Frequently Purchased Together ?


Compatibility
This part will fit the following 6 machines
Porter Cable
RN175 Type 1 Roofing Nailer View Diagrams & Manuals
RN175 Type 2 Roofing Nailer View Diagrams & Manuals
FN250A Finish Nailer View Diagrams & Manuals
NSS150 Super Narrow Crown 18 Gauge Stapler View Diagrams & Manuals
FN250A (Type 1) 2 1/2in Finish Nailer Power Tool View Diagrams & Manuals
NSS150 (Type 1) Super 1.5 Nc Stapler Power Tool View Diagrams & Manuals
Show More Compatible Models
This item works with the following types of products:
- Nailer Parts
- Stapler Parts
Customer Part Reviews ?
Average Rating (out of 5):
Click to filter by ratings:
5 stars
37
4 stars
1
3 stars
1
2 stars
0
1 stars
0
< PREV
- 1
- 2
- 3
Easy order and delivery
Exactly the parts I needed. Easy to find on their hyperlinked parts diagrams, select, order, and deliver. Perfect
Paul -
June 27, 2023
Verified Purchase
Saved over $100
A simple part and repair saved me over $150 by fixing rather than replacing my finish nailer. The exploded diagrams are a big help in diagnosing what needs to be ordered and replaced.
William -
March 17, 2023
Verified Purchase
great
arrived quicker than expected and worked great. thanks
Guest -
February 27, 2023
Verified Purchase
Great experience!
The wrong part was delivered either By my mistake or someone from ereplacementparts.com, but it was easy to return and get the right part needed. Every-time I call to place an order, the call taker is very cordial and knowledgeable and makes the experience enjoyable. I like doing business with your company!
Guest -
January 11, 2023
Verified Purchase
Easy Repair
Part ordered and recived was correct and easy to install.
Raul -
August 10, 2022
Verified Purchase
Air Nailer Repair
Your parts diagram made identification of the piston stop I needed easy. Thanks
Guest -
July 23, 2022
Verified Purchase
Great service
The part was shipped the same day and arrived quickly. Easy to install.
Guest -
January 7, 2022
Verified Purchase
Good job
Good part, came in a timely manner, fixed my problem!!
iGlobal -
September 14, 2021
Verified Purchase
Excellent experience
Part was exactly what was needed. Fit perfectly. Easy repair. Great price and fast delivery. Thanks!
Guest -
September 3, 2021
Verified Purchase
Finish nailer repair. it fit perfectly.
Part arrived quickly, fit perfectly and nail gun works like new. A five minute repair.
Paul -
July 30, 2021
Verified Purchase
t
t
t -
t days ago
Verified Purchase
eReplacementParts Team
t
Questions & Answers ?
Our customer Service team is at the ready daily to answer your part and product questions.

Ask our Team
We have a dedicated staff with decades of collective experience in helping customers just like you purchase parts to repair their products.
Does this fit my product?Questions & Answers for Piston Stop
How to reassemble head replacing piston stop? Thanks
Jobn
for model number Fn250a
asked on 2023-11-30
Hi John,
Thank you for your question. Here is a link to one of our YouTube videos that you may reference for information on how to install the piston stop, https://www.youtube.com/watch?v=BITWsVZ3KVI. The nail gun in the video may not be the same as yours, but it will give you a general idea on how to install the part. We hope this helps!
eReplacementParts Team November 30, 2023
Customer Repair Instructions ?
All our customer repair instructions are solicited directly from other customers just like you who have purchased and replaced this exact part.
Not shooting nails
Paul - February 15, 2016
👍 36 of 38 people found this instruction helpful
Tool Type
Nailer
Difficulty
Easy
Time
15-30 minutes
Tools Used
Wrench Set, Allen wrench
Parts Used
Removed the bolts holding the top cap. When I removed the top cap, I found that the piston bumper was broken. I then cleaned out the all the broken pieces.. I then installed the new bumper, replaced the the top cap. Now the gun works great.
Did you find this story helpful?
Thanks for voting and helping fellow customers!
Porter Cable finish nailer was missing every other nail, and then every nail. Took it apart and piston bumper was falling apart.
Fred - February 8, 2016
👍 17 of 17 people found this instruction helpful
Tool Type
Nailer
Difficulty
Easy
Time
15-30 minutes
Tools Used
Wrench Set
Clean all the pieces out from the broken piston bumper, and clean muffler. Install new bumper, make sure when installing top portion of piston not to dislodge o-ring, I did and it leaked air when I put it back together, took back apart and saw it had pulled out, just take time and align piston when installing, goes in easy and properly. Put back together, and shooting like new. Hope this helps anyone.
Did you find this story helpful?
Thanks for voting and helping fellow customers!
Piston stop was destroyed so nail gun wouldn't fire.
Wayne - May 23, 2016
👍 13 of 14 people found this instruction helpful
Tool Type
Nailer
Difficulty
Easy
Time
15-30 minutes
Tools Used
, Allen wrench
Parts Used
Remove the four bolts that hold the cylinder cap on, and remove the cap. Clean out all of the pieces of the broken piston stop. Then install the new piston stop. Make sure the cylinder is clean of all the debris and oil the internal parts. Then install the cylinder cap.
Did you find this story helpful?
Thanks for voting and helping fellow customers!
FN250 was not returning driver all the way up.
Jay - March 16, 2016
👍 10 of 11 people found this instruction helpful
Tool Type
Nailer
Difficulty
Easy
Time
15-30 minutes
Tools Used
, Allen wrench
Parts Used
Broke open the gun head and cleaned out the broken bumper pieces, cleaned moving parts, installed new bumper. Installed new gasket and replaced gun head. Checked operation, total work time: 25 Minutes.
Did you find this story helpful?
Thanks for voting and helping fellow customers!
Pneumatic nailer intermittent fire, sticking.
Bill - February 28, 2016
👍 7 of 8 people found this instruction helpful
Tool Type
Nailer
Difficulty
Medium
Time
1-2 hours
Tools Used
Wrench Set, Allen Wrenches, Needlenose Pliers, Air Tool Lubricant.
In addition to a new piston bumper and manifold gasket I installed an O-ring kit. I started with the firing mechanism valve assembly which unscrews from the body using a box wrench. I cleaned the valve and fitted new O-rings the lubricated and reinstalled. When there was still a problem I disassembled further and found that the piston bumper had been dissolved after someone had tried to clean the tool with solvent. I removed the manifold cap, piston and cylinder and flushed the unit with WD-40. I wiped and dried all pieces then lubricated all O-rings and reassembled. The most important thing to remember is to properly reinstall the neoprene band that covers the small holes in the middle of the cylinder. The band acts as a one-way valve allowing the pressure charge to vent into the outer cylinder chamber where it then forces the piston back up completing the firing cycle. Everything else is step by step except for the band since it will slide out of position during disassembly and unless you know where it goes back your tool will fail to cycle. A little study and you can figure it out if you don't know.
Did you find this story helpful?
Thanks for voting and helping fellow customers!
No fire / air leak
Tim - May 3, 2017
👍 2 of 2 people found this instruction helpful
Tool Type
Nailer
Difficulty
Easy
Time
Less than 15 minutes
Tools Used
, Allen wrench
Parts Used
Remove head, install piston stop and gasket
Did you find this story helpful?
Thanks for voting and helping fellow customers!
Nailed quit working - driver would not retract.
Dennis - April 27, 2017
👍 2 of 2 people found this instruction helpful
Tool Type
Nailer
Difficulty
Easy
Time
Less than 15 minutes
Tools Used
, Allen wrench
Parts Used
Disassembled nailer - saw that a nylon part had broken into several picked - ordered replacement part - cleaned and reassembled with new part - works fine.
Did you find this story helpful?
Thanks for voting and helping fellow customers!
The bumper that stops the upward movement of the piston broke apart
Jerry - May 16, 2016
👍 4 of 6 people found this instruction helpful
Tool Type
Nailer
Difficulty
Easy
Time
15-30 minutes
Tools Used
Screwdriver
Parts Used
I removed the top cap of the nail gun. Then I cleaned out every darned piece of that broken piston stop. Installed the new one, and oiled it all up. And put the top cap back on. Works like a charm now.
Did you find this story helpful?
Thanks for voting and helping fellow customers!
Wouldn't fire nails.
Edward - June 14, 2017
👍 1 of 1 people found this instruction helpful
Tool Type
Nailer
Difficulty
Easy
Time
Less than 15 minutes
Tools Used
Wrench Set
Parts Used
1. Removed the top cover.
2. Removed the broken stop.
3. Used assembly diagram to reinstall parts.
4. Secured the cover.
2. Removed the broken stop.
3. Used assembly diagram to reinstall parts.
4. Secured the cover.
Did you find this story helpful?
Thanks for voting and helping fellow customers!
Piston stop is made of plastic and it broke into little pieces keeping the piston from moving
Dennis - May 15, 2017
👍 1 of 1 people found this instruction helpful
Tool Type
Nailer
Difficulty
Easy
Time
Less than 15 minutes
Tools Used
Wrench Set
Parts Used
1. Took the top of the nail gun off (4 screws).
2. Clean out the old piston stop.
3. Dropped in the new one.
4. Reinstalled the top.
2. Clean out the old piston stop.
3. Dropped in the new one.
4. Reinstalled the top.
Did you find this story helpful?
Thanks for voting and helping fellow customers!
Load More Install Stories
OEM stands for Original Equipment Manufacturer and means the part you’re buying is sourced directly from the manufacturer who made your product. At eReplacementParts, we sell only genuine OEM parts, guaranteeing the part you’re purchasing is of better design and of higher quality than aftermarket parts.
Our product descriptions are a combination of data sourced directly from the manufacturers who made your product as well as content researched and curated by our content & customer service teams. This content is edited and reviewed internally before being made public to customers.
Our customer service team are at the ready daily to answer your part and product questions. We have a dedicated staff with decades of collective experience in helping customers just like you purchase parts to repair their products.
All our part reviews are solicited directly from other customers who have purchased this exact part. While we moderate these reviews for profanity, offensive language or personally identifiable information, these reviews are posted exactly as submitted and no alterations are made by our team.
All our customer repair instructions are solicited directly from other customers just like you who have purchased and replaced this exact part. While we moderate these reviews for profanity, offensive language or personally identifiable information, these reviews are posted exactly as submitted and no alterations are made by our team.
Based on data from past customer purchasing behaviors, these parts are most commonly purchased together along with the part you are viewing. These parts may be necessary or helpful to replace to complete your current repair.
All our installation videos are created and produced in collaboration with our in-house repair technician, Mark Sodja, who has helped millions of eReplacementParts customers over the last 13 years repair their products. Mark has years of experience in selling and repairing both commercial and residential products with a specialty in gas-powered equipment.
This data is collected from customers who submitted a repair instruction after replacing this exact part. Customers can rate how easy the repair was to complete and how long it took. We aggregate this data to provide a repair rating that allows customers to quickly determine the difficulty and time needed to perform their own repair.