
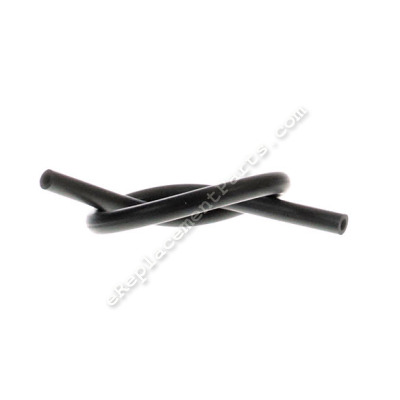


This is a genuine OEM replacement part designed for use with gas trimmers/blowers. The fuel line is what delivers the fuel from the fuel tank into the carburetor. When you press the primer bulb, it will purge all the air out of the carburetor and fill its chambers with fuel. The excess fuel is then forced back into the tank through the return line. Over time these lines will become brittle and may crack, and will have to be replaced. This item is made out of rubber and it is sold individually.
Fuel Line V471001231
OEM part for: Echo, Little Wonder, Shindaiwa
Part Number: V471001231
$5.45
In Stock
Jump To:
Frequently Purchased Together ?


Compatibility
This part will fit the following 132 machines
Echo
PB-265L (09001001-09999999) Backpack Blower View Diagrams & Manuals
PB-265L (P06313001001-P06313999999) Backpack Blower View Diagrams & Manuals
PB-265L (P07811001001-P07811999999) Backpack Blower View Diagrams & Manuals
PB-265L (P09312001001-P09312999999) Backpack Blower View Diagrams & Manuals
SRM-225i (S54911001001 - S45911999999) Straight Shaft Trimmer / Brushcutter View Diagrams & Manuals
SRM-225 (S03912001001 - S03912999999) Straight Shaft Trimmer / Brushcutter View Diagrams & Manuals
SRM-225i (S55013001001 - S55013999999) Straight Shaft Trimmer / Brushcutter View Diagrams & Manuals
SRM-225 (S04011001001 - S04011999999) Straight Shaft Trimmer / Brushcutter View Diagrams & Manuals
SRM-225SB (S79312001001 - S79312999999) Straight Shaft Trimmer / Brushcutter View Diagrams & Manuals
SRM-225U (S79012001001 - S79012999999) Straight Shaft Trimmer / Brushcutter View Diagrams & Manuals
SRM-225 (S04113001001 - S04113999999) Straight Shaft Trimmer / Brushcutter View Diagrams & Manuals
SRM-225SB (S79411001001 - S79411999999) Straight Shaft Trimmer / Brushcutter View Diagrams & Manuals
SRM-225U (S79111001001 - S79111999999) Straight Shaft Trimmer / Brushcutter View Diagrams & Manuals
SRM-225i (S08712001001 - S08712999999) Straight Shaft Trimmer / Brushcutter View Diagrams & Manuals
SRM-225SB (S79513001001 - S79513999999) Straight Shaft Trimmer / Brushcutter View Diagrams & Manuals
SRM-225U (S79213001001 - S79213999999) Straight Shaft Trimmer / Brushcutter View Diagrams & Manuals
TC-2100 (Type 1E) (001001 - 999999) Tiller Cultivator View Diagrams & Manuals
TC-2100 (Type 1E) (023313-999999, Canada - 018677-999999) Tiller Cultivator View Diagrams & Manuals
TC-210i (05001001 - 05999999) Tiller Cultivator View Diagrams & Manuals
TC-210I (07001001 - 07999999) Tiller Cultivator View Diagrams & Manuals
TC-210I (09001001 - 09999999) Tiller Cultivator View Diagrams & Manuals
TC-210i (10001001 - 10999999) Tiller Cultivator View Diagrams & Manuals
TC-210 (E13912001001 - E13912999999) Tiller Cultivator View Diagrams & Manuals
TC-210 (E14013001001 - E14013999999) Tiller Cultivator View Diagrams & Manuals
TC-210 (05001001 - 05999999) Tiller Cultivator View Diagrams & Manuals
TC-210 (07001001 - 07999999) Tiller Cultivator View Diagrams & Manuals
PE-225 (S78611001001 - S78611999999) Edger View Diagrams & Manuals
PE-225 (S78712001001 - S78712999999) Edger View Diagrams & Manuals
PE-225 (S78813001001 - S78813999999) Edger View Diagrams & Manuals
PB-2400 (Type 1) (After S/N 001001) Handheld Blower View Diagrams & Manuals
PB-2400 (Type 1E) (After S/N 001001) Handheld Blower View Diagrams & Manuals
PB-24LN (Type 1) (S/N 001001) Handheld Blower View Diagrams & Manuals
PB-24LN (Type 1E) (After S/N 001001) Handheld Blower View Diagrams & Manuals
CS-271T 26.9cc Top Handle Chainsaw View Diagrams & Manuals
GT-225 (S09812001001-S09812999999) 21.2cc Curved Shaft Trimmer View Diagrams & Manuals
ES-250 (P33612001001-P33612999999) 25.4 cc Shred 'N' Vac View Diagrams & Manuals
ES-250 (P33711001001-P33711999999) 25.4 cc Shred 'N' Vac View Diagrams & Manuals
ES-250 (P33813001001-P33813999999) 25.4 cc Shred 'N' Vac View Diagrams & Manuals
GT-225 (S09313001001-S09313999999) 21.2 cc Curved Shaft Trimmer View Diagrams & Manuals
GT-225 (S09911001001-S09911999999) 21.2 cc Curved Shaft Trimmer View Diagrams & Manuals
GT-225 (S53912001001-S53912999999) 21.2 cc Curved Shaft Trimmer View Diagrams & Manuals
GT-225 (S08612001001-S08612999999) 21.2 cc Curved Shaft Trimmer View Diagrams & Manuals
GT-225I (S08612001001-S08612999999) 21.2 cc Curved Shaft Trimmer View Diagrams & Manuals
GT-225I (S54711001001-S54711999999) 21.2 cc Curved Shaft Trimmer View Diagrams & Manuals
GT-225I (S54813001001-S54813999999) 21.2 cc Curved Shaft Trimmer View Diagrams & Manuals
PAS-225 (S59511001001-S59511003000) Gas Power Source Attachement View Diagrams & Manuals
PAS-225 (S59511003001-S59511999999) Gas Power Source Attachement View Diagrams & Manuals
PAS-225 (S59612001001-S59612022000) Gas Power Source Attachement View Diagrams & Manuals
PAS-225 (S59612022001-S59612999999) Gas Power Source Attachement View Diagrams & Manuals
PAS-225 (S86813001001-S86813999999) Gas Power Source Attachement View Diagrams & Manuals
PB-250 (P33211001001-P33211999999) Handheld Blower View Diagrams & Manuals
PB-252 (P35620001001-P35620999999) Handheld Blower View Diagrams & Manuals
TC-2100 (Type 1 S/N: 001001-999999) Tiller/Cultivator View Diagrams & Manuals
PAS-225VP (S59612001001 - S59612022000) Gas Power Source Attachment View Diagrams & Manuals
PAS-225VPB (S59511003001 - S59511017000) Gas Power Source Attachment View Diagrams & Manuals
PAS-225VPB (S59612022001 - S59612117000) Gas Power Source Attachment View Diagrams & Manuals
PAS-225VPB (S86813001001 - S86813012000) Gas Power Source Attachment View Diagrams & Manuals
SRM-225 (S89312001001 - S89312013423) Straight Shaft Trimmer / Brushcutter View Diagrams & Manuals
PB-265LN (P38426001001 - P38426999999) Low Noise Backpack Blower View Diagrams & Manuals
CS-271T (C21112001001 - C21112999999) 26.9cc Top Handle Chain Saw View Diagrams & Manuals
CS-271T (C21211001001 - C21211999999) 26.9cc Top Handle Chain Saw View Diagrams & Manuals
CS-271T (C21313001001 - C21313999999) 26.9cc Top Handle Chain Saw View Diagrams & Manuals
ES-252 (P39726001001-P39726999999) Echo Shred N Vac Shredder/Vacuum View Diagrams & Manuals
ES-252 (P39826001001-P39826999999) Echo Shred N Vac Shredder/Vacuum View Diagrams & Manuals
PB-8010H (P48715001001-P48715999999) Blowers Backpack (Pb) View Diagrams & Manuals
PB-8010H (P49415001001-P49415999999) Blowers Backpack (Pb) View Diagrams & Manuals
PB-8010H (P52315001001-P52315999999) Blowers Backpack (Pb) View Diagrams & Manuals
PB-8010T (P48615001001-P48615999999) Blowers Backpack (Pb) View Diagrams & Manuals
PB-8010T (P49515001001-P49515999999) Blowers Backpack (Pb) View Diagrams & Manuals
PB-8010T (P52415001001-P52415999999) Blowers Backpack (Pb) View Diagrams & Manuals
SV-5H (2)(36001001-36999999) O. E. M. Little Wonder (Sv) View Diagrams & Manuals
SV-5H (2)(E15012001001-E15012999999) O. E. M. Little Wonder (Sv) View Diagrams & Manuals
SRM-4510 (U23720001001-U23720999999) Straight Shaft Trimmer Brushcutter (Srm) View Diagrams & Manuals
SV-4 Engine Lawn Equipment View Diagrams & Manuals
SV-4A Engine Lawn Equipment View Diagrams & Manuals
SV-4B (1)(001001-999999) Engine Lawn Equipment View Diagrams & Manuals
SV-4B (1E) Engine Lawn Equipment View Diagrams & Manuals
SV-5C (05001001-05999999) Engine Lawn Equipment View Diagrams & Manuals
SV-5C (08001001-08999999) Engine Lawn Equipment View Diagrams & Manuals
SV-5C (09001001-09999999) Engine Lawn Equipment View Diagrams & Manuals
SV-5C (10001001-10999999) Engine Lawn Equipment View Diagrams & Manuals
SV-5C (E14112001001-E14112999999) Engine Lawn Equipment View Diagrams & Manuals
SV-5C (E14112001001-E141129999999) Engine Lawn Equipment View Diagrams & Manuals
SV-5Ci (05001001-05999999) Engine Lawn Equipment View Diagrams & Manuals
SV-5Ci (E14912001001-E14912999999) Engine Lawn Equipment View Diagrams & Manuals
SV-5Ci (E14912001001-E149129999999) Engine Lawn Equipment View Diagrams & Manuals
SV-5H (05001001-05999999) Engine Lawn Equipment View Diagrams & Manuals
SV-5H (09001001-09999999) Engine Lawn Equipment View Diagrams & Manuals
SV-6 (35001001-35999999) Engine Lawn Equipment View Diagrams & Manuals
SV-6 (36001001-36999999) Engine Lawn Equipment View Diagrams & Manuals
GT-225 (S5392001001-S53912999999) Trimmer Lawn Equipment View Diagrams & Manuals
SRM-225 (S89312001001-S89312999999) Trimmer Lawn Equipment View Diagrams & Manuals
SRM-225i (S54911001001-S54911999999) Trimmer Lawn Equipment View Diagrams & Manuals
TC-210 (E14712001001-E14712999999) Tiller Cultivator Lawn Equipment View Diagrams & Manuals
TC-210 (E14813001001-E14813999999) Tiller Cultivator Lawn Equipment View Diagrams & Manuals
TC-2100 (1)(001001-999999) Tiller Cultivator Lawn Equipment View Diagrams & Manuals
PAS-225 (S59511001001-S59511999999) Pas Series Powerhead Lawn Equipment View Diagrams & Manuals
PAS-225 (S59612001001-S59612999999) Pas Series Powerhead Lawn Equipment View Diagrams & Manuals
PB-9010H (P53315001001-P53315999999) Backpack Blower Lawn Equipment View Diagrams & Manuals
PB-9010T (P53415001001-P53415999999) Backpack Blower Lawn Equipment View Diagrams & Manuals
PB-250 (P36826001001-P36826999999) Handheld Blower Lawn Equipment View Diagrams & Manuals
PB-252 (P35720001001-P35720999999) Handheld Blower Lawn Equipment View Diagrams & Manuals
Little Wonder
SV-4A View Diagrams & Manuals
SV-4B View Diagrams & Manuals
SV-5C (05001001-05999999) View Diagrams & Manuals
SV-5C/1 (08001001-08999999) View Diagrams & Manuals
SV-5C/2 (09001001-09999999) View Diagrams & Manuals
SV-5C/2 (10001001-10999999) View Diagrams & Manuals
SV-5C/2 (E14112001001-E141129999999) View Diagrams & Manuals
SV-5CI (05001001-05999999) View Diagrams & Manuals
SV-5H/2 (05001001-05999999) View Diagrams & Manuals
SV-5H/2 (09001001-09999999) View Diagrams & Manuals
SV-6 (35001001-35999999) View Diagrams & Manuals
SV-6/1 (36001001-36999999) View Diagrams & Manuals
SV-6/2 (36001001-36999999) View Diagrams & Manuals
6040 Mantis Edger View Diagrams & Manuals
2230S Gas Hedge Trimmer View Diagrams & Manuals
2242S Gas Hedge Trimmer View Diagrams & Manuals
2216D Gas Hedge Trimmer View Diagrams & Manuals
2224D Gas Hedge Trimmer View Diagrams & Manuals
2230D Gas Hedge Trimmer View Diagrams & Manuals
2119 Gas Hedge Trimmer View Diagrams & Manuals
2124 Gas Hedge Trimmer View Diagrams & Manuals
2130 Gas Hedge Trimmer View Diagrams & Manuals
Shindaiwa
EB810 (P51915001001-P51915999999) Blowers Backpack View Diagrams & Manuals
EB810 (P52515001001-P52515999999) Blowers Backpack View Diagrams & Manuals
EB810RT (P52015001001-P52015999999) Blowers Backpack View Diagrams & Manuals
EB810RT (P52615001001-P52615999999) Blowers Backpack View Diagrams & Manuals
B451 (U23820001001-U23820999999) Brushcutters (B) View Diagrams & Manuals
EB910 (P53515001001-P53515999999) Backpack Blower View Diagrams & Manuals
EB910RT (P53615001001-P53615999999) Backpack Blower View Diagrams & Manuals
Show More Compatible Models
This item works with the following types of products:
- Blower Parts
- Trimmer Parts
- Cultivator Parts
- Edger Parts
- Chain Saw Parts
- Saw Parts
- Vacuum Parts
- Hedge Trimmer Parts
This part replaces obsolete part #: V471001230, 13201011520
Repair Videos ?
Watch the Repair Video for
Fuel Line

Articles:
|
Step-by-step instructions for replacing the incoming fuel pipe on an Echo SRM-225 trimmer....
May 22, 2015
|

|
Filthy Filters? This article will show you how to install a filter kit on an Echo SRM-225 trimmer....
May 27, 2015
|

Customer Part Reviews ?
Average Rating (out of 5):
Click to filter by ratings:
5 stars
4
4 stars
0
3 stars
0
2 stars
0
1 stars
0
< PREV
- 1
As expected. Fast delivery, accurate parts.
I especially appreciated the repair videos. They made the job easy.
David -
October 14, 2020
Verified Purchase
Ordered new fuel lines filter and grommet. All fit perfectly!!
Ordered new fuel lines filter and grommet. All fit perfectly!!
Guest -
September 21, 2020
Verified Purchase
Hi easy replacement. Looked up my machine then looked up all the proper parts. All fit perfectly.
All parts were very easy to look up. All parts fit perfectly, very pleased.
DB
Guest -
September 10, 2020
Verified Purchase
Worked as expected.
Part was the correct part. Came on time. No issues. No more leaks!
Guest -
June 17, 2020
Verified Purchase
t
t
t -
t days ago
Verified Purchase
eReplacementParts Team
t
Questions & Answers ?
Our customer Service team is at the ready daily to answer your part and product questions.

Ask our Team
We have a dedicated staff with decades of collective experience in helping customers just like you purchase parts to repair their products.
Does this fit my product?Questions & Answers for Fuel Line
No questions have been asked yet
Customer Repair Instructions ?
All our customer repair instructions are solicited directly from other customers just like you who have purchased and replaced this exact part.
Had a fuel leak, plus deteriorating lines
Felipe - March 25, 2017
👍 2 of 2 people found this instruction helpful
Tool Type
Trimmer
Difficulty
Medium
Time
Less than 15 minutes
Tools Used
Screwdriver, Pliers, elbow grease ;) *wink*
I watched your YouTube tutorials. They were very helpful and easy to follow, thanks!
Did you find this story helpful?
Thanks for voting and helping fellow customers!
Fuel line somehow broke and could not draw fuel. It appears there may have been an issue with the factory installed system
Jim - July 12, 2018
Tool Type
Trimmer
Difficulty
Easy
Time
15-30 minutes
Tools Used
Screwdriver, Nutdriver
Took the fuel tank off, dumped out the broken part, released the line from the tank using the grommet and installed the new equipment.
Did you find this story helpful?
Thanks for voting and helping fellow customers!
Fuel line was leaking.
Britt - May 16, 2018
Tool Type
Trimmer
Difficulty
Easy
Time
1-2 hours
Tools Used
Screwdriver, Pliers
1. Remove all fuel from fuel tank.
2. Remove screws holding fuel tank to trimmer chassis.
3. Pull off fuel supply and return lines from carburetor.
4. Remove plug from fuel tank.
5. Replace fuel lines and filter.
6. Install fuel line plug back into fuel tank. Use a lubricant to make installation easier.
7. Reconnect fuel and fuel return lines to carburetor.
8. Secure fuel tank using original fasteners.
9. Remove primer bulb retaining screws.
10. Replace primer bulb and reconnect to carburetor.
Did you find this story helpful?
Thanks for voting and helping fellow customers!
Fuel tank cracked, filter disolved
Charles - April 11, 2018
Tool Type
Cultivator
Difficulty
Easy
Time
15-30 minutes
Tools Used
Screwdriver, Pliers
As noted by others, grommet does not fit the new tank. It is too small for the hole.
You need to find a larger grommet that does fit, or use a rubber cork with a hole in it.
1. Remove three screws holding tank to engine
2. Remove fuel hose from carburetor
3. Remove fuel cap and save. Discard old tank (with hose and filter inside)
4. Slide clip over hose about 1/4 inch from one end
5. Insert filter into end of hose
6 Slide clip over the hose where filter is inserted
7. Slide grommet over the over end of the hose. Be sure that orientation is correct (small end towards filter. Position grommet approximately 2 inches from end of hose.
8. Insert filter end of hose into the new tank
9. Do NOT insert grommet at this time.
10. Attach tank to engine with the three screws.
11. Attach end of hoe to carburetor
12 Hold grommet against the hole in tank. Make sure that the hose is not stretched or kinked. Adjust the length of the hose until there are 2 smooth curves in it.
13 Insert grommet into the tank. Ensure that is seats completely.
14 Fill tank part way with clean fuel and tilt the engine until the grommet is covered by the fuel. Check for leaks around grommet and carburetor connection.
Did you find this story helpful?
Thanks for voting and helping fellow customers!
Leaking fuel / maintenance
Reid - March 20, 2018
Tool Type
Trimmer
Difficulty
Easy
Time
15-30 minutes
Tools Used
Screwdriver, Pliers
Removed old fuel lines,, replaced the same way they came off. Grommet was the only part that was a little difficult to get in the tank, put some grease on it and get one side started and roll it in with a screw driver tip.
Did you find this story helpful?
Thanks for voting and helping fellow customers!
In need of new fuel tank and fuel line grommet grommet. Original Mantis SV-4
Bill - March 10, 2018
Tool Type
Cultivator
Difficulty
Easy
Time
15-30 minutes
Tools Used
Nutdriver, Knife
Purchased fuel tank, 13100511521. Tank is sourced directly from manufacturer so everything was identical to original tank except that they have increased the size of the fuel outlet hole to match their newer models.
If your making the same repair/replacement be aware that the fuel grommet being sold to match the tank (13211504920) WILL NOT WORK, they are too small for the tank outlet. If you have already bought the wrong grommet use a short piece of 3/8" ID X 5/8" OD fuel line about an inch long, to stick in the hole. Your fuel grommet will fit tight inside of this line with no leaks. Make sure the 1" piece is for fuel and made of the old fashioned nitrile rubber.
If your making the same repair/replacement be aware that the fuel grommet being sold to match the tank (13211504920) WILL NOT WORK, they are too small for the tank outlet. If you have already bought the wrong grommet use a short piece of 3/8" ID X 5/8" OD fuel line about an inch long, to stick in the hole. Your fuel grommet will fit tight inside of this line with no leaks. Make sure the 1" piece is for fuel and made of the old fashioned nitrile rubber.
Did you find this story helpful?
Thanks for voting and helping fellow customers!
Leaking gas and needed a general servicing
Paddy - November 21, 2017
Tool Type
Blower
Difficulty
Easy
Time
30-60 minutes
Tools Used
Pliers
Removed all parts to be replaced, cleaned area and replaced with new parts
take your time not to damage anything and you will be good to go
take your time not to damage anything and you will be good to go
Did you find this story helpful?
Thanks for voting and helping fellow customers!
Fuel line cracked
Thomas - August 5, 2017
Tool Type
Edger
Difficulty
Easy
Time
15-30 minutes
Tools Used
Screwdriver, Pliers
Parts Used
Removed gas tank
Removed and replaced gas line, filter and grommet
Installed new fuel line, attached to old filter,
Inserted lines into grommet
Installed grommet into tank
Reinstalled tank
Attached lines to carburetor
Pulled the cord and off it ran
Removed and replaced gas line, filter and grommet
Installed new fuel line, attached to old filter,
Inserted lines into grommet
Installed grommet into tank
Reinstalled tank
Attached lines to carburetor
Pulled the cord and off it ran
Did you find this story helpful?
Thanks for voting and helping fellow customers!
Fuel leak and hard to start
Daniel - June 29, 2017
Tool Type
Trimmer
Difficulty
Easy
Time
15-30 minutes
Tools Used
Screwdriver, Pliers
Cleaned carburetor and grommet area
Removed old parts
Installed new parts
Refilled fuel
Started trimmer
Removed old parts
Installed new parts
Refilled fuel
Started trimmer
Did you find this story helpful?
Thanks for voting and helping fellow customers!
Tiller would not rev up after starting.
Jack - July 6, 2016
Tool Type
Cultivator
Difficulty
Easy
Time
30-60 minutes
Tools Used
Screwdriver, Pliers, Wrench Set, Spark plug socket
1. Installed the new gas filter inside the tank.
2. Installed new gas line and the grommet on the tank.
3. Rebuilt carburetor with the kit.
4. installed new spark plug
Ran well after installing the above parts.
2. Installed new gas line and the grommet on the tank.
3. Rebuilt carburetor with the kit.
4. installed new spark plug
Ran well after installing the above parts.
Did you find this story helpful?
Thanks for voting and helping fellow customers!
OEM stands for Original Equipment Manufacturer and means the part you’re buying is sourced directly from the manufacturer who made your product. At eReplacementParts, we sell only genuine OEM parts, guaranteeing the part you’re purchasing is of better design and of higher quality than aftermarket parts.
Our product descriptions are a combination of data sourced directly from the manufacturers who made your product as well as content researched and curated by our content & customer service teams. This content is edited and reviewed internally before being made public to customers.
Our customer service team are at the ready daily to answer your part and product questions. We have a dedicated staff with decades of collective experience in helping customers just like you purchase parts to repair their products.
All our part reviews are solicited directly from other customers who have purchased this exact part. While we moderate these reviews for profanity, offensive language or personally identifiable information, these reviews are posted exactly as submitted and no alterations are made by our team.
All our customer repair instructions are solicited directly from other customers just like you who have purchased and replaced this exact part. While we moderate these reviews for profanity, offensive language or personally identifiable information, these reviews are posted exactly as submitted and no alterations are made by our team.
Based on data from past customer purchasing behaviors, these parts are most commonly purchased together along with the part you are viewing. These parts may be necessary or helpful to replace to complete your current repair.
All our installation videos are created and produced in collaboration with our in-house repair technician, Mark Sodja, who has helped millions of eReplacementParts customers over the last 13 years repair their products. Mark has years of experience in selling and repairing both commercial and residential products with a specialty in gas-powered equipment.
This data is collected from customers who submitted a repair instruction after replacing this exact part. Customers can rate how easy the repair was to complete and how long it took. We aggregate this data to provide a repair rating that allows customers to quickly determine the difficulty and time needed to perform their own repair.