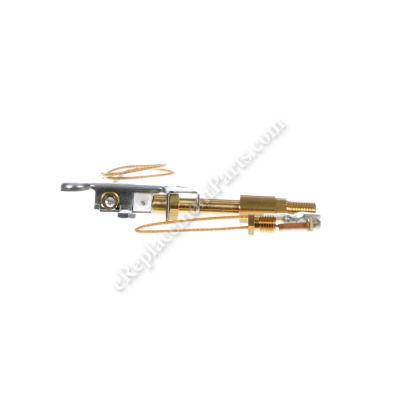
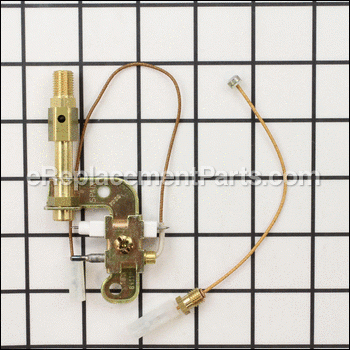
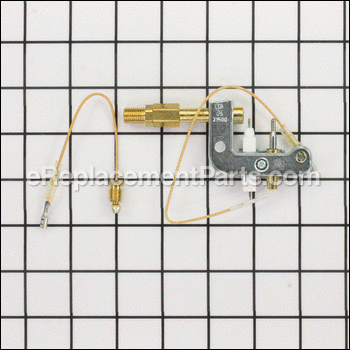
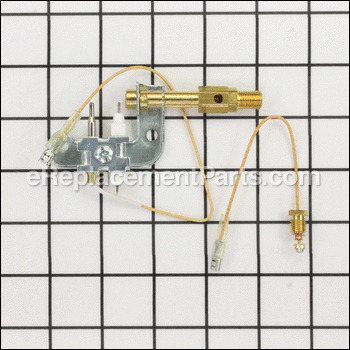


Includes Thermocouple.
Pilot Assembly 73404
OEM part for: Mr. Heater
Part Number: 73404
$29.76
In Stock
Compatibility
This item works with the following types of products:
- Heater Parts
This part replaces obsolete part #: ENE 73404, E73404
Customer Part Reviews ?
Average Rating (out of 5):
Click to filter by ratings:
5 stars
1
4 stars
0
3 stars
0
2 stars
0
1 stars
0
< PREV
- 1
Great part. Worked better than expected
The part arrived within 5 days of ordering. Fit perfectly. I think the unit lit faster than when it was new.
Guest -
December 12, 2022
Verified Purchase
t
t
t -
t days ago
Verified Purchase
eReplacementParts Team
t
Questions & Answers ?
Our customer Service team is at the ready daily to answer your part and product questions.

Ask our Team
We have a dedicated staff with decades of collective experience in helping customers just like you purchase parts to repair their products.
Does this fit my product?Questions & Answers for Pilot Assembly
IT'S TWO YEAR OLD IT LIGHTS GO'G FOR ABOUT A MINUNT THEN EVEYTHING SHUTS DOWN
Steven
for model number MHVFBF30NGBT
asked on 2022-12-16
Hi Steven,
Thank you for your question. If your heater lights for about a minute and then shuts off, the pilot orifice may be clogged with a buildup of carbon. A buildup of carbon can restrict the flow of gas and prevent the pilot heating up the thermocouple. It is important to clean the pilot orifice on a regular basis. If you have any questions, please let us know. We are open 7 days a week. We look forward to hearing from you!
eReplacementParts Team December 16, 2022
The clicker doesn't work. Is that the igniter I want to replace the thermocouple, igniter and what else?
Tony
for model number Mh9bx
asked on 2022-12-01
Hello Tony, Thank you for contacting us. We have researched the model you have provided and have found the part you are looking for is Part Number: 73404. We hope this helps, good luck with this repair!
eReplacementParts Team December 01, 2022
will this pilot assembly work on Mr Heater/little buddy model mh4b
john
for model number mh4b
asked on 2022-10-30
Hello John, Thank you for your inquiry. We have researched the model you have provided and do not show this part as compatible. The compatible part number is 15155. Good luck with your repair and if you need assistance with placing an order, please do not hesitate to call our customer service, open 7 days a week to help you. We look forward to hearing from you.
eReplacementParts Team October 30, 2022
Customer Repair Instructions ?
All our customer repair instructions are solicited directly from other customers just like you who have purchased and replaced this exact part.
Heater would not stay on when lit.
Dan - January 11, 2017
👍 14 of 14 people found this instruction helpful
Tool Type
Heater
Difficulty
Medium
Time
30-60 minutes
Tools Used
Screwdriver, Nutdriver, Adjustable Wrench
Parts Used
I had to verify first by wire brushing the Pilot end sensor, Then trying to hold in the " Pilot light button, then cleaning all the propane lines, and finally the Main propane regulator, carefully poking solid wire in and out of the outlet jet orifice. (sp). The final verifying process was doing a fuel / air wire trial test. In the burner assembly. there is a air hole before the pilot flame Assembly that allows air to mix with the pilot flame. If you take different size pieces of wire and hold the in the hole which goes all the way through the other side it will restrict air mixing in with the pilot fuel and actually tune the pilot flame mixture. In my case the wire I used to get the pilot flame at It's proper color was the thickness of a small paper clip and at the same time increased the pilot flame longer to burn closer to the thermocouple sensor. I secured the wire in the hole and well , the test worked, Stayed on for 2hrs. and I was convinced. So I purchased a new complete pilot assembly and problem was solved and done Thanks for a good quality part. Dan
Did you find this story helpful?
Thanks for voting and helping fellow customers!
Pilot light assembly inoperative
Richard - November 27, 2017
👍 2 of 2 people found this instruction helpful
Tool Type
Heater
Difficulty
Medium
Time
15-30 minutes
Tools Used
Screwdriver, Wrench Set
Parts Used
Removed outer metal covering on heater.
Disassembled gas lines to pilot light assembly, and electrical wire
Removed assembly, three screws “phillips”
Re-assembled in reverse order. Methodical.
Disassembled gas lines to pilot light assembly, and electrical wire
Removed assembly, three screws “phillips”
Re-assembled in reverse order. Methodical.
Did you find this story helpful?
Thanks for voting and helping fellow customers!
bad pilot
KEN - February 13, 2020
Tool Type
Heater
Difficulty
Easy
Time
30-60 minutes
Tools Used
Screwdriver, Pliers
Parts Used
removed old pilot and replaced with new one.
Did you find this story helpful?
Thanks for voting and helping fellow customers!
The pilot would not stay lit for more the 5 minutes
Stephen - April 10, 2019
Tool Type
Heater
Difficulty
Easy
Time
30-60 minutes
Tools Used
Screwdriver, Wrench Set, Cloth to clean up the inside
Parts Used
remove handle the side screws to allow the back and bottom to be removed.
Removed pilot assembly and tried to find thermo couple but found you have to buy whole assembly.
Got the part hooked up gas line and new tip saftey wire reasembled and it works great.
Removed pilot assembly and tried to find thermo couple but found you have to buy whole assembly.
Got the part hooked up gas line and new tip saftey wire reasembled and it works great.
Did you find this story helpful?
Thanks for voting and helping fellow customers!
heater would not stay lit
william - December 2, 2018
Tool Type
Heater
Difficulty
Medium
Time
30-60 minutes
Tools Used
Screwdriver, Wrench Set
Parts Used
replaced the part by dismantling hilf of the heater. to date still not working
Did you find this story helpful?
Thanks for voting and helping fellow customers!
Thermocoupler & Pilot assembly bad
WILLIAM - February 21, 2018
Tool Type
Heater
Difficulty
Easy
Time
15-30 minutes
Tools Used
Screwdriver, Power Drill, Wrench Set
Parts Used
Disassembled heater and replaced old part with new parts.
Did you find this story helpful?
Thanks for voting and helping fellow customers!
Thermocouple was bad.
Phillip - January 23, 2018
Tool Type
Heater
Difficulty
Medium
Time
15-30 minutes
Tools Used
Screwdriver, Wrench Set
Parts Used
Removed the necessary front and side panels to expose the parts to replace.
Did you find this story helpful?
Thanks for voting and helping fellow customers!
Pilot light was clogged after unit was flooded
Wyatt - January 19, 2018
Tool Type
Heater
Difficulty
Easy
Time
15-30 minutes
Tools Used
Screwdriver, Wrench Set
Parts Used
Removed rear cover. Removed pilot light Assembly and replaced. Tested for leaks and restarted the heater.
Did you find this story helpful?
Thanks for voting and helping fellow customers!
OEM stands for Original Equipment Manufacturer and means the part you’re buying is sourced directly from the manufacturer who made your product. At eReplacementParts, we sell only genuine OEM parts, guaranteeing the part you’re purchasing is of better design and of higher quality than aftermarket parts.
Our product descriptions are a combination of data sourced directly from the manufacturers who made your product as well as content researched and curated by our content & customer service teams. This content is edited and reviewed internally before being made public to customers.
Our customer service team are at the ready daily to answer your part and product questions. We have a dedicated staff with decades of collective experience in helping customers just like you purchase parts to repair their products.
All our part reviews are solicited directly from other customers who have purchased this exact part. While we moderate these reviews for profanity, offensive language or personally identifiable information, these reviews are posted exactly as submitted and no alterations are made by our team.
All our customer repair instructions are solicited directly from other customers just like you who have purchased and replaced this exact part. While we moderate these reviews for profanity, offensive language or personally identifiable information, these reviews are posted exactly as submitted and no alterations are made by our team.
Based on data from past customer purchasing behaviors, these parts are most commonly purchased together along with the part you are viewing. These parts may be necessary or helpful to replace to complete your current repair.
All our installation videos are created and produced in collaboration with our in-house repair technician, Mark Sodja, who has helped millions of eReplacementParts customers over the last 13 years repair their products. Mark has years of experience in selling and repairing both commercial and residential products with a specialty in gas-powered equipment.
This data is collected from customers who submitted a repair instruction after replacing this exact part. Customers can rate how easy the repair was to complete and how long it took. We aggregate this data to provide a repair rating that allows customers to quickly determine the difficulty and time needed to perform their own repair.