
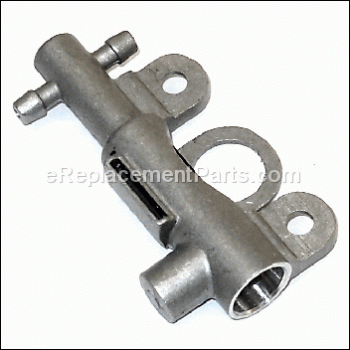
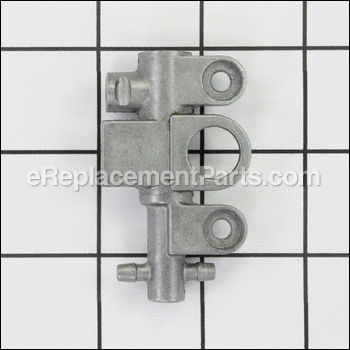
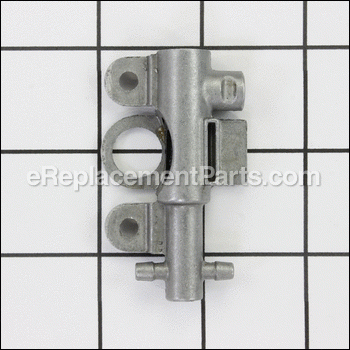
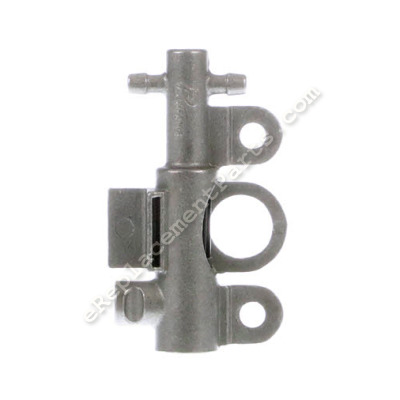


This is a genuine manufacturer-sourced part which is specially designed for use with Homelite and Ryobi chainsaws. It is an identical replacement for a missing or damaged oil pump assembly that was installed on a new unit, please make sure to refer to the appropriate diagrams of your model for the correct location and use of this component. Keep in mind this high-quality assembly is made of durable metal and is sold individually.
Oil Pump Assembly 309514001
OEM part for: Homelite, Ryobi
Part Number: 309514001
$8.38
In Stock
Jump To:
Frequently Purchased Together ?


Compatibility
This part will fit the following 25 machines
Homelite
UT10540 14 In. 35cc Chainsaw View Diagrams & Manuals
UT10560 16" Gas Chainsaw View Diagrams & Manuals
UT10580 18" Gas Chainsaw View Diagrams & Manuals
UT10544 14 In. 35cc Chainsaw View Diagrams & Manuals
UT10546 14 In. 35cc Chainsaw View Diagrams & Manuals
UT10564 16 In. 38cc Chainsaw View Diagrams & Manuals
UT10566 16 In. 38cc Chainsaw View Diagrams & Manuals
UT10584 18 In. 42cc Chainsaw View Diagrams & Manuals
UT10586 18 In. 42cc Chainsaw View Diagrams & Manuals
UT10548 14 In. 35cc Chainsaw View Diagrams & Manuals
UT10568 16 In. 38cc Chainsaw View Diagrams & Manuals
UT10588 18 In. 42cc Chainsaw View Diagrams & Manuals
UT10549 14 In. 35cc Chainsaw View Diagrams & Manuals
UT10569 16 In. 38cc Chainsaw View Diagrams & Manuals
UT10589 18 In. 42cc Chainsaw View Diagrams & Manuals
UT10542 14 in. 35cc Chain Saw View Diagrams & Manuals
UT10562 16 in. 38cc Chain Saw View Diagrams & Manuals
UT10582 18 in. 42cc Chain Saw View Diagrams & Manuals
UT10640 14 Inch 42cc Chain Saw View Diagrams & Manuals
UT10660 16 Inch 42cc Chain Saw View Diagrams & Manuals
UT10680 18 Inch 42cc Chain Saw View Diagrams & Manuals
UT10918 18 Inch 42cc Chainsaw View Diagrams & Manuals
Ryobi
RY40502 Chain Saw View Diagrams & Manuals
P548 (107251025) 18 Volt Chain Saw View Diagrams & Manuals
P548 (107251005) 18 Volt Chain Saw View Diagrams & Manuals
Show More Compatible Models
This item works with the following types of products:
- Chain Saw Parts
- Saw Parts
Customer Part Reviews ?
Average Rating (out of 5):
Click to filter by ratings:
5 stars
1
4 stars
0
3 stars
0
2 stars
0
1 stars
0
< PREV
- 1
Oil pump for 14" Battery powered Ryobi chain saw
I am really satisfied with your parts and service and shipping process! This was the third time I've ordered parts from you and there has never been a problem. Will continue doing business with you!!!
Joel -
March 4, 2020
Verified Purchase
t
t
t -
t days ago
Verified Purchase
eReplacementParts Team
t
Questions & Answers ?
Our customer Service team is at the ready daily to answer your part and product questions.

Ask our Team
We have a dedicated staff with decades of collective experience in helping customers just like you purchase parts to repair their products.
Does this fit my product?Questions & Answers for Oil Pump Assembly
No questions have been asked yet
Customer Repair Instructions ?
All our customer repair instructions are solicited directly from other customers just like you who have purchased and replaced this exact part.
Automatic oiler did not work
Marylou - June 28, 2016
👍 2 of 2 people found this instruction helpful
Tool Type
Chain Saw
Difficulty
Medium
Time
30-60 minutes
Tools Used
Screwdriver, Pliers, Socket set, Wrench Set, Nutdriver
Parts Used
Removed the chain cover assembly then the bar and chain. Remove the the clutch drum, then the clutch and washer. Removed the oil inlet and outlet tubes from the oil pump. Removed the old oil pump. Then installed the new pump. Then installed all of the other parts in reverse order.
Did you find this story helpful?
Thanks for voting and helping fellow customers!
Oil pump quit working!
Austin - April 18, 2021
Tool Type
Chain Saw
Difficulty
Easy
Time
30-60 minutes
Tools Used
Screwdriver, Pliers, Socket set, Wrench Set
Parts Used
Removed shroud and then spark plug. Made sure piston head was bottomed and then put rope in cylinder and then but wrench on clutch and took it off the shaft. Removed large washer and got to pump and removed old and replaced with new. Reassembled in reverse order. Filled with gas mix and bar chain oil and started chainsaw up and all worked great. Pump worked great so went and cut down a tree!! If you don’t understand this I advise you go to UTube and watch your make and model being repaired.
Did you find this story helpful?
Thanks for voting and helping fellow customers!
Oil pump stopped working.
Joel - March 6, 2020
Tool Type
Chain Saw
Difficulty
Medium
Time
30-60 minutes
Tools Used
Screwdriver, Pliers
Parts Used
Basically had to disassemble the chainsaw to access the little oil pump. That was no problem, but after undoing the two screws attaching the pump I had to pull the two small little plastic oil lines loose. That was like doing open heart surgery, but after a little time and a lot of patience I managed to get it all back together and the saw and oiler are working fine now.
Did you find this story helpful?
Thanks for voting and helping fellow customers!
Defective oil pump
Harold - October 20, 2019
Tool Type
Chain Saw
Difficulty
Medium
Time
30-60 minutes
Tools Used
Socket set
Remove the chain.
Removed the sprocket.
Remove the clutch.
Remove the defective pump.
Install the new pump.
Reverse the process.
Removed the sprocket.
Remove the clutch.
Remove the defective pump.
Install the new pump.
Reverse the process.
Did you find this story helpful?
Thanks for voting and helping fellow customers!
Plastic gear on pump had threads flattened due to build -up of small wood chips
James - June 8, 2018
Tool Type
Chain Saw
Difficulty
Medium
Time
15-30 minutes
Tools Used
, Punch, hammer, five small handled screwdrivers
Parts Used
1. Five small screwdriver handles were inserted into cooling fins on /into flywheel with the outer shell of housing intact, to keep engine from turning.
2.Removed cir-clip / e-clip and outer shell of clutch.
(No spanner wrench is in this household to undo clutch.)
4. Punch and hammer used to release the clutch.
5. Remove old pump.
6. Be careful to be sure of plastic gear line-up on metal crankshaft to avoid damage when
installing new pump.
2.Removed cir-clip / e-clip and outer shell of clutch.
(No spanner wrench is in this household to undo clutch.)
4. Punch and hammer used to release the clutch.
5. Remove old pump.
6. Be careful to be sure of plastic gear line-up on metal crankshaft to avoid damage when
installing new pump.
Did you find this story helpful?
Thanks for voting and helping fellow customers!
OEM stands for Original Equipment Manufacturer and means the part you’re buying is sourced directly from the manufacturer who made your product. At eReplacementParts, we sell only genuine OEM parts, guaranteeing the part you’re purchasing is of better design and of higher quality than aftermarket parts.
Our product descriptions are a combination of data sourced directly from the manufacturers who made your product as well as content researched and curated by our content & customer service teams. This content is edited and reviewed internally before being made public to customers.
Our customer service team are at the ready daily to answer your part and product questions. We have a dedicated staff with decades of collective experience in helping customers just like you purchase parts to repair their products.
All our part reviews are solicited directly from other customers who have purchased this exact part. While we moderate these reviews for profanity, offensive language or personally identifiable information, these reviews are posted exactly as submitted and no alterations are made by our team.
All our customer repair instructions are solicited directly from other customers just like you who have purchased and replaced this exact part. While we moderate these reviews for profanity, offensive language or personally identifiable information, these reviews are posted exactly as submitted and no alterations are made by our team.
Based on data from past customer purchasing behaviors, these parts are most commonly purchased together along with the part you are viewing. These parts may be necessary or helpful to replace to complete your current repair.
All our installation videos are created and produced in collaboration with our in-house repair technician, Mark Sodja, who has helped millions of eReplacementParts customers over the last 13 years repair their products. Mark has years of experience in selling and repairing both commercial and residential products with a specialty in gas-powered equipment.
This data is collected from customers who submitted a repair instruction after replacing this exact part. Customers can rate how easy the repair was to complete and how long it took. We aggregate this data to provide a repair rating that allows customers to quickly determine the difficulty and time needed to perform their own repair.