
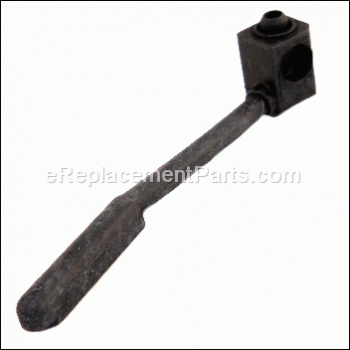
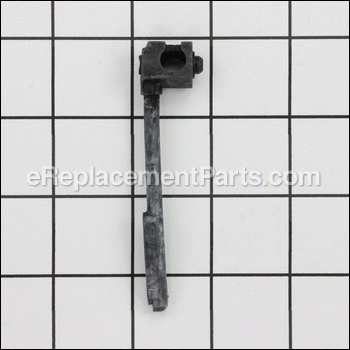
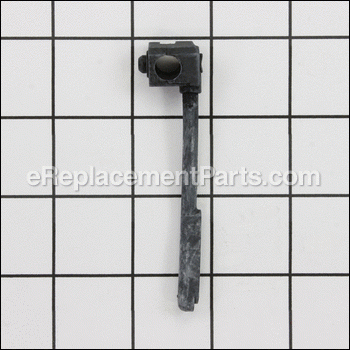
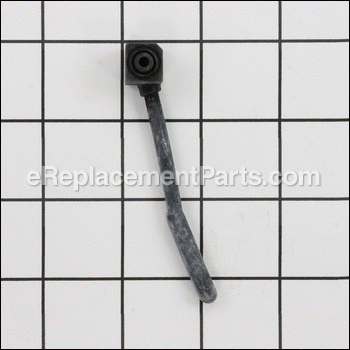
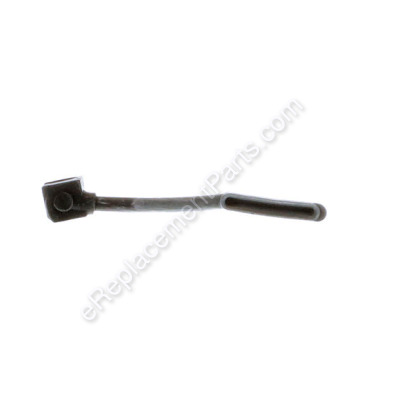


The oil hose connects to the pump cylinder. This part is an OEM from Husqvarna and Jonsered for chainsaws. Keep in mind that this part is sold individually. If this part breaks it can prevent oil from entering where it needs to go, so it will need to be replaced. A screwdriver and a socket set might be required during the replacement of this part.
Oil Hose 544084202
OEM part for: Husqvarna, Craftsman, Jonsered
Part Number: 544084202
$27.40
In Stock
Jump To:
Frequently Purchased Together ?


Compatibility
This part will fit the following 43 machines
Husqvarna
435 (2008-05) Chainsaw View Diagrams & Manuals
435 E (2008-05) Chainsaw View Diagrams & Manuals
440 E (2008-05) Chainsaw View Diagrams & Manuals
445 (2007-03) Chainsaw View Diagrams & Manuals
445 (2007-09) Chainsaw View Diagrams & Manuals
445 E (2007-03) Chainsaw View Diagrams & Manuals
445 E (2007-09) Chainsaw View Diagrams & Manuals
450 E (2007-03) Chainsaw View Diagrams & Manuals
450 E (2007-09) Chainsaw View Diagrams & Manuals
450 (2011-07) Chainsaw View Diagrams & Manuals
450 (2010-09) Chainsaw View Diagrams & Manuals
445 E II Chain Saw View Diagrams & Manuals
445 II Chain Saw View Diagrams & Manuals
135 (2011-08) From Chain Saw View Diagrams & Manuals
135 E (2011-08) From Chain Saw View Diagrams & Manuals
450 E II Chain Saw View Diagrams & Manuals
140 (2012-01) From Chain Saw View Diagrams & Manuals
140 E (2012-01) From Chain Saw View Diagrams & Manuals
435 E II Chain Saw View Diagrams & Manuals
435 II Chain Saw View Diagrams & Manuals
440 E II Chain Saw View Diagrams & Manuals
440 II Chain Saw View Diagrams & Manuals
450 II Chainsaw View Diagrams & Manuals
Craftsman
358381800 Chainsaw View Diagrams & Manuals
358382000 Chainsaw View Diagrams & Manuals
Jonsered
CS2240 (2009-02) Chain Saw View Diagrams & Manuals
CS2240 (2010-06) Chain Saw View Diagrams & Manuals
CS2240 (2011-05) Chain Saw View Diagrams & Manuals
CS2240 S (2009-02) Chain Saw View Diagrams & Manuals
CS2240 S (2010-06) Chain Saw View Diagrams & Manuals
CS2240 S (2011-05) Chain Saw View Diagrams & Manuals
CS2245 (2008-09) Chain Saw View Diagrams & Manuals
CS2245 (2009-02) Chain Saw View Diagrams & Manuals
CS2245 (2010-07) Chain Saw View Diagrams & Manuals
CS2245 (2011-07) Chain Saw View Diagrams & Manuals
CS2245 S (2008-09) Chain Saw View Diagrams & Manuals
CS2245 S (2009-02) Chain Saw View Diagrams & Manuals
CS2245 S (2010-07) Chain Saw View Diagrams & Manuals
CS2245 S (2011-07) Chain Saw View Diagrams & Manuals
CS2250 S (2008-09) Chain Saw View Diagrams & Manuals
CS2250 S (2009-02) Chain Saw View Diagrams & Manuals
CS2250 S (2010-07) Chain Saw View Diagrams & Manuals
CS2250 S (2011-07) Chain Saw View Diagrams & Manuals
Show More Compatible Models
This item works with the following types of products:
- Chain Saw Parts
- Saw Parts
This part replaces obsolete part #: 544084201 (Oil Hose), 544084201
Customer Part Reviews ?
Average Rating (out of 5):
Click to filter by ratings:
5 stars
1
4 stars
0
3 stars
0
2 stars
0
1 stars
0
< PREV
- 1
Did the Job.!
The ordering was easy, the Part fit perfectly. My saw is working fine with no more oil leak
Guest -
March 13, 2023
Verified Purchase
t
t
t -
t days ago
Verified Purchase
eReplacementParts Team
t
Questions & Answers ?
Our customer Service team is at the ready daily to answer your part and product questions.

Ask our Team
We have a dedicated staff with decades of collective experience in helping customers just like you purchase parts to repair their products.
Does this fit my product?Questions & Answers for Oil Hose
No questions have been asked yet
Customer Repair Instructions ?
All our customer repair instructions are solicited directly from other customers just like you who have purchased and replaced this exact part.
Husqvarna chain not oiling
Carl - September 6, 2017
👍 4 of 4 people found this instruction helpful
Tool Type
Chain Saw
Difficulty
Easy
Time
15-30 minutes
Tools Used
Screwdriver, Socket set
Parts Used
Measured height of oil hose outlet and found it was below the mounting surface of the chain bar. This prevented 100% of oil from entering oil channel in bar. A new oil hose solved the issue. To remove clutch, just free it with a hammer and punch.
Did you find this story helpful?
Thanks for voting and helping fellow customers!
Leaking bar oil.
Alexander - March 1, 2018
👍 2 of 2 people found this instruction helpful
Tool Type
Chain Saw
Difficulty
Easy
Time
15-30 minutes
Tools Used
Screwdriver, Socket set, Custom cut socket to remove the clutch.
Took the bar and chain off, removed the clutch, and sprocket. Took out the Oiler pump assembly, drained, and thoroughly cleaned the oil tank. Reinstalled all the new parts, leak fixed. Runs great
Did you find this story helpful?
Thanks for voting and helping fellow customers!
No chain lubrication
Greg - February 12, 2018
👍 2 of 2 people found this instruction helpful
Tool Type
Chain Saw
Difficulty
Medium
Time
15-30 minutes
Tools Used
Screwdriver, Torx bit (to remove side cover), spark plug wrench
1 Removed chain,cover and bar
2 Removed recoil cover
3 Large end of spark plug wrench securely in vice other end on nut in middle of recoil (to hold so chain sprocket and clutch can be removed from other side of the saw)
4 Remove plate (1 screw)
5 Remove oil pump piston,pinion and oil hose
6 Reinstall new pump piston, pinion and oil hose and reverse steps 4,3,2 and 1
Did you find this story helpful?
Thanks for voting and helping fellow customers!
The oiler wouldn’t oil the bar anymore because I used to use canola oil and I think it hardened inside the piston.
Carver - November 24, 2017
👍 2 of 3 people found this instruction helpful
Tool Type
Chain Saw
Difficulty
Easy
Time
15-30 minutes
Tools Used
Screwdriver, Chainsaw key
I removed the bar and chain. Then popped the cover off the top of the saw removed the spark plug and put in this special piston stopper I got when I converted my saw to a chain saw carving saw. Then I put some vise grips clamped to the clutch used another wrench to turn the clutch till it came off. Removed the clutch and all the other inner. Then removed the metal shield plate and got access to the piston and pump and oil tube thingy. Swapped all that out cleaned the old oil bar oil off and put it all back together the way I took it apart.
Did you find this story helpful?
Thanks for voting and helping fellow customers!
inspect, clean,lube & replace worn parts
Lawrence - March 23, 2022
Tool Type
Chain Saw
Difficulty
Medium
Time
1-2 hours
Tools Used
Screwdriver, Pliers, Socket set, Wrench Set
removed chain guard, chain & chain bar, clutch, pin bearing sleeve, oil hose & any part that has been chaffed. cleaned out saw dust/oil build ups.replaced parts where needed.installed chain & bar. adjusted to. proper tension. lubed internal parts on the rebuild. gapped new spark plug & replaced. put in 50:1 gas mix & bar oil.
started up saw & checked bar oil spray on a piece of cardboard. good as new !!
started up saw & checked bar oil spray on a piece of cardboard. good as new !!
Did you find this story helpful?
Thanks for voting and helping fellow customers!
chain saw starter rope broke & chain oiler hose cracked
Stephen - May 9, 2021
Tool Type
Chain Saw
Difficulty
Medium
Time
30-60 minutes
Tools Used
Screwdriver
r/r rope & oiler hose
Did you find this story helpful?
Thanks for voting and helping fellow customers!
My 20 inch husqvarna chainsaw would not oil the chain. Picked up a hunk of wood that bent the chain guide plate and tore the oil pump hose.
Charles - May 18, 2019
Tool Type
Chain Saw
Difficulty
Medium
Time
30-60 minutes
Tools Used
Screwdriver, Socket set, Wrench Set, Nutdriver, clutch driver. piston block plug.
removed the engine cover. Removed the spark plug. Installed the piston stop plug. Removed the chain and bar. Removed the clutch. Removed the clutch bearing and oil pump drive gear. Removed the chain guide plate and oil pump hose. Replaced the oil pump hose and the chain guide plate. The rest of the repair was the reverse of the tear down.. This repair was made easy by having a clutch removal tool and a piston stop plug and 51 years of experience. NOTE !! The clutch has left hand threads. NOTE !! don't force anything. Note !! it was nice ordering the parts from people that knew just what I was talking about and they spoke perfect English. Thank You, Chuck
Did you find this story helpful?
Thanks for voting and helping fellow customers!
No oil coming out of chain bar
matthew - July 30, 2017
👍 1 of 2 people found this instruction helpful
Tool Type
Chain Saw
Difficulty
Easy
Time
Less than 15 minutes
Tools Used
Screwdriver, Rope/chainsaw/socket
Removed chain bar and chain/removed cover/sprocket and spark plug
Installed the parts need for the pump
Installed the parts need for the pump
Did you find this story helpful?
Thanks for voting and helping fellow customers!
OEM stands for Original Equipment Manufacturer and means the part you’re buying is sourced directly from the manufacturer who made your product. At eReplacementParts, we sell only genuine OEM parts, guaranteeing the part you’re purchasing is of better design and of higher quality than aftermarket parts.
Our product descriptions are a combination of data sourced directly from the manufacturers who made your product as well as content researched and curated by our content & customer service teams. This content is edited and reviewed internally before being made public to customers.
Our customer service team are at the ready daily to answer your part and product questions. We have a dedicated staff with decades of collective experience in helping customers just like you purchase parts to repair their products.
All our part reviews are solicited directly from other customers who have purchased this exact part. While we moderate these reviews for profanity, offensive language or personally identifiable information, these reviews are posted exactly as submitted and no alterations are made by our team.
All our customer repair instructions are solicited directly from other customers just like you who have purchased and replaced this exact part. While we moderate these reviews for profanity, offensive language or personally identifiable information, these reviews are posted exactly as submitted and no alterations are made by our team.
Based on data from past customer purchasing behaviors, these parts are most commonly purchased together along with the part you are viewing. These parts may be necessary or helpful to replace to complete your current repair.
All our installation videos are created and produced in collaboration with our in-house repair technician, Mark Sodja, who has helped millions of eReplacementParts customers over the last 13 years repair their products. Mark has years of experience in selling and repairing both commercial and residential products with a specialty in gas-powered equipment.
This data is collected from customers who submitted a repair instruction after replacing this exact part. Customers can rate how easy the repair was to complete and how long it took. We aggregate this data to provide a repair rating that allows customers to quickly determine the difficulty and time needed to perform their own repair.