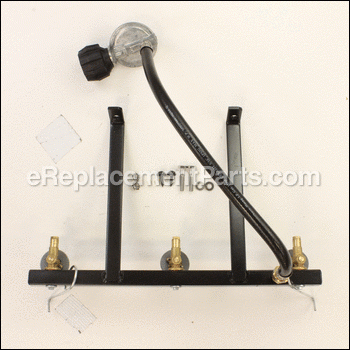

This is a genuine Weber part used with Genesis and Spirit grills. This assembly includes the hose and regulator as well as the manifold. The regulator controls the release of gas from the tank into the fuel line to the manifold. The manifold then directs the fuel to the burners. It includes installation hardware and written instructions.
Manifold With Larger Sweep 60141
OEM part for: Weber
Part Number: 60141
$213.58
In Stock
Jump To:
Frequently Purchased Together ?

Compatibility
This part will fit the following 18 machines
Weber
2281001 Genesis Silver B LP SWE Grill View Diagrams & Manuals
2281398 Genesis Silver B LP SWE Grill View Diagrams & Manuals
2281411 Genesis Silver B LP SWE Grill View Diagrams & Manuals
2281698 Genesis Silver B LP SWE HL Grill View Diagrams & Manuals
2281699 Genesis Silver B LP HL Grill View Diagrams & Manuals
2281898 Genesis Silver B LP SWE Grill w/ SS Handle View Diagrams & Manuals
6221001 (2004) Genesis Silver B LP SWE Grill View Diagrams & Manuals
6221398 (2004) Genesis Silver B LP SWE Grill View Diagrams & Manuals
6221411 (2004) Genesis Silver B LP SWE Grill View Diagrams & Manuals
6221898 Genesis Silver B LP SWE Grill View Diagrams & Manuals
6720801 (2005) Genesis Silver B LP SWE Grill View Diagrams & Manuals
6721001 (2005) Genesis Silver B LP SWE Grill View Diagrams & Manuals
6721301 (2005) Genesis Silver B LP SWE Grill View Diagrams & Manuals
6721411 (2005) Genesis Silver B LP SWE Grill View Diagrams & Manuals
3720301 Spirit SP-310 Gas Grill View Diagrams & Manuals
3721001 Spirit E-310 Gas Grill View Diagrams & Manuals
55549 Genesis Silver View Diagrams & Manuals
2281999 Genesis Silver B Lp Blk For Snap On View Diagrams & Manuals
Show More Compatible Models
This item works with the following types of products:
Repair Videos ?

Articles:
|
Having trouble getting your grill to light up? A common cause of this issue is a defective ignition switch. We'll sho...
November 08, 2012
|

Customer Part Reviews ?
Questions & Answers ?
Our customer Service team is at the ready daily to answer your part and product questions.

Ask our Team
We have a dedicated staff with decades of collective experience in helping customers just like you purchase parts to repair their products.
Does this fit my product?Questions & Answers for Manifold With Larger Sweep
I'm looking to replace my LP Gas Manifold and valves. I own a 2007-08 Weber E-310 grill. I just wanted to verify Part No. 3721001 will fit my grill?
Brian
for model number 89524
asked on 2023-02-28
Hi Brian,
Thank you for your question. Before we can verify if this is the correct part for your grill, we will need the model number from it. It may be located on the front or back cover of your owner's manual, on the bottom panel, on the manifold, on the inside face of the left panel, inside the tank panel below the cookbox,or underneath the control panel. If you could resubmit your question with this information, we would be happy to help you. We look forward to hearing from you!
eReplacementParts Team February 28, 2023
Will part number 60142fit this grill. Date on assembly instructions is 7/14/2006
Sherrill
for model number Weber SN:NT6097304 E-310 LP gas
asked on 2022-04-22
Hello Sherril, thank you for your question. We have researched the model you have provided, and part number 60142 is the correct part for your unit. If you need help placing an order, our customer service is open 7 days a week. Please feel free to give us a call. We look forward to hearing from you!
eReplacementParts Team April 22, 2022
Customer Repair Instructions ?
All our customer repair instructions are solicited directly from other customers just like you who have purchased and replaced this exact part.
Burner manifold caught on fire.
Michael - December 2, 2015
👍 6 of 6 people found this instruction helpful
Tool Type
Outdoor Grill
Difficulty
Easy
Time
Less than 15 minutes
Tools Used
Screwdriver, Wrench Set
Remove LP gas tank, remove knobs, remove Grates, and Flavor bars, remove 2 screws by knob assembly. remove knob cover. remove 2 nuts holding manifold in place,unclip wires holding manifold. Remove manifold. loosen burner tube screws inside grill. pull out burner tubes,(pay attention to the way the holes face on the tubes) I like to take a picture with smart phone. and slightly turn them to remove from grill opening. replace with new burner tubes. secure under screws in grill, slide manifold back into place, secure metal wires into holes. tighten nuts to hold manifold in place. put cover back on, tighten end screws replace knobs. hook up LP gas.
Did you find this story helpful?
Thanks for voting and helping fellow customers!
Replaced burners and manifold on 9 years old Weber E-310 grill
Boris - April 23, 2016
👍 5 of 5 people found this instruction helpful
Tool Type
Outdoor Grill
Difficulty
Easy
Time
15-30 minutes
Tools Used
Screwdriver, Socket set
1. Remove propane tank
2. Remove cooking grates and flavor bars
3. Remove the three control knobs
4. Using Phillips screwdriver unscrew two screws that hold the manifold cover located on right side of the cover. You can access the screws through the plastic part on right side that has the hooks to hold cooking utensils. There are two cutouts through which you can insert the screwdriver
5. Unhook the two wire clips helping secure the manifold from the right side crossbar
6. Using 5/16 sockets unbolt the two bolts that hold the manifold secured to the bottom part of the grill tub
7. Gently pull the manifold from the burners. The nipples of the manifold inserted to the ends of the burners are not secured with anything. Just pull out and remove the manifold
8. Take picture or make a drawing of the orientation of each burner tube. The two outside tubes have the drilled holes pointing horizontally and toward middle of the tub. The middle tube has the openings pointing straight up
9. Pull each burner tube out. You must twist each tube 90 degrees in order to get the flat ends through the opening in the grill tub
10. Clean and degrease the grill as you now have the best access to the bottom of the tub
11. Reassemble using the new parts following the above steps in reverse.
You are done and the grill is now grilling as when it was brand new.
Did you find this story helpful?
Thanks for voting and helping fellow customers!
Weber grill did nto light.
ralph - January 26, 2017
👍 1 of 1 people found this instruction helpful
Tool Type
Outdoor Grill
Difficulty
Easy
Time
Less than 15 minutes
Tools Used
Wrench Set
Parts Used
Removed all grill parts and replaced with all the new parts including manifold. Works great, thanks!
Did you find this story helpful?
Thanks for voting and helping fellow customers!
Manifold needed to be replaced
Shannon - August 10, 2016
👍 1 of 1 people found this instruction helpful
Tool Type
Outdoor Grill
Difficulty
Easy
Time
15-30 minutes
Tools Used
Screwdriver
Parts Used
1. Removed the burners and manifold
2. Replaced the burners
3. Lined the burners up with the manifold
4. Tighten the manifold to the grill
5. Hooked up the gas tank
6. Checked for leaks
7. Turned on burners
8. EXTREMELY EASY
2. Replaced the burners
3. Lined the burners up with the manifold
4. Tighten the manifold to the grill
5. Hooked up the gas tank
6. Checked for leaks
7. Turned on burners
8. EXTREMELY EASY
Did you find this story helpful?
Thanks for voting and helping fellow customers!
Burner tubes were rusting out and manifold had "locked up" and didn't allow burners to turn on/off.
Michael - August 29, 2016
👍 1 of 1 people found this instruction helpful
Tool Type
Outdoor Grill
Difficulty
Medium
Time
30-60 minutes
Tools Used
Screwdriver, Pliers, Socket set, Adjustable Wrench
1. Removed, measured and researched part numbers from Weber.
2. Replaced burner tubes, 1 at a time in sequence so they were in the correct position.
3. Replaced burner manifold. Two hex nuts and two retaining clips held it in place.
4. Reattached to propane and lit. Works good as new!
2. Replaced burner tubes, 1 at a time in sequence so they were in the correct position.
3. Replaced burner manifold. Two hex nuts and two retaining clips held it in place.
4. Reattached to propane and lit. Works good as new!
Did you find this story helpful?
Thanks for voting and helping fellow customers!
Manifold on gas grill leaking and catching fire
John - June 13, 2018
Tool Type
Outdoor Grill
Difficulty
Easy
Time
30-60 minutes
Tools Used
Screwdriver, Pliers, Adjustable Wrench
Removed old burner tubes and manifold. Replaced with new burner tubes and manifold. Replaced burner knobs. Reconnected gas line. Started grill. Pretty seamless and straightforward.
Did you find this story helpful?
Thanks for voting and helping fellow customers!
Gas manifold/regulator was not working
Al - January 29, 2018
Tool Type
Outdoor Grill
Difficulty
Easy
Time
15-30 minutes
Tools Used
Screwdriver, Pliers
Parts Used
Disconnect gas from tank
Remove the knobs
Removed the two screws on the right hand side
Removed the plate that covers the gas manifold/regulator
Removed the two wing nuts that hold the regulator in place
Removed the black plastic covers that go between the regulator and the gas tubes
Lifted the regulator out
Reverse steps to install
Did you find this story helpful?
Thanks for voting and helping fellow customers!
Stopped working and was leaking gas.
Albert - September 17, 2017
Tool Type
Outdoor Grill
Difficulty
Easy
Time
15-30 minutes
Tools Used
Screwdriver, Pliers, Socket set, Nutdriver
1. Raised the grill up and propped with a jack stand for better access.
2. Took out all the grates and the flavor bars.
3. Removed the nuts from the holding bracket.
4. Unclipped the holder.
5. Removed old unit.
6. Reassembled using the new parts.
7. Tested.
2. Took out all the grates and the flavor bars.
3. Removed the nuts from the holding bracket.
4. Unclipped the holder.
5. Removed old unit.
6. Reassembled using the new parts.
7. Tested.
Did you find this story helpful?
Thanks for voting and helping fellow customers!
No problem at all
Mike - June 29, 2017
Tool Type
Outdoor Grill
Difficulty
Easy
Time
15-30 minutes
Tools Used
Screwdriver, Wrench Set
Parts Used
Remove old part and put in new just like it was made for the grill.
Did you find this story helpful?
Thanks for voting and helping fellow customers!
OEM stands for Original Equipment Manufacturer and means the part you’re buying is sourced directly from the manufacturer who made your product. At eReplacementParts, we sell only genuine OEM parts, guaranteeing the part you’re purchasing is of better design and of higher quality than aftermarket parts.
Our product descriptions are a combination of data sourced directly from the manufacturers who made your product as well as content researched and curated by our content & customer service teams. This content is edited and reviewed internally before being made public to customers.
Our customer service team are at the ready daily to answer your part and product questions. We have a dedicated staff with decades of collective experience in helping customers just like you purchase parts to repair their products.
All our part reviews are solicited directly from other customers who have purchased this exact part. While we moderate these reviews for profanity, offensive language or personally identifiable information, these reviews are posted exactly as submitted and no alterations are made by our team.
All our customer repair instructions are solicited directly from other customers just like you who have purchased and replaced this exact part. While we moderate these reviews for profanity, offensive language or personally identifiable information, these reviews are posted exactly as submitted and no alterations are made by our team.
Based on data from past customer purchasing behaviors, these parts are most commonly purchased together along with the part you are viewing. These parts may be necessary or helpful to replace to complete your current repair.
All our installation videos are created and produced in collaboration with our in-house repair technician, Mark Sodja, who has helped millions of eReplacementParts customers over the last 13 years repair their products. Mark has years of experience in selling and repairing both commercial and residential products with a specialty in gas-powered equipment.
This data is collected from customers who submitted a repair instruction after replacing this exact part. Customers can rate how easy the repair was to complete and how long it took. We aggregate this data to provide a repair rating that allows customers to quickly determine the difficulty and time needed to perform their own repair.