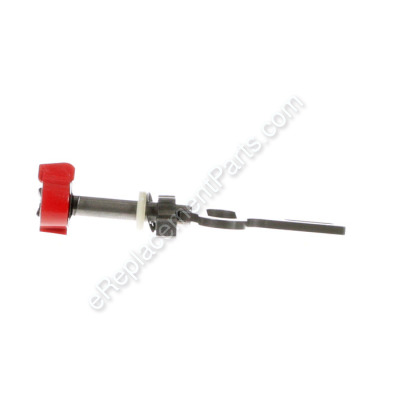


This part includes one lifting rod for use in jigsaws. This lifting rod is supplied by the original manufacturer, ensuring the utmost quality and compatibility. The lifting rod is an essential part of the mechanism that drives the blade. This part is commonly replaced because the blade continuously comes loose and is no longer locking the blade securely. When performing this repair be very careful not to turn the release lever on the lifting rod without having the saw blade in place as this could damage the part.
Lifting Rod 2600780173
OEM part for: Bosch
Part Number: 2600780173
$44.66
In Stock
Compatibility
This part will fit the following 13 machines
Bosch
JS260 (3601E8H010) Jig Saw View Diagrams & Manuals
GST 75 E (3601E8H0D0) Jig Saw View Diagrams & Manuals
GST 75 E (3601E8H0E0) Jig Saw View Diagrams & Manuals
GST 75 E (3601E8H0G0) Jig Saw View Diagrams & Manuals
GST 75 E (3601E8H0H0) Jig Saw View Diagrams & Manuals
GST 75 E (3601E8H0N0) Jig Saw View Diagrams & Manuals
GST 18 VLI (3601E8J300) Cordless Jigsaw View Diagrams & Manuals
JSH180 (3601E8J310) Cordless Jigsaw View Diagrams & Manuals
JSH180 (3601E8J311) Cordless Jigsaw View Diagrams & Manuals
GST 18 VLI (3601E8J3D0) Cordless Jigsaw View Diagrams & Manuals
GST 14,4 VLI (3601E8J400) Cordless Jigsaw View Diagrams & Manuals
GST 14,4 VLI (3601E8J401) Cordless Jigsaw View Diagrams & Manuals
JS120 (3601EA1010) Cordless Jigsaw View Diagrams & Manuals
Show More Compatible Models
This item works with the following types of products:
- Jig saw Parts
- Saw Parts
Customer Part Reviews ?
Average Rating (out of 5):
Click to filter by ratings:
5 stars
2
4 stars
0
3 stars
0
2 stars
0
1 stars
0
< PREV
- 1
Easier repair
Very expensive. For the cost of the replacement part you could buy a new hand held jig saw, but I like to fix things and not throw useful equipment away when they can be repaired to reduce global warming.
David -
March 15, 2022
Verified Purchase
the new lifting rod was an exact fit.
Installed new lifting rod into my jig saw and it works fine. great service , thanks.
Guest -
September 18, 2019
Verified Purchase
t
t
t -
t days ago
Verified Purchase
eReplacementParts Team
t
Questions & Answers ?
Our customer Service team is at the ready daily to answer your part and product questions.

Ask our Team
We have a dedicated staff with decades of collective experience in helping customers just like you purchase parts to repair their products.
Does this fit my product?Questions & Answers for Lifting Rod
can the release button be replaced only and not the entire lifting rod
William
for model number js260
asked on 2023-10-22
Hello William, Thank you for your inquiry. Researching your model, we show that the button/know is only available as part of the lifting rod. We hope this helps.
eReplacementParts Team October 22, 2023
Customer Repair Instructions ?
All our customer repair instructions are solicited directly from other customers just like you who have purchased and replaced this exact part.
Saw blade would not lock into place
Toney - July 1, 2017
👍 7 of 8 people found this instruction helpful
Tool Type
Jig saw
Difficulty
Easy
Time
15-30 minutes
Tools Used
Screwdriver
Parts Used
1. Removed base held by two hex head screws
2. Pulled end cap from front end of saw
3. Removed recessed phillips head screws which hold two halves of saw body together.
4. Lay saw on side and lift half of saw body off to expose lifting rod
5. Remove lifting rod and replace with new rod. used excess grease in saw to lube new rod
6. Replace components which were removed for repair
7. Plug saw in and test run.
8. Saw runs perfectly.
Did you find this story helpful?
Thanks for voting and helping fellow customers!
The quick release blade holder was broken.
jon - October 22, 2016
👍 5 of 5 people found this instruction helpful
Tool Type
Jig saw
Difficulty
Easy
Time
Less than 15 minutes
Tools Used
Screwdriver, Wrench Set
Parts Used
Separated the two halves of the saw. Replaced the lifting rod and put the halves back together.
Did you find this story helpful?
Thanks for voting and helping fellow customers!
Lifting rod broke - would not hold saw blades
Dennis - August 15, 2018
👍 2 of 2 people found this instruction helpful
Tool Type
Jig saw
Difficulty
Easy
Time
30-60 minutes
Tools Used
Screwdriver
Parts Used
1. Remove base plate held by Hex Socket Head Cap Screw
2. Remove decorative cover held by two TORX head screws
3. Lay saw on side and remove recessed TORX head screws which hold two halves of saw housing together.
4. Lift half of saw housing off to expose lifting rod
5. Before removing the old lifting rod, take note of how everything is positioned, especially the washers where the lifting rod exits the housing and the coiled spring that holds the lifting rod into place. NOTE: I suggest taking a picture of it now with your cell phone camera.
5. Remove broken lifting rod and replace with new rod. The bearing block that was on the broken lifting rod is used when installing the new lifting rod.
6. Reassemble the saw in reverse order of steps 1-4 above.
NOTE: Pay attention to the caution in the owners manual about not turning the release lever on the lifting rod without have the saw blade in place or you may be ordering another lifting rod or throwing the saw away.
Did you find this story helpful?
Thanks for voting and helping fellow customers!
Blade would not insert or stay in place
Aaron - January 14, 2024
Tool Type
Jig saw
Difficulty
Easy
Time
15-30 minutes
Tools Used
, Star bits
Parts Used
Remove all star drive screws, separate housing, remove shaft and back end cylinder, utilize excess grease in housing and grease parts, then install
Did you find this story helpful?
Thanks for voting and helping fellow customers!
Wouldn’t hold blade
Sheri - March 1, 2023
Tool Type
Jig saw
Difficulty
Easy
Time
15-30 minutes
Tools Used
Screwdriver
Parts Used
Replaced part
Did you find this story helpful?
Thanks for voting and helping fellow customers!
OEM stands for Original Equipment Manufacturer and means the part you’re buying is sourced directly from the manufacturer who made your product. At eReplacementParts, we sell only genuine OEM parts, guaranteeing the part you’re purchasing is of better design and of higher quality than aftermarket parts.
Our product descriptions are a combination of data sourced directly from the manufacturers who made your product as well as content researched and curated by our content & customer service teams. This content is edited and reviewed internally before being made public to customers.
Our customer service team are at the ready daily to answer your part and product questions. We have a dedicated staff with decades of collective experience in helping customers just like you purchase parts to repair their products.
All our part reviews are solicited directly from other customers who have purchased this exact part. While we moderate these reviews for profanity, offensive language or personally identifiable information, these reviews are posted exactly as submitted and no alterations are made by our team.
All our customer repair instructions are solicited directly from other customers just like you who have purchased and replaced this exact part. While we moderate these reviews for profanity, offensive language or personally identifiable information, these reviews are posted exactly as submitted and no alterations are made by our team.
Based on data from past customer purchasing behaviors, these parts are most commonly purchased together along with the part you are viewing. These parts may be necessary or helpful to replace to complete your current repair.
All our installation videos are created and produced in collaboration with our in-house repair technician, Mark Sodja, who has helped millions of eReplacementParts customers over the last 13 years repair their products. Mark has years of experience in selling and repairing both commercial and residential products with a specialty in gas-powered equipment.
This data is collected from customers who submitted a repair instruction after replacing this exact part. Customers can rate how easy the repair was to complete and how long it took. We aggregate this data to provide a repair rating that allows customers to quickly determine the difficulty and time needed to perform their own repair.