eReplacementParts.com
877-346-4815
Black and Decker Parts

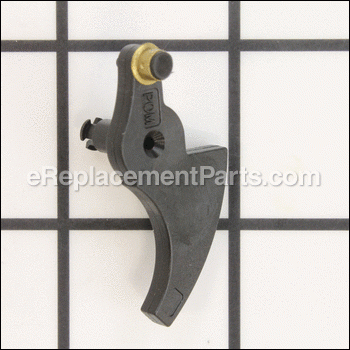
Lever 598435-00SV

OEM part for: DeWALT, Black and Decker

Part Number: 598435-00SV


Install
Videos!
Grid squares measure 1x1 inch
In Stock
Ships within 1 business day
Easy Less than 15 minutes (55 rated repairs)?
OEM: Original Equipment Manufacturer ?
DeWALTBlack and Decker
Does this d-block d-md-none fit my product?

Product Description ?

This is a genuine Black and Decker replacement part, it is sold individually.
The purpose of the 598435-00SV Lever, is to regulate the amount of line that is fed from the auto-feed spool.

This part has a tendency to wear out often.
It is advised to have an extra one on hand.

  • Classification: Part
  • Weight: 0.02 lbs.
  • Shipping: Ships Worldwide

Frequently Purchased Together ?

Compatibility

This part will fit the following 8 machines

Black and Decker

GH600 Type 1 14" Automatic Feed Trimmer/Edger View Diagrams & Manuals
GH600 Type 2 14" Automatic Feed Trimmer/Edger View Diagrams & Manuals
GH600 Type 3 14" Automatic Feed Trimmer/Edger View Diagrams & Manuals
GH600 Type 4 14" Automatic Feed Trimmer/Edger View Diagrams & Manuals
74526 Type 1 14 StringTrimmer View Diagrams & Manuals
GH600 Type 5 14 Grass Hog View Diagrams & Manuals
ST8000 (Type 1) 12 String Trimmer View Diagrams & Manuals
GH600-B3LZ (Type 5) String Trimmer - Fob Inte Power Tool View Diagrams & Manuals
Show More Compatible Models
Don't see yours? Try searching our site for :

This item works with the following types of products:

  • Edger Parts
  • Trimmer Parts
  • Grass Trimmer Parts

This part replaces obsolete part #: 598435-00

Customer Part Reviews ?

4.8
Average Rating (out of 5):
22 Reviews
Click to filter by ratings:
5 stars
20
4 stars
1
3 stars
0
2 stars
0
1 stars
1
  • Highest Rating
  • Most Recent
< PREV
  • 1
  • 2
  • 3
NEXT >
  • Always as expected:
    I believe I already sent a review, but anyway, These new parts and any I have ordered in the past, have come in a reasonable time frame, been exactly what I ordered and I have never had an issue:
    Guest - September 8, 2022 Verified Purchase
    Lever worked as expected
    No installation instructions. Pried out the old part, inserted the new.
    Guest - June 15, 2022 Verified Purchase
    Weed Eater
    The part fixed my problem.
    Guest - July 23, 2021 Verified Purchase
    Great service
    Next time I need a replacement part I will go to Replacementparts.
    Guest - July 23, 2021 Verified Purchase
    easy repair. fixed the problem perfectly in minutes
    arrived in great condition.
    Audrey - June 21, 2021 Verified Purchase
    This part was easy to install
    This was exactly what we needed.
    Guest - May 25, 2021 Verified Purchase
    Like magic!
    After ordering new cord, hours on YouTube and talking with my step-dad, I finally figured out that the little post where the metal ring is had snapped off my original part. My eReplacementPart came quickly, snapped right in and I was off to the weed wacking races!
    Guest - May 11, 2021 Verified Purchase
    Levers for weed eater
    Sturdy and worked great.
    Carolyn - May 3, 2021 Verified Purchase
    perfect fit
    My "old" weed eater broke and would just shoot out line. The problem was this part broke. I tried ordering the part from another site, but the part I received wasn't the correct one for my equipment. I thought that since my machine was so old that I wouldn't be able to get the part I needed. I found this site and put in my type of machine and up came all the replacement parts currently available. I ordered it thinking it probably wouldn't fit like the first one I ordered, but it fit perfectly and now I have a weed eater that's like new. Thank you for helping me save a perfectly good machine.
    Guest - July 11, 2020 Verified Purchase
    Fast service
    Work as expected
    Guest - June 12, 2020 Verified Purchase
    t
    t
    t - t days ago Verified Purchase
    eReplacementParts Team
    t

    Questions & Answers ?

    Our customer Service team is at the ready daily to answer your part and product questions.

    photo of team member
    Ask our Team

    We have a dedicated staff with decades of collective experience in helping customers just like you purchase parts to repair their products.

    Does this fit my product?

    Questions & Answers for Lever


    Does this ship from US or China?
    Jim asked on 2022-08-17
    Hello Jim, Thank you for the question. eReplacementparts.com ships from our Utah warehouse. Once the part is added to the cart and the zip code is entered, the site will provide the shipping options with time frames. We hope this helps, good luck with this repair!
    eReplacementParts Team August 17, 2022

    Customer Repair Instructions ?

    All our customer repair instructions are solicited directly from other customers just like you who have purchased and replaced this exact part.

    Easy Less than 15 minutes (55 rated repairs)?

    The little plastic release lever was shot.

    Norah - March 18, 2016
    👍 31 of 35 people found this instruction helpful
    Tool Type

    Trimmer

    Difficulty

    Easy

    Time

    Less than 15 minutes

    Tools Used

    Pliers

    Take off the cap where the string is wound. Remove the spool. See the little plastic release lever? Use the pliers to pull it out, line the new one up and press it into place. Super easy.
    Did you find this story helpful?
    Thanks for voting and helping fellow customers!

    The trimmer line did not automatically feed.

    Mary - April 27, 2016
    👍 16 of 16 people found this instruction helpful
    Tool Type

    Trimmer

    Difficulty

    Easy

    Time

    Less than 15 minutes

    Tools Used

    Pliers

    Turns out all that was needed was to replace the feeder lever inside the line hub. I removed the hub cap and lifted the line spool out revealing the white lever. I just pulled the existing lever out with a needle-nose pliers and pushed the new lever in. Done. (I think it took me longer to type these instructions than the time it took to actually make the repair.) Tip: Order a few spare levers. Apparently they wear out often.
    Did you find this story helpful?
    Thanks for voting and helping fellow customers!

    Trimmer would not auto advance line.

    Roxanne - May 3, 2016
    👍 6 of 6 people found this instruction helpful
    Tool Type

    Hedge Trimmer

    Difficulty

    Easy

    Time

    Less than 15 minutes

    Tools Used

    Pliers

    I looked up my model on line and found instructions to repair trimmer that would not auto advance the line and followed instructions. Took less than 5 minutes to repair and it works like new. Too much is going into land fills that can be repaired at a reasonable cost so that is why I fixed my trimmer. This place had the parts I needed and was easy to order and at my door in days. I was thrilled. All I need to do was press the sides of the bottom cap to remove the old spool and spring. The I used pliers to pull the lever out of the spool housing , then pressed the new one in. Inserted the new spool and line with 4 or 5 inches of line out of the eyelets on the spool cover, placed in the spring, then pressed the bottom cap back on.
    Did you find this story helpful?
    Thanks for voting and helping fellow customers!

    Had a broken lever that I replaced

    Milton - March 27, 2016
    👍 4 of 4 people found this instruction helpful
    Tool Type

    Trimmer

    Difficulty

    Easy

    Time

    Less than 15 minutes

    Tools Used

    , No tools needed

    Had to replace the lever that was broken and because of wear I replaced
    the spool,spring and cover and was ready to go to work in a heartbeat. It was a simple
    repair. I had a harder time finding a web site that had the parts I needed than the repair.
    Thanks
    Did you find this story helpful?
    Thanks for voting and helping fellow customers!

    The pin on the lever that engages the spool was broken off. Replacing the push-in lever fixed the problem of the line unraveling.

    David - April 10, 2016
    👍 3 of 3 people found this instruction helpful
    Tool Type

    Trimmer

    Difficulty

    Easy

    Time

    Less than 15 minutes

    Tools Used

    Pliers, None

    Pull out the lever using pliers and push in the replacement. Simple job.
    Did you find this story helpful?
    Thanks for voting and helping fellow customers!

    Broken lever would not permit line to advance from tripper under centrifugal force

    Paul - June 20, 2017
    👍 2 of 2 people found this instruction helpful
    Tool Type

    Grass Trimmer

    Difficulty

    Easy

    Time

    Less than 15 minutes

    Tools Used

    Screwdriver

    1. Removed the cover from the trimmer and line spool.
    2. Carefully pried the old lever out using a screwdriver.
    3. Pressed the new lever into the recess.
    4. Replaced the line spool and cover.
    Strangely, the old lever did not appear broken, but with the replacement lever, the trimmer works like new.
    Did you find this story helpful?
    Thanks for voting and helping fellow customers!

    Broken lever arm

    Dave - June 7, 2017
    👍 2 of 2 people found this instruction helpful
    Tool Type

    Grass Trimmer

    Difficulty

    Medium

    Time

    Less than 15 minutes

    Tools Used

    Pliers

    Remove the bottom plate and the spool. Remove the lever from the spool housing. Press the new lever on. Install the spool and the bottom plate
    Did you find this story helpful?
    Thanks for voting and helping fellow customers!

    Auto feed lever was worn out

    Thomas - July 27, 2017
    👍 1 of 1 people found this instruction helpful
    Tool Type

    Grass Trimmer

    Difficulty

    Easy

    Time

    Less than 15 minutes

    Tools Used

    Pliers

    Removed trimmer line spool and pulled off the old lever with needle nose pliers. Pushed new lever in it's place and replaced line spool. (Too Easy) Took 5 minutes. Auto feed works like new.
    Did you find this story helpful?
    Thanks for voting and helping fellow customers!

    Trimmer spool lever worn. Cutting line would not auto extract

    Charles - July 12, 2017
    👍 1 of 1 people found this instruction helpful
    Tool Type

    Grass Trimmer

    Difficulty

    Easy

    Time

    Less than 15 minutes

    Tools Used

    Pliers

    Remove the bottom cover
    Removed the spool
    Removed the old lever from the spool cover and installed the new lever
    Replaced the spool
    Replaced the bottom cover
    Did you find this story helpful?
    Thanks for voting and helping fellow customers!

    String would not feed properly

    Michael - July 12, 2017
    👍 1 of 1 people found this instruction helpful
    Tool Type

    Grass Trimmer

    Difficulty

    Easy

    Time

    Less than 15 minutes

    Tools Used

    Pliers

    removed the cap and spool, then using needle nose pliers pulled out damaged lever, snapped in place the new lever; installed spool and cap ready to go
    Did you find this story helpful?
    Thanks for voting and helping fellow customers!

    OEM stands for Original Equipment Manufacturer and means the part you’re buying is sourced directly from the manufacturer who made your product. At eReplacementParts, we sell only genuine OEM parts, guaranteeing the part you’re purchasing is of better design and of higher quality than aftermarket parts.

    Our product descriptions are a combination of data sourced directly from the manufacturers who made your product as well as content researched and curated by our content & customer service teams. This content is edited and reviewed internally before being made public to customers.

    Our customer service team are at the ready daily to answer your part and product questions. We have a dedicated staff with decades of collective experience in helping customers just like you purchase parts to repair their products.

    All our part reviews are solicited directly from other customers who have purchased this exact part. While we moderate these reviews for profanity, offensive language or personally identifiable information, these reviews are posted exactly as submitted and no alterations are made by our team.

    All our customer repair instructions are solicited directly from other customers just like you who have purchased and replaced this exact part. While we moderate these reviews for profanity, offensive language or personally identifiable information, these reviews are posted exactly as submitted and no alterations are made by our team.

    Based on data from past customer purchasing behaviors, these parts are most commonly purchased together along with the part you are viewing. These parts may be necessary or helpful to replace to complete your current repair.

    All our installation videos are created and produced in collaboration with our in-house repair technician, Mark Sodja, who has helped millions of eReplacementParts customers over the last 13 years repair their products. Mark has years of experience in selling and repairing both commercial and residential products with a specialty in gas-powered equipment.

    This data is collected from customers who submitted a repair instruction after replacing this exact part. Customers can rate how easy the repair was to complete and how long it took. We aggregate this data to provide a repair rating that allows customers to quickly determine the difficulty and time needed to perform their own repair.

    eReplacementParts.com
    7174 South 400 West
    Suite 5
    Midvale, UT 84047
    visa mastercard discover american express PayPal