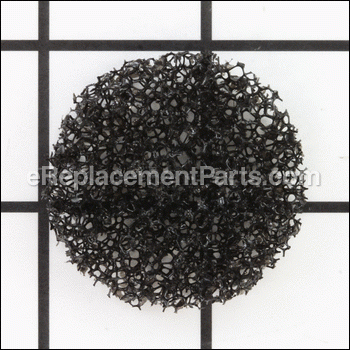

This part comes directly from the manufacturer. The Lever Filter is used in many models of Bissell vacuum cleaners. This Filter fits into Lock N Seal Lever (part number B-203-1190) and is used to filter out any large particles before the motor. This Filter is made of a flexible foam. This Filter should be replaced if it becomes torn or lost. To replace this part the Dirt Cup (B-203-2453) and the Filter Case (B-203-2454) will need to be removed.
Lever Filter B-203-1215
OEM part for: Bissell
Part Number: B-203-1215
$3.99
In Stock
Jump To:
Frequently Purchased Together ?


Compatibility
This part will fit the following 44 machines
Bissell
6585 Powerforce Turbo Bagless Upright Vacuum View Diagrams & Manuals
3576 Cleanview II Bagless Vacuum View Diagrams & Manuals
3576-1 Cleanview II Bagless Vacuum View Diagrams & Manuals
3576-2 Cleanview II Bagless Vacuum View Diagrams & Manuals
3576-6 Cleanview II Bagless Vacuum View Diagrams & Manuals
3576-C Cleanview II Bagless Vacuum View Diagrams & Manuals
3576-H Cleanview II Bagless Vacuum View Diagrams & Manuals
3576-U Cleanview II Bagless Vacuum View Diagrams & Manuals
20Q9 Cleanview II Plus Upright Vacuum View Diagrams & Manuals
82H1 Cleanview Helix Upright Vacuum View Diagrams & Manuals
22C1 Cleanview Helix Upright Vacuum View Diagrams & Manuals
22C1-2 Cleanview Helix Upright Vacuum View Diagrams & Manuals
21K3 Cleanview Helix Upright Vacuum View Diagrams & Manuals
3574 Cleanview II Upright Vacuum View Diagrams & Manuals
6579 Powerforce Cleaners Bagless Upright Vacuum View Diagrams & Manuals
6594 Powerforce Cleaners Bagless Upright Vacuum View Diagrams & Manuals
6579-2 Powerforce Cleaners Bagless Upright Vacuum View Diagrams & Manuals
6582 Powerforce Bagless Upright Vacuum View Diagrams & Manuals
6583 Powerforce Bagless Upright Vacuum View Diagrams & Manuals
6596 PowerForce Bagless Turbo Upright Vacuum View Diagrams & Manuals
58F8 Rewind SmartClean Upright Vacuum View Diagrams & Manuals
58F83 Rewind SmartClean Upright Vacuum View Diagrams & Manuals
84G9 Rewind SmartClean Upright Vacuum View Diagrams & Manuals
18M9P Rewind SmartClean Upright Vacuum View Diagrams & Manuals
18M9V Rewind SmartClean Upright Vacuum View Diagrams & Manuals
18M9W Rewind SmartClean Upright Vacuum View Diagrams & Manuals
6584 Powerforce Bagless Upright Vacuum View Diagrams & Manuals
44M3 Rewind Pet Premium View Diagrams & Manuals
62X5 PowerClean Rewind View Diagrams & Manuals
68C7 Upright Bagless Vacuum View Diagrams & Manuals
98N4 Powergroom Helix Rewind View Diagrams & Manuals
6579-3 Powerforce Bagless Vacuum View Diagrams & Manuals
20Q92 Upright - Cleanview Ii View Diagrams & Manuals
12B1 (1240) Powerforce Helix Bagless Upright View Diagrams & Manuals
18M9 Rewind Smartclean Bagless Upright View Diagrams & Manuals
26T5 Rewind Smartclean Bagless Upright View Diagrams & Manuals
3576-M Cleanview 2 Bagless Upright View Diagrams & Manuals
6221 Cleanview Bagged Upright View Diagrams & Manuals
67F8 Rewind Premium Pet Bagless View Diagrams & Manuals
71V92 Cleanview Helix Bagless Upright View Diagrams & Manuals
73G8 Cleanview II Bagless View Diagrams & Manuals
81L2 PowerEdge Hard Floor Vacuum View Diagrams & Manuals
82H CleanView Helix Bagless View Diagrams & Manuals
95P1 CleanView Helix Bagless View Diagrams & Manuals
Show More Compatible Models
This item works with the following types of products:
- Vacuum Parts
This part replaces obsolete part #: 203-1215
Customer Part Reviews ?
Average Rating (out of 5):
Click to filter by ratings:
5 stars
4
4 stars
0
3 stars
0
2 stars
0
1 stars
0
< PREV
- 1
Perfect Fit
just what was needed. glad I found you guys
Guest -
June 28, 2022
Verified Purchase
Bissell vacuum
One of six parts I ordered. Fit perfectly and were Bissell vacuum parts I couldn't even find from the Bissell website!
Guest -
May 14, 2021
Verified Purchase
Exactly what I needed!
I didn't even know this was a filter my vacuum used. I ordered this and two other filters. My vacuum now works like new again. I would definitely order from ereplacementparts again.
Guest -
April 14, 2021
Verified Purchase
Yes parts were right
My vacuum is like new again
Guest -
January 12, 2021
Verified Purchase
t
t
t -
t days ago
Verified Purchase
eReplacementParts Team
t
Questions & Answers ?
Our customer Service team is at the ready daily to answer your part and product questions.

Ask our Team
We have a dedicated staff with decades of collective experience in helping customers just like you purchase parts to repair their products.
Does this fit my product?Questions & Answers for Lever Filter
No questions have been asked yet
Customer Repair Instructions ?
All our customer repair instructions are solicited directly from other customers just like you who have purchased and replaced this exact part.
The upright locking lever broke and i had to remove old one and put new in. I needed two thin blade screwdrivers to expand the housing enough to pop old release out and it was trial and error until I
conrad - September 9, 2016
👍 3 of 3 people found this instruction helpful
Tool Type
Vacuum
Difficulty
Medium
Time
15-30 minutes
Tools Used
Screwdriver
Put the wheeled assy up on back of a chair as I needed to get at the bottom where the release lever was in plastic housing. Lever was held in place and pivoted on two prongs on the new lever I saw how there was an angle to prongs saw I knew it would slide down and lock in to slots in housing so I knew I had to get it to go upward after a few minutes trying to pop it out one side at a time I took two screwdrivers with 1/8th inch shafts and inserted on both sides of lever moving prongs out of slots. I hit lever with a pen and it fell out Putting vacuum on floor I inserted new lever until it snapped in place. The filters I replaced as I needed to put a little more volume on my order so decided to replace the filters. The best advice I can give on making a repair is to study the replacement part to see how it is made to be sure of what you are going to do. I do not advise using knife blades but it is up to the DIYer to decide.
Did you find this story helpful?
Thanks for voting and helping fellow customers!
Would not work due to broken belt and clogged up filters. I got the Vac at a Yard Sell.
Sheila - June 20, 2016
👍 1 of 1 people found this instruction helpful
Tool Type
Vacuum
Difficulty
Easy
Time
15-30 minutes
Tools Used
Screwdriver
I had already removed all parts and cleaned them and removed broken belt. Then looking at picture of parts on your web sight. Replaced all filters and reinstalled the belt turned on the vac and it works like a champ. This is bagless Bissell with Hepa Filter.
Did you find this story helpful?
Thanks for voting and helping fellow customers!
lost part
Diane - March 18, 2019
Tool Type
Vacuum
Difficulty
Easy
Time
Less than 15 minutes
Tools Used
, nothing
replaced missing part
Did you find this story helpful?
Thanks for voting and helping fellow customers!
All the filters were old and in need of replacement.
Diana - February 18, 2018
Tool Type
Vacuum
Difficulty
Easy
Time
Less than 15 minutes
Tools Used
I exchanged each filter item out from old to new. Very easy repair/replacement. Prompt service and delivery. Received accurate parts.
Did you find this story helpful?
Thanks for voting and helping fellow customers!
Maintenance
Donald - November 13, 2016
👍 0 of 1 people found this instruction helpful
Tool Type
Vacuum
Difficulty
Easy
Time
Less than 15 minutes
Tools Used
Screwdriver
Remove the dirt cup
Remove the pleated filter
Remove the lock lever and filter
Remove the foam filter
Replace the filter remove
Install the part in reverse
Remove the pleated filter
Remove the lock lever and filter
Remove the foam filter
Replace the filter remove
Install the part in reverse
Did you find this story helpful?
Thanks for voting and helping fellow customers!
OEM stands for Original Equipment Manufacturer and means the part you’re buying is sourced directly from the manufacturer who made your product. At eReplacementParts, we sell only genuine OEM parts, guaranteeing the part you’re purchasing is of better design and of higher quality than aftermarket parts.
Our product descriptions are a combination of data sourced directly from the manufacturers who made your product as well as content researched and curated by our content & customer service teams. This content is edited and reviewed internally before being made public to customers.
Our customer service team are at the ready daily to answer your part and product questions. We have a dedicated staff with decades of collective experience in helping customers just like you purchase parts to repair their products.
All our part reviews are solicited directly from other customers who have purchased this exact part. While we moderate these reviews for profanity, offensive language or personally identifiable information, these reviews are posted exactly as submitted and no alterations are made by our team.
All our customer repair instructions are solicited directly from other customers just like you who have purchased and replaced this exact part. While we moderate these reviews for profanity, offensive language or personally identifiable information, these reviews are posted exactly as submitted and no alterations are made by our team.
Based on data from past customer purchasing behaviors, these parts are most commonly purchased together along with the part you are viewing. These parts may be necessary or helpful to replace to complete your current repair.
All our installation videos are created and produced in collaboration with our in-house repair technician, Mark Sodja, who has helped millions of eReplacementParts customers over the last 13 years repair their products. Mark has years of experience in selling and repairing both commercial and residential products with a specialty in gas-powered equipment.
This data is collected from customers who submitted a repair instruction after replacing this exact part. Customers can rate how easy the repair was to complete and how long it took. We aggregate this data to provide a repair rating that allows customers to quickly determine the difficulty and time needed to perform their own repair.