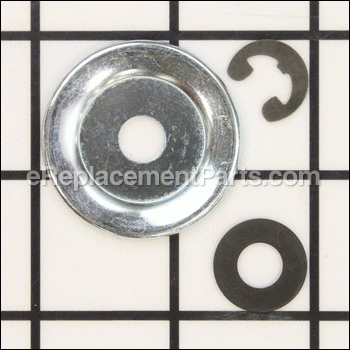


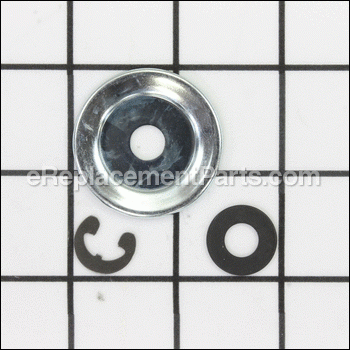
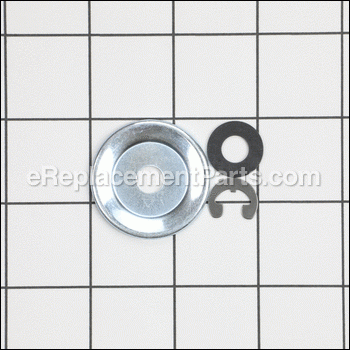

It is a genuine OEM item that is made for Craftsman chainsaws. This is a special component which helps to provide a tight fit between connected parts. Over time it may wear out, get damaged or lost eventually requiring a replacement. Make sure to check the appropriate diagrams for your model to ensure the proper repair procedure. It consists of three durable metal parts.
Clutch Washer Kit 530071945
OEM part for: Poulan, Craftsman, Jonsered, Husqvarna, Weed Eater
Part Number: 530071945
$6.21
In Stock
Jump To:
Frequently Purchased Together ?


Compatibility
This part will fit the following 166 machines
Poulan
P3314 Type 1 Gas Chain Saw View Diagrams & Manuals
P3314 Type 2 Gas Chain Saw View Diagrams & Manuals
P3314WS Type 1 Gas Chain Saw View Diagrams & Manuals
P3314WS Type 2 Gas Chain Saw View Diagrams & Manuals
P3314WSA Type 1 Gas Chain Saw View Diagrams & Manuals
P3314WSA Type 2 Gas Chain Saw View Diagrams & Manuals
P3416 Type 1 Gas Chain Saw View Diagrams & Manuals
P3416 Type 2 Gas Chain Saw View Diagrams & Manuals
P3516PR Type 1 Gas Chain Saw View Diagrams & Manuals
P3516PR Type 2 Gas Chain Saw View Diagrams & Manuals
P3818AV Type 1 Gas Chain Saw View Diagrams & Manuals
P3818AV Type 2 Gas Chain Saw View Diagrams & Manuals
P4018 Gas Chain Saw View Diagrams & Manuals
P4018AV Type 1 Gas Chain Saw View Diagrams & Manuals
P4018AV Type 2 Gas Chain Saw View Diagrams & Manuals
P4018AV-BH Type 1 Gas Chain Saw View Diagrams & Manuals
P4018AV-BH Type 2 Gas Chain Saw View Diagrams & Manuals
P4018WM Type 1 Gas Chain Saw View Diagrams & Manuals
P4018WM Type 2 Gas Chain Saw View Diagrams & Manuals
P4018WT Type 1 Gas Chain Saw View Diagrams & Manuals
P4018WT Type 2 Gas Chain Saw View Diagrams & Manuals
P4018WTL Gas Chain Saw View Diagrams & Manuals
PP3516 Type 2 Gas Chain Saw View Diagrams & Manuals
PP3816 Type 2 Gas Chain Saw View Diagrams & Manuals
PP3816AV Type 2 Gas Chain Saw View Diagrams & Manuals
PP4018 Type 2 Gas Chain Saw View Diagrams & Manuals
PP4218AV Type 2 Gas Chain Saw View Diagrams & Manuals
PP4218AVHD Type 2 Gas Chain Saw View Diagrams & Manuals
PP4218AVL Type 2 Gas Chain Saw View Diagrams & Manuals
PPB3416 Type 2 Gas Chain Saw View Diagrams & Manuals
PPB4018 Type 2 Gas Chain Saw View Diagrams & Manuals
S1970 Type 1 Gas Chain Saw View Diagrams & Manuals
S1970 Type 2 Gas Chain Saw View Diagrams & Manuals
SM4218AV Type 2 Gas Chain Saw View Diagrams & Manuals
PP3516AVX Gas Chainsaw View Diagrams & Manuals
PP4218AVX Gas Chainsaw View Diagrams & Manuals
PP4218 (Type 1 ) Gas Saw View Diagrams & Manuals
PP4218 (Type 2) Gas Saw View Diagrams & Manuals
PPB4218 Chain Saw View Diagrams & Manuals
PP3416 (966063001) Gas Chainsaw View Diagrams & Manuals
P3816 Gas Chain Saw Type 1 View Diagrams & Manuals
PP3816AV Gas Saw Type 1 View Diagrams & Manuals
PP4218AV (Type 1) Gas Saw 4218AV-POULAN Pro View Diagrams & Manuals
PPB4218 (Type 1) Gas Chainsaw View Diagrams & Manuals
PPB4218 (Type 2) Gas Chainsaw View Diagrams & Manuals
SM4218AVX Gas Chainsaw View Diagrams & Manuals
SM4518AVX Gas Chainsaw View Diagrams & Manuals
P 3816 (Type 2) Chainsaw View Diagrams & Manuals
P 3818 (2012-01) Chainsaw View Diagrams & Manuals
P 4018 (952802151)(2012-01) Chainsaw View Diagrams & Manuals
P 4018 AV-BH Chainsaw View Diagrams & Manuals
PP 3516 (Type 1)(2006-12) Chainsaw View Diagrams & Manuals
PP 3516 (Type 2)(2006-12) Chainsaw View Diagrams & Manuals
PP 3816 (Type 1)(2006-07) Chainsaw View Diagrams & Manuals
PP 3816 (Type 2)(2006-07) Chainsaw View Diagrams & Manuals
PP 4018 (Type 1) Chainsaw View Diagrams & Manuals
PP 4018 (Type 1)(2006-06) Chainsaw View Diagrams & Manuals
PP 4018 (Type 2)(2006-06) Chainsaw View Diagrams & Manuals
PP 4218 (2012-01) Chainsaw View Diagrams & Manuals
PP 4218 (Type 1)(2006-07) Chainsaw View Diagrams & Manuals
PP 4218 (Type 2)(2006-07) Chainsaw View Diagrams & Manuals
PP 4218 AVHD (Type 1) Chainsaw View Diagrams & Manuals
PP 4218 AVHD (Type 1)(2006-09) Chainsaw View Diagrams & Manuals
PP 4218 AVHD (Type 2)(2006-09) Chainsaw View Diagrams & Manuals
PPB 3416 (Type 1)(2008-07) Chainsaw View Diagrams & Manuals
PPB 3416 (Type 2)(2008-07) Chainsaw View Diagrams & Manuals
PPB 4018 (Type 1) Chainsaw View Diagrams & Manuals
PPB 4018 (Type 1)(2006-12) Chainsaw View Diagrams & Manuals
PPB 4018 (Type 2)(2006-12) Chainsaw View Diagrams & Manuals
PPB 4218 (Type 1)(2008-07) Chainsaw View Diagrams & Manuals
PPB 4218 (Type 2)(2008-07) Chainsaw View Diagrams & Manuals
Craftsman
358351710 Chainsaw View Diagrams & Manuals
358351700 Chainsaw View Diagrams & Manuals
358350990 Chainsaw View Diagrams & Manuals
358351900 Chainsaw View Diagrams & Manuals
358351820 Chainsaw View Diagrams & Manuals
358351600 Chainsaw View Diagrams & Manuals
358351810 Chainsaw View Diagrams & Manuals
358351800 Chainsaw View Diagrams & Manuals
358350820 Chainsaw View Diagrams & Manuals
358350821 Chainsaw View Diagrams & Manuals
358350870 Chainsaw View Diagrams & Manuals
358350880 Chainsaw View Diagrams & Manuals
358350830 Chainsaw View Diagrams & Manuals
358351610 Chainsaw View Diagrams & Manuals
358351902 Gas Chainsaw View Diagrams & Manuals
358350992 Gas Chainsaw View Diagrams & Manuals
358351702 Gas Chainsaw View Diagrams & Manuals
358351910 Chainsaw View Diagrams & Manuals
358350991 Chainsaw View Diagrams & Manuals
358351901 Chainsaw View Diagrams & Manuals
358351701 Chainsaw View Diagrams & Manuals
358360690 Chainsaw View Diagrams & Manuals
358360681 Chainsaw View Diagrams & Manuals
944415371 Chainsaw View Diagrams & Manuals
358350811 Chainsaw View Diagrams & Manuals
358350671 Chainsaw View Diagrams & Manuals
944415431 Chainsaw View Diagrams & Manuals
358360381 Chainsaw View Diagrams & Manuals
358360361 Chainsaw View Diagrams & Manuals
944415361 Chainsaw View Diagrams & Manuals
358360680 Chainsaw View Diagrams & Manuals
944415430 Chainsaw View Diagrams & Manuals
944415370 Chainsaw View Diagrams & Manuals
944415360 Chainsaw View Diagrams & Manuals
358350670 Chainsaw View Diagrams & Manuals
358360360 Chainsaw View Diagrams & Manuals
358350810 Chainsaw View Diagrams & Manuals
358360380 Chainsaw View Diagrams & Manuals
358341950 Chainsaw View Diagrams & Manuals
358381700 Chainsaw View Diagrams & Manuals
358341900 Chain Saw View Diagrams & Manuals
967085101 Gas Chainsaw View Diagrams & Manuals
967085001 Gas Chainsaw View Diagrams & Manuals
358740160 Chainsaw View Diagrams & Manuals
Jonsered
CS2138 C (2006-01) Chain Saw View Diagrams & Manuals
Husqvarna
P3314 (Type 1) (2008-07) Chain Saw View Diagrams & Manuals
P3314 (Type 2) (2008-07) Chain Saw View Diagrams & Manuals
P3314 (Type 1) (2008-07) Ws Chain Saw View Diagrams & Manuals
P3314 (Type 2) (2008-07) Ws Chain Saw View Diagrams & Manuals
P3314 (Type 1) (2008-07) Wsa Chain Saw View Diagrams & Manuals
P3314 (Type 2) (2008-07) Wsa Chain Saw View Diagrams & Manuals
P3416 (Type 1) (2008-07) Chain Saw View Diagrams & Manuals
P3416 (Type 2) (2008-07) Chain Saw View Diagrams & Manuals
P3516PR (Type 1) (2008-07) Chain Saw View Diagrams & Manuals
P3516PR (Type 2) (2008-07) Chain Saw View Diagrams & Manuals
P3818AV (Type 1) (2008-07) Chain Saw View Diagrams & Manuals
P3818AV (Type 2) (2008-07) Chain Saw View Diagrams & Manuals
P4018 (Type 1) (2008-07) Wt Chain Saw View Diagrams & Manuals
P4018 (Type 2) (2008-07) Wt Chain Saw View Diagrams & Manuals
P4018AV (Type 1) (2008-07) Chain Saw View Diagrams & Manuals
P4018AV (Type 2) (2008-07) Chain Saw View Diagrams & Manuals
P4018AVBH (Type 1) (2008-07) Chain Saw View Diagrams & Manuals
P4018AVBH (Type 2) (2008-07) Chain Saw View Diagrams & Manuals
P4018WM (Type 1) (2008-07) Chain Saw View Diagrams & Manuals
P4018WM (Type 2) (2008-07) Chain Saw View Diagrams & Manuals
PP3516 (Type 1) (2006-12) Chain Saw View Diagrams & Manuals
PP3516 (Type 2) (2006-12) Chain Saw View Diagrams & Manuals
PP3816 (Type 1) (2006-07) Chain Saw View Diagrams & Manuals
PP3816 (Type 2) (2006-07) Chain Saw View Diagrams & Manuals
PP3816AV (Type 1) (2008-07) Chain Saw View Diagrams & Manuals
PP3816AV (Type 2) (2008-07) Chain Saw View Diagrams & Manuals
PP4018 (Type 1) (2006-06) Chain Saw View Diagrams & Manuals
PP4018 (Type 2) (2006-06) Chain Saw View Diagrams & Manuals
PP4218 (Type 1) (2006-07) Chain Saw View Diagrams & Manuals
PP4218 (Type 2) (2006-07) Chain Saw View Diagrams & Manuals
PP4218AV (Type 1) (2006-12) Chain Saw View Diagrams & Manuals
PP4218AV (Type 1) (2008-07) Chain Saw View Diagrams & Manuals
PP4218AV (Type 2) (2006-12) Chain Saw View Diagrams & Manuals
PP4218AV (Type 2) (2008-07) Chain Saw View Diagrams & Manuals
PP4218AV (Type 1) (952802031) (2008-07) Chain Saw View Diagrams & Manuals
PP4218AV (Type 2) (952802031) (2008-07) Chain Saw View Diagrams & Manuals
PP4218AVHD (Type 1) (2006-09) Chain Saw View Diagrams & Manuals
PP4218AVHD (Type 2) (2006-09) Chain Saw View Diagrams & Manuals
PPB3416 (Type 1) (2008-07) Chain Saw View Diagrams & Manuals
PPB3416 (Type 2) (2008-07) Chain Saw View Diagrams & Manuals
PPB4018 (Type 1) (2006-12) Chain Saw View Diagrams & Manuals
PPB4018 (Type 2) (2006-12) Chain Saw View Diagrams & Manuals
PPB4218 (Type 1) (2008-07) Chain Saw View Diagrams & Manuals
PPB4218 (Type 2) (2008-07) Chain Saw View Diagrams & Manuals
S1970 (Type 1) (2006-06) Woodshark View Diagrams & Manuals
S1970 (Type 2) (2006-06) Woodshark View Diagrams & Manuals
SM4218AV (Type 1) (2008-07) Chain Saw View Diagrams & Manuals
SM4218AV (Type 2) (2008-07) Chain Saw View Diagrams & Manuals
SM4218AVX (2008-09) Chain Saw View Diagrams & Manuals
Weed Eater
PP3516AVX (2012-06) Chainsaw View Diagrams & Manuals
Show More Compatible Models
This item works with the following types of products:
- Chain Saw Parts
- Saw Parts
Repair Videos ?
Watch the Repair Video for
Clutch Washer Kit

Articles:
|
Washers warped? Step-by-step instructions show you how to install the clutch washer kit on your Poulan chainsaw....
January 03, 2017
|

Customer Part Reviews ?
Average Rating (out of 5):
Click to filter by ratings:
5 stars
13
4 stars
2
3 stars
0
2 stars
0
1 stars
0
< PREV
- 1
- 2
Good quality part
Was just what I needed. It came quickly and worked as expected ! Easy shopping experience.
Guest -
November 1, 2022
Verified Purchase
Excellent parts very easy to instal
Shipping was very fast great quality
Guest -
July 7, 2022
Verified Purchase
Correct replacement part.
Exactly what I ordered.
Guest -
February 8, 2022
Verified Purchase
Fast Service
Parts arrived quick and the website was easy to navigate to find parts. Thanks
Guest -
April 21, 2021
Verified Purchase
The Exact Part I Needed and a Very Easy Repair
My Chainsaw popped out the little clip that holds the clutch washer and secures the chain. My work stopped. But then I did a quick search on eReplacement Parts and found my parts kit quickly and at a great price. The kit showed up in days and I was able to re-install it on my Chainsaw and I was back in business right away! Great service.
Guest -
February 8, 2021
Verified Purchase
happy customer
order was easy and all part were on time and worked perfectly
Guest -
May 15, 2020
Verified Purchase
Perfect fit
The part was a perfect fit . Good quality, and price.
Tim -
March 4, 2020
Verified Purchase
Exactly like origional
Easy to install, my chainsaw is working again
Kenneth -
January 20, 2020
Verified Purchase
Great part
The part arrived on scheduled and was easy to install,now my chainsaw works perfectly
Bruce -
November 9, 2019
Verified Purchase
Worked as expected
A little difficult to get the clip on but part functioned as expect. I thought shipping cost were a little high for this part
Guest -
October 29, 2019
Verified Purchase
t
t
t -
t days ago
Verified Purchase
eReplacementParts Team
t
Questions & Answers ?
Our customer Service team is at the ready daily to answer your part and product questions.

Ask our Team
We have a dedicated staff with decades of collective experience in helping customers just like you purchase parts to repair their products.
Does this fit my product?Questions & Answers for Clutch Washer Kit
Will this washer kit fit poulan pro chainsaw?
Jerry
for model number Pr4218
asked on 2023-03-15
Hi Jerry,
Thank you for your question. Yes, this kit is listed for your chainsaw. If you would like to place an order for it, please call our customer service line and anyone will be happy to assist you. We look forward to hearing from you!
eReplacementParts Team March 15, 2023
Customer Repair Instructions ?
All our customer repair instructions are solicited directly from other customers just like you who have purchased and replaced this exact part.
Teeth on clutch drum worn and chain slipped and came off.
Ron - January 2, 2016
👍 8 of 8 people found this instruction helpful
Tool Type
Chain Saw
Difficulty
Medium
Time
15-30 minutes
Tools Used
Screwdriver, Pliers, hammer and brass punch
Removed, cover and chain.
Removed c-clip retaining clutch drum and removed the drum.
Removed clutch assembly (left-hand threads !) by tapping it with the hammer and brass punch.
Removed the large clutch washer and replaced it with the new washer and clutch assembly.
Lubed the clutch drum bearing and installed the drum.
Re-installed the c-clip.
Ready for a new chain and cover.
Did you find this story helpful?
Thanks for voting and helping fellow customers!
Chain would not turn - the drive gear teeth were worn and needed replacing
Jon - May 23, 2016
👍 3 of 3 people found this instruction helpful
Tool Type
Chain Saw
Difficulty
Easy
Time
Less than 15 minutes
Tools Used
Screwdriver, hammer, punch, torx wrench
Removed cover. Removed spark plug. Rotated piston just short of TDC. Inserted nylon rope into spark plug hole to stop piston from moving. Used a hammer and punch to unthread the clutch (clockwise - reverse threads). Threaded on new clutch and reinstalled new clutch housing, washers, etc. Reinstalled spark plug and cover.
Did you find this story helpful?
Thanks for voting and helping fellow customers!
Washer fell off the clutch
jerry - February 19, 2016
👍 2 of 2 people found this instruction helpful
Tool Type
Chain Saw
Difficulty
Easy
Time
Less than 15 minutes
Tools Used
Screwdriver, Pliers
Parts Used
Remove the clutch cover, remove the chain from the sprocket. Then remove the c-clip from the shaft, and remove the larger washer, clutch drum and small washer behind it. Place the small washer on the shaft, then the clutch drum, the large washer and c-clip. Put the chain on the sprocket . Then install the clutch cover. Then adjust the chain to the correct tension.
Did you find this story helpful?
Thanks for voting and helping fellow customers!
Replaced chain drive gear and washer
Joseph - February 10, 2016
👍 2 of 2 people found this instruction helpful
Tool Type
Chain Saw
Difficulty
Easy
Time
Less than 15 minutes
Tools Used
Pliers
Remove the clutch cover assembly. Then remove the c ring and washer. You now can remove the worn clutch drum. Replace all of the parts in reverse order. And you are done.
Did you find this story helpful?
Thanks for voting and helping fellow customers!
Clutch drum was warn, chain falls off.
Albert - July 20, 2018
👍 1 of 1 people found this instruction helpful
Tool Type
Chain Saw
Difficulty
Easy
Time
15-30 minutes
Tools Used
Pliers, Socket set
1) Remove plastic chain cover
2) Remove chain
3) Remove "c" clip from clutch washer
4) Replace clutch drum
5) Re-install chain and cover.
2) Remove chain
3) Remove "c" clip from clutch washer
4) Replace clutch drum
5) Re-install chain and cover.
Did you find this story helpful?
Thanks for voting and helping fellow customers!
Groove worn in drive gear on clutch drum.
Kevin - July 3, 2018
👍 1 of 1 people found this instruction helpful
Tool Type
Chain Saw
Difficulty
Easy
Time
15-30 minutes
Tools Used
Screwdriver, Socket set, Snap ring pliers.
1.Remove clutch cover.
2.Removed bar and chain.
3.Removed snap ring,washer kit, clutch drum.
4.Installed new parts.
Chainsaw working great like brand new.
2.Removed bar and chain.
3.Removed snap ring,washer kit, clutch drum.
4.Installed new parts.
Chainsaw working great like brand new.
Did you find this story helpful?
Thanks for voting and helping fellow customers!
Misplaced sprocket washer.
Marcel - May 31, 2018
👍 1 of 1 people found this instruction helpful
Tool Type
Chain Saw
Difficulty
Easy
Time
Less than 15 minutes
Tools Used
Screwdriver, Wrench Set
Parts Used
1 Removed chain bar retainer.
2 Removed chain bar.
3 Removed retainer clip.
4 Installed sprocket washer
5 Installed retainer clip
6 Installed chain bar
7 Installed chain bar retainer
2 Removed chain bar.
3 Removed retainer clip.
4 Installed sprocket washer
5 Installed retainer clip
6 Installed chain bar
7 Installed chain bar retainer
Did you find this story helpful?
Thanks for voting and helping fellow customers!
Chainsaw clutch drum-sprocket was worn from contact while driving the chain.
William - May 29, 2018
👍 1 of 1 people found this instruction helpful
Tool Type
Chain Saw
Difficulty
Easy
Time
Less than 15 minutes
Tools Used
Screwdriver, Pliers
1. Slacken chain tension.
2. Remove clutch cover, then chain and bar together.
3. Using flat-blade screwdriver, remove circlip from spindle groove.
4. Lift away washer.
5. Lift out Clutch Drum.
6. Slide new Clutch Drum onto spindle.
7. Slide new Clutch Washer onto spindle.
8. Using needle-nosed pliers (or fingertips), slide new circlip into spindle groove.
9. Fit chain and bar.
10. Re-align chain tensioner (new, unworn part will make a difference in chain tension).
11. Carefully install cover, ensuring that chain tensioner lug is aligned with mating hole in cutting bar.
12. Install clutch cover.
13. Adjust chain.
Did you find this story helpful?
Thanks for voting and helping fellow customers!
Chain brake broken
Paul - May 9, 2018
👍 1 of 1 people found this instruction helpful
Tool Type
Chain Saw
Difficulty
Easy
Time
30-60 minutes
Tools Used
Screwdriver, Pliers, None
Safety glasses on (you're working with a spring).
Removed old assembly. Installed per directions. Once the drum is on, you do need to move the lever, to seat the new brake assembly. Good idea to watch e-replacement's video, before you install.
https://www.youtube.com/watch?v=V6e1dS-8M-s
Removed old assembly. Installed per directions. Once the drum is on, you do need to move the lever, to seat the new brake assembly. Good idea to watch e-replacement's video, before you install.
https://www.youtube.com/watch?v=V6e1dS-8M-s
Did you find this story helpful?
Thanks for voting and helping fellow customers!
Chain falling off
Nick - April 27, 2018
👍 1 of 1 people found this instruction helpful
Tool Type
Chain Saw
Difficulty
Medium
Time
30-60 minutes
Tools Used
Screwdriver, Socket set, Spark plug socket and cotton cord.
I removed the spark plug and inserted cotton cord into cylinder, turned clutch clockwise until snug, then used a hammer and drift to loosen clutch, replaced with new parts.
Did you find this story helpful?
Thanks for voting and helping fellow customers!
Load More Install Stories
OEM stands for Original Equipment Manufacturer and means the part you’re buying is sourced directly from the manufacturer who made your product. At eReplacementParts, we sell only genuine OEM parts, guaranteeing the part you’re purchasing is of better design and of higher quality than aftermarket parts.
Our product descriptions are a combination of data sourced directly from the manufacturers who made your product as well as content researched and curated by our content & customer service teams. This content is edited and reviewed internally before being made public to customers.
Our customer service team are at the ready daily to answer your part and product questions. We have a dedicated staff with decades of collective experience in helping customers just like you purchase parts to repair their products.
All our part reviews are solicited directly from other customers who have purchased this exact part. While we moderate these reviews for profanity, offensive language or personally identifiable information, these reviews are posted exactly as submitted and no alterations are made by our team.
All our customer repair instructions are solicited directly from other customers just like you who have purchased and replaced this exact part. While we moderate these reviews for profanity, offensive language or personally identifiable information, these reviews are posted exactly as submitted and no alterations are made by our team.
Based on data from past customer purchasing behaviors, these parts are most commonly purchased together along with the part you are viewing. These parts may be necessary or helpful to replace to complete your current repair.
All our installation videos are created and produced in collaboration with our in-house repair technician, Mark Sodja, who has helped millions of eReplacementParts customers over the last 13 years repair their products. Mark has years of experience in selling and repairing both commercial and residential products with a specialty in gas-powered equipment.
This data is collected from customers who submitted a repair instruction after replacing this exact part. Customers can rate how easy the repair was to complete and how long it took. We aggregate this data to provide a repair rating that allows customers to quickly determine the difficulty and time needed to perform their own repair.