eReplacementParts.com
877-346-4815
DeWALT Parts
Repair Parts Home
  
Power Tool Parts
  
DeWALT Parts
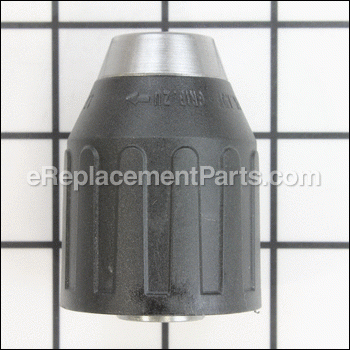
  N504250 Keyless Chuck

Keyless Chuck N504250

OEM part for: DeWALT

Part Number: N504250


Install
Videos!
Grid squares measure 1x1 inch
In Stock
Order within the next 2 hours and your part ships today!
Easy Less than 15 minutes (17 rated repairs)?
OEM: Original Equipment Manufacturer ?
DeWALT
Does this d-block d-md-none fit my product?

Product Description ?

This is an authentic manufacturer-sourced replacement part which is specially designed for use with DeWALT drills. It allows a user to secure drill bits. This 1/2" capacity chuck uses a 1/2"-20 spindle for mounting to the drill. The light-weight plastic and single-sleeve design provide user comfort while improving efficiency with easier keyless bit changes. The ratcheting action clicks the jaws tightly into place for reduced bit slippage. Keep in mind this high-quality component is sold individually. Due to a replacement some models may require #50 Part Number N016823. Please make sure to refer to the owners manual for the correct installation.

See our post on Removing a Cordless Drill Chuck if you need help replacing your old chuck.

  • Classification: Part
  • Weight: 0.44 lbs.
  • Shipping: Ships Worldwide

Frequently Purchased Together ?

Compatibility

This part will fit the following 12 machines

DeWALT

DC759KA Type 1 18V Cordless Drill View Diagrams & Manuals
DC728 Type 1 14.4V Cordless Drill View Diagrams & Manuals
DC720KA 18V Drill Driver View Diagrams & Manuals
DC730A 14.4V Drill Driver View Diagrams & Manuals
DCK759 Type 1 1/2" 18V Drill/Driver View Diagrams & Manuals
DW959 Type 2 18V Cordless Drill View Diagrams & Manuals
DCD760 Type 1 18V Drill Driver Parts View Diagrams & Manuals
DC970 18V Cordless Drill View Diagrams & Manuals
DCD760KL Type 1 18V Compact Drill View Diagrams & Manuals
DCD760B Type 1 18V Drill Driver View Diagrams & Manuals
DC720KA-AR (Type 1) Cordless Drill/Driver Power Tool View Diagrams & Manuals
DC720KA (Type 1) Cordless Drill/Driver Power Tool View Diagrams & Manuals
Show More Compatible Models
Don't see yours? Try searching our site for :

This item works with the following types of products:

  • Cordless Drill Parts
  • Drill Parts

This part replaces obsolete part #: N250759, 330075-74, 330075-64

Repair Videos ?

Articles:
This article explains steps for how to remove threaded-on chucks and taper-fit drill chucks, as well as steps for removi...
September 18, 2009
Broken gearboxes and sticky chuck screws can make removing a drill chuck difficult. This article explains the tricks you...
August 12, 2010

Customer Part Reviews ?

4.7
Average Rating (out of 5):
12 Reviews
Click to filter by ratings:
5 stars
10
4 stars
0
3 stars
2
2 stars
0
1 stars
0
  • Highest Rating
  • Most Recent
< PREV
  • 1
  • 2
NEXT >
  • Exact part I needed, quick shipping!
    This was an easy repair and saved my favorite Dewalt drill/driver.
    Guest - February 25, 2023 Verified Purchase
    restored my Dewalt to former glory
    After watching a Youtube video on the procedure to spin off the old chuck, it was a matter of minutes to install the new one. Wala,all is well.
    Guest - June 21, 2022 Verified Purchase
    Prompt service and shipping - Brand new OEM parts, plus DYI videos. Can't ask for more
    OEM parts, arrived in perfect condition.
    Guest - January 14, 2022 Verified Purchase
    Arrived late but worth the wait !!
    I didn’t receive the drill chuck due to a slow in the mail process, I did receive it , the correct part good quality, My drill is good as new . Great courteous staff to work with, I’ll look for you guys when something else fails, and it always does
    Guest - June 9, 2021 Verified Purchase
    easy repair, worked as expected
    fit perfectly. Drill working again
    Guest - May 11, 2020 Verified Purchase
    Part
    They had what I needed and customer service was great.
    Guest - May 10, 2020 Verified Purchase
    Keyless Chuck replacement
    Fit my drill motor perfectly and works great.
    Guest - February 24, 2020 Verified Purchase
    Worked as expected!
    The keyless chuck worked perfectly! Great OEM part! Fast shipping! Will definitely be my go to store replacement parts!
    Guest - October 10, 2019 Verified Purchase
    Easy find
    The product was easy to find at a fair price and arrived quickly
    Guest - October 4, 2019 Verified Purchase
    Great product.
    Great product. Could use some instruction,as I wasnt sure which way to turn the fasteners to remove the old chuck. But it worked out and my old drill is good for another 10yrs.
    Guest - September 17, 2019 Verified Purchase
    t
    t
    t - t days ago Verified Purchase
    eReplacementParts Team
    t

    Questions & Answers ?

    Our customer Service team is at the ready daily to answer your part and product questions.

    photo of team member
    Ask our Team

    We have a dedicated staff with decades of collective experience in helping customers just like you purchase parts to repair their products.

    Does this fit my product?

    Questions & Answers for Keyless Chuck


    No questions have been asked yet

    Customer Repair Instructions ?

    All our customer repair instructions are solicited directly from other customers just like you who have purchased and replaced this exact part.

    Easy Less than 15 minutes (17 rated repairs)?

    chuck became difficult to use

    glenn - July 16, 2016
    👍 4 of 4 people found this instruction helpful
    Tool Type

    Cordless Drill

    Difficulty

    Easy

    Time

    Less than 15 minutes

    Tools Used

    Screwdriver, Vice grips

    After watching your video I was able to make repair in under 5 min, Thank you!
    Did you find this story helpful?
    Thanks for voting and helping fellow customers!

    The chuck would not open all of the way.

    RUDY - June 7, 2016
    👍 2 of 2 people found this instruction helpful
    Tool Type

    Cordless Drill

    Difficulty

    Easy

    Time

    Less than 15 minutes

    Tools Used

    Screwdriver, Allen wrench,Torx T-20, hammer

    I used a Torx T-20 screwdriver to remove the LH chuck screw. I then made sure that the drill was in low gear and in the drill setting. Use the largest allen wrench that you can tighten in the chuck. Insert the short end of the allen wrench into the chuck and tighten up the chuck. Lay the drill on its side , then strike the long end of the allen wrench with a hammer to unscrew it from the spindle. Once the chuck is removed, screw the new chuck on the drill spindle tight. Then screw in the LH chuck screw. And you're done!
    Did you find this story helpful?
    Thanks for voting and helping fellow customers!

    Chuck was stuck

    Stewart - September 11, 2018
    👍 1 of 1 people found this instruction helpful
    Tool Type

    Cordless Drill

    Difficulty

    Easy

    Time

    Less than 15 minutes

    Tools Used

    Screwdriver, Wrench Set, Hex head wrench and torx screwdriver

    Removed old chuck and replaced. Very simple. Much cheaper than replacing drill
    eReplacement has very good service,very expedient,always the right part,and easy to find on their site and fair prices to go along with it.
    Did you find this story helpful?
    Thanks for voting and helping fellow customers!

    chuck worn out

    Tom - March 25, 2023
    Tool Type

    Cordless Drill

    Difficulty

    Easy

    Time

    Less than 15 minutes

    Tools Used

    , torques driver and Allen wrench

    removed torques screw in chuck, reverse thread
    removed chuck with Allen wrench

    reinstalled new chuck reverse process , good to go.
    Did you find this story helpful?
    Thanks for voting and helping fellow customers!

    Had to provide a washer (spacer) between the chuck and the drill. Original chuck was constructed with a lip (for lack of a better word) to keep it from binding on the drill housing.

    Timothy - August 29, 2022
    Tool Type

    Cordless Drill

    Difficulty

    Easy

    Time

    15-30 minutes

    Tools Used

    Screwdriver, Hex (Allen) wrench & Hammer

    Followed the instructions. I also provided the “SPACER” (washer) that was required.
    Did you find this story helpful?
    Thanks for voting and helping fellow customers!

    Bits would slip in chuck.

    Patrick - March 17, 2022
    Tool Type

    Cordless Drill

    Difficulty

    Easy

    Time

    Less than 15 minutes

    Tools Used

    , Allen wrench, rubber mallet

    Opened up the chuck and removed the retainer screw inside the base of the chuck with an Allen wrench. The screw in my drill did not have a Phillips head as described in some of the instructional videos I watched. After screw removal, I placed a large Allen wrench in the chuck and tightened it securely. Hit the Allen wrench with a large mallet and unscrewed the chuck. Screwed on the new chuck and replaced the retainer screw.
    Did you find this story helpful?
    Thanks for voting and helping fellow customers!

    Bad keyless chuck

    Leslie - February 4, 2022
    Tool Type

    Cordless Drill

    Difficulty

    Easy

    Time

    15-30 minutes

    Tools Used

    Screwdriver, Power Drill, Nutdriver, Impact tool saws drivers

    Removed the old chuck and replace it with the new one simple no big issues. I’m glad I found this site. Used hand tools to complete
    Did you find this story helpful?
    Thanks for voting and helping fellow customers!

    broken clamshell and chuck

    christos - July 10, 2021
    Tool Type

    Cordless Drill

    Difficulty

    Easy

    Time

    15-30 minutes

    Tools Used

    Screwdriver, allen wrench

    reinstall clamshell and endcap. use allen wrench and open end wrench to remove broken chuck.install new chuck and counterclockwise security screw
    Did you find this story helpful?
    Thanks for voting and helping fellow customers!

    The Chuck would not hold drills

    Edward - March 14, 2021
    Tool Type

    Cordless Drill

    Difficulty

    Easy

    Time

    15-30 minutes

    Tools Used

    Screwdriver, Vise and allen wrench

    1.Removed old chuck from Drill using directions from internet, using screwdriver to removed left hand screw in the center of the chuck
    2. Used 3/8 Allen wrench held in my vise to unscrew old chuck from the drill.
    3. Screwed new chuck onto drill by hand. DO NOT OVER TIGHTEN! Hand tighten only.
    4. Reinstalled left hand screw screw tightening it securely.
    Did you find this story helpful?
    Thanks for voting and helping fellow customers!

    Old chuck would not lock drill bit

    TOM - July 23, 2020
    Tool Type

    Cordless Drill

    Difficulty

    Easy

    Time

    Less than 15 minutes

    Tools Used

    Screwdriver

    Replaced the chuck;
    I removed the old chuck (reverse thread) screw inside the chuck, then unscrewed the old chuck.

    Screwed on the new chuck & replaced the reverse thread screw.
    Did you find this story helpful?
    Thanks for voting and helping fellow customers!

    OEM stands for Original Equipment Manufacturer and means the part you’re buying is sourced directly from the manufacturer who made your product. At eReplacementParts, we sell only genuine OEM parts, guaranteeing the part you’re purchasing is of better design and of higher quality than aftermarket parts.

    Our product descriptions are a combination of data sourced directly from the manufacturers who made your product as well as content researched and curated by our content & customer service teams. This content is edited and reviewed internally before being made public to customers.

    Our customer service team are at the ready daily to answer your part and product questions. We have a dedicated staff with decades of collective experience in helping customers just like you purchase parts to repair their products.

    All our part reviews are solicited directly from other customers who have purchased this exact part. While we moderate these reviews for profanity, offensive language or personally identifiable information, these reviews are posted exactly as submitted and no alterations are made by our team.

    All our customer repair instructions are solicited directly from other customers just like you who have purchased and replaced this exact part. While we moderate these reviews for profanity, offensive language or personally identifiable information, these reviews are posted exactly as submitted and no alterations are made by our team.

    Based on data from past customer purchasing behaviors, these parts are most commonly purchased together along with the part you are viewing. These parts may be necessary or helpful to replace to complete your current repair.

    All our installation videos are created and produced in collaboration with our in-house repair technician, Mark Sodja, who has helped millions of eReplacementParts customers over the last 13 years repair their products. Mark has years of experience in selling and repairing both commercial and residential products with a specialty in gas-powered equipment.

    This data is collected from customers who submitted a repair instruction after replacing this exact part. Customers can rate how easy the repair was to complete and how long it took. We aggregate this data to provide a repair rating that allows customers to quickly determine the difficulty and time needed to perform their own repair.

    eReplacementParts.com
    7174 South 400 West
    Suite 5
    Midvale, UT 84047
    visa mastercard discover american express PayPal