
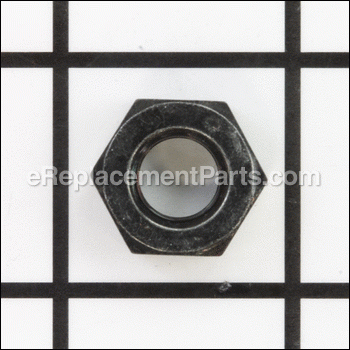
Hex. Nut M10 931502-4
Part Number: 931502-4
Leaves our warehouse within
7 - 12 business days
7 - 12 business days
Product Information
Description:
| This is a genuine item that is supplied by the original equipment manufacturer for use with Makita table saws. It is the special nut that helps to secure the lock lever shaft. It is an identical replacement for a missing or a faulty hardware that was installed on a new unit, please make sure to refer to the appropriate diagrams of your model for the correct location and application of this component. Keep in mind this high-quality hex nut is made of durable metal and is sold individually. |
Frequently Purchased With


Compatibility
This part is compatible with the following machines:
the 22 compatible machines
Products Compatibility
This item works with the following types of products:
- • Saw
- • Table Saw
Questions & Answers for Hex. Nut M10
No questions have been asked yet
Repair Instructions: Submitted by Customers Like You
1 of 1 people found this instruction helpful
Tool Type:
Table Saw
Parts Used:
Repair Difficulty:
Medium
Time Spent Repairing:
15-30 minutes
Tools Used:
Screwdriver, Pliers, Power Drill, Adjustable Wrench
Table saw had no angle adjustment
Removed old stem, spring and nut, installed new stock
Did you find this story helpful?
Thanks for voting and helping fellow customers!
Tool Type:
Table Saw
Parts Used:
Repair Difficulty:
Easy
Time Spent Repairing:
30-60 minutes
Tools Used:
Screwdriver, allen wrench
The lock nut and spring that allow the table saw to swing from 90 degree angle to 45 degree angle was broken
Removed the old stem and spring buy turning the lock lever to the left until stem was free of the nut then replaced with the new parts. Now my 25 year old 10 inch Makita table saw works like new saving me hundreds of dollars. Thank you to Replacement Parts.com for stocking these old parts.
Did you find this story helpful?
Thanks for voting and helping fellow customers!
Tool Type:
Table Saw
Parts Used:
Repair Difficulty:
Easy
Time Spent Repairing:
Less than 15 minutes
Tools Used:
Screwdriver, Roll pin punch
The blade tilt lock would not lock in place.
1. Removed the roll pin from the elevation crank.
2. Remove crank handle and the tilt control assembly slides off the drive shaft.
3. Unscrew the old lock shaft and replace with the new parts.
4. Reassemble in reverse order and adjust lock tension so blade tilts easily but also locks solidly when lever is turned clockwise.
2. Remove crank handle and the tilt control assembly slides off the drive shaft.
3. Unscrew the old lock shaft and replace with the new parts.
4. Reassemble in reverse order and adjust lock tension so blade tilts easily but also locks solidly when lever is turned clockwise.
Did you find this story helpful?
Thanks for voting and helping fellow customers!
Product Information