
This is a Genuine Bosch replacement part, it is sold individually.
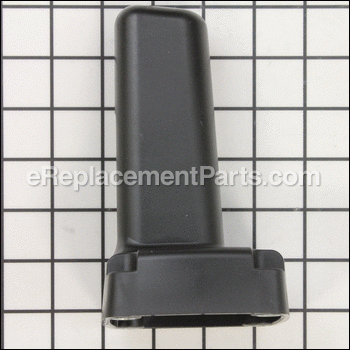
This is the Switch Handle for the Bosch Demolition Hammers shown below.
It has a rectangular hole in it for the 1612026011 Switch-Pawl.
It is connected to the Hammer by using four of the 2914551189 Microencapsulated Screw.
Handle 1615132010
OEM part for: Bosch
Part Number: 1615132010
$44.66
In Stock
Jump To:
Product Description ?
- Classification: Part
- Weight: 0.35 lbs.
- Shipping: Ships Worldwide
Frequently Purchased Together ?


Compatibility
This part will fit the following 16 machines
Bosch
11304 (0611304139) Demolition Hammer View Diagrams & Manuals
11304 (0611304034) "Brute" Hammer View Diagrams & Manuals
USH27 (0611304003) 220v - 230v Demolition Hammer View Diagrams & Manuals
0612306002 Demolition Hammer View Diagrams & Manuals
0612306003 Demolition Hammer View Diagrams & Manuals
0612306004 Demolition Hammer View Diagrams & Manuals
0612306061 Demolition Hammer View Diagrams & Manuals
0612307002 Demolition Hammer View Diagrams & Manuals
0612308001 Road Breaker View Diagrams & Manuals
0612308002 Demolition Hammer View Diagrams & Manuals
0612308003 Demolition Hammer View Diagrams & Manuals
0612308061 Demolition Hammer View Diagrams & Manuals
0612308090 Demolition Hammer View Diagrams & Manuals
0612309001 Demolition Hammer View Diagrams & Manuals
HSH 28 (0612314001) Road Breaker View Diagrams & Manuals
HSH 28 (0612314014) Road Breaker View Diagrams & Manuals
Show More Compatible Models
This item works with the following types of products:
- Demolition Hammer Parts
- Drill Parts
- Hammer Drill Parts
Customer Part Reviews ?
Average Rating (out of 5):
Click to filter by ratings:
5 stars
5
4 stars
0
3 stars
0
2 stars
0
1 stars
0
< PREV
- 1
good quality part
Part fit great easy to install.
Dan -
July 20, 2022
Verified Purchase
Excellent service
Arrived quickly
Guest -
July 25, 2020
Verified Purchase
Fast shipping
Flawless, accurate, shipped same day. Highly recommended
Guest -
April 26, 2020
Verified Purchase
Exact part needed!
Called looking for a particular part,. Trying to describe it,in what I needed,. She was able to find it, super quick shipping and excellent service! Thanks
Guest -
November 14, 2019
Verified Purchase
GREAT PART !
THE WAS IN GREAT CONDITION
Guest -
September 9, 2019
Verified Purchase
t
t
t -
t days ago
Verified Purchase
eReplacementParts Team
t
Questions & Answers ?
Our customer Service team is at the ready daily to answer your part and product questions.

Ask our Team
We have a dedicated staff with decades of collective experience in helping customers just like you purchase parts to repair their products.
Does this fit my product?Questions & Answers for Handle
No questions have been asked yet
Customer Repair Instructions ?
All our customer repair instructions are solicited directly from other customers just like you who have purchased and replaced this exact part.
Broken cord.
Jim - August 9, 2017
👍 2 of 2 people found this instruction helpful
Tool Type
Demolition Hammer
Difficulty
Easy
Time
15-30 minutes
Tools Used
Screwdriver
Parts Used
1. Took apart.
2. Removed the old power cord.
3. Secured the new cord.
4. Reassembled and tested.
2. Removed the old power cord.
3. Secured the new cord.
4. Reassembled and tested.
Did you find this story helpful?
Thanks for voting and helping fellow customers!
Cracked handle
Guy - January 2, 2016
👍 3 of 4 people found this instruction helpful
Tool Type
Demolition Hammer
Difficulty
Easy
Time
Less than 15 minutes
Tools Used
Wrench Set, Allen wrench
Parts Used
Remove the 4 screws the attach the handle to the hammer. Note the location of the switch pawl and mounting plate. Install new handle with the 4 screws
Did you find this story helpful?
Thanks for voting and helping fellow customers!
They sent the wrong side of thed handles now I have two trigger handles.
Luis - June 20, 2021
👍 1 of 1 people found this instruction helpful
Tool Type
Demolition Hammer
Difficulty
Easy
Time
Less than 15 minutes
Tools Used
Power Drill
Parts Used
Installed the triggere handle on the side that the handle was supposed to be without the trigger. My trigger handle was finer ut was the other handle that was faulty
Did you find this story helpful?
Thanks for voting and helping fellow customers!
I've had my demo hammer over 25 years, plus workers who often don't take care of tools properly after and during use. Dropped at different times & broke parts off
Ruben - December 18, 2020
Tool Type
Demolition Hammer
Difficulty
Easy
Time
Less than 15 minutes
Tools Used
Screwdriver, Standard L-end wrenches
Placed on shop table & removed old broken parts one at a time & replaced with new using same bolts. Self example to follow or see on video
Did you find this story helpful?
Thanks for voting and helping fellow customers!
Handel broke
Russell - July 10, 2020
Tool Type
Demolition Hammer
Difficulty
Easy
Time
15-30 minutes
Tools Used
, Allen wrench
Parts Used
Easy. Four screws and done.
Did you find this story helpful?
Thanks for voting and helping fellow customers!
Replacement of the trigger handle on the Brute demo hammer.
Glenn - October 11, 2018
Tool Type
Demolition Hammer
Difficulty
Easy
Time
Less than 15 minutes
Tools Used
Screwdriver, Socket set
Parts Used
Simple replacement of the trigger handle and reused trigger switch.
Did you find this story helpful?
Thanks for voting and helping fellow customers!
Hammer fell into dry swimming pool and handles broke off
DENNIS - June 8, 2017
Tool Type
Demolition Hammer
Difficulty
Easy
Time
Less than 15 minutes
Tools Used
Screwdriver, Allen wrench
Parts Used
Basically just lined them up inserted the screws and tighten them up.
Did you find this story helpful?
Thanks for voting and helping fellow customers!
Hammer fell over and smashed the handle on the ground breaking it
James - September 29, 2016
👍 0 of 1 people found this instruction helpful
Tool Type
Demolition Hammer
Difficulty
Easy
Time
Less than 15 minutes
Tools Used
, Allen wrench
Parts Used
I used an allen wrench to remove the handle retaining screws then pushed out the pin for the paw , installed the new paw then put the handle back together
Did you find this story helpful?
Thanks for voting and helping fellow customers!
OEM stands for Original Equipment Manufacturer and means the part you’re buying is sourced directly from the manufacturer who made your product. At eReplacementParts, we sell only genuine OEM parts, guaranteeing the part you’re purchasing is of better design and of higher quality than aftermarket parts.
Our product descriptions are a combination of data sourced directly from the manufacturers who made your product as well as content researched and curated by our content & customer service teams. This content is edited and reviewed internally before being made public to customers.
Our customer service team are at the ready daily to answer your part and product questions. We have a dedicated staff with decades of collective experience in helping customers just like you purchase parts to repair their products.
All our part reviews are solicited directly from other customers who have purchased this exact part. While we moderate these reviews for profanity, offensive language or personally identifiable information, these reviews are posted exactly as submitted and no alterations are made by our team.
All our customer repair instructions are solicited directly from other customers just like you who have purchased and replaced this exact part. While we moderate these reviews for profanity, offensive language or personally identifiable information, these reviews are posted exactly as submitted and no alterations are made by our team.
Based on data from past customer purchasing behaviors, these parts are most commonly purchased together along with the part you are viewing. These parts may be necessary or helpful to replace to complete your current repair.
All our installation videos are created and produced in collaboration with our in-house repair technician, Mark Sodja, who has helped millions of eReplacementParts customers over the last 13 years repair their products. Mark has years of experience in selling and repairing both commercial and residential products with a specialty in gas-powered equipment.
This data is collected from customers who submitted a repair instruction after replacing this exact part. Customers can rate how easy the repair was to complete and how long it took. We aggregate this data to provide a repair rating that allows customers to quickly determine the difficulty and time needed to perform their own repair.