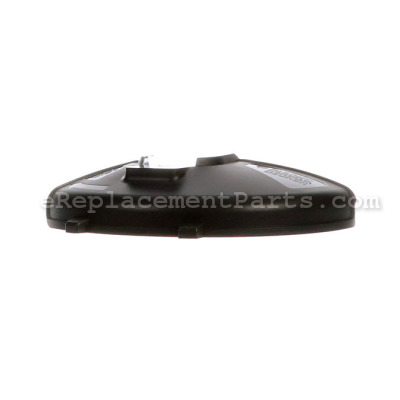
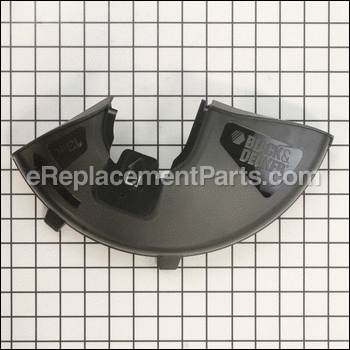


This is an authentic OEM replacement part designed for use with Black and Decker string trimmer. The purpose of it is to direct debris away from the user. This guard is made out of plastic and it is sold individually.
To complete this repair you would need a screwdriver.
• Remove the screw from the bottom of the old guard and replace it
• Insert the guard into the motor housing until it “snaps” into place
• Reinsert the screw through the hole in the guard and tighten
Guard Assy 90558494
OEM part for: Black and Decker, DeWALT
Part Number: 90558494
$9.85
In Stock
Product Description ?
- Classification: Part
- Weight: 0.35 lbs.
- Shipping: Ships Worldwide
Compatibility
This part will fit the following 1 machine
Black and Decker
NST1024 Type 1 24V String Trimmer View Diagrams & Manuals
This item works with the following types of products:
- Trimmer Parts
This part replaces obsolete part #: 90548002
Customer Part Reviews ?
Average Rating (out of 5):
Click to filter by ratings:
5 stars
1
4 stars
1
3 stars
1
2 stars
0
1 stars
0
< PREV
- 1
Timely service, accurately filled order
The part was correct and fit the weed cutter.
Guest -
June 1, 2020
Verified Purchase
Easy to find right part.
Diagrams and part, model, etc. were easy to read and process was flawless.
Vince -
July 20, 2019
Verified Purchase
Guard Assembly won't snap into place
Part came quickly - thank you! - but it won't fit my weedeater. Can't get it to snap into place so I can then insert the screw and secure it. Oh, well! It's an original B & D part, so that can't be the problem...Called you, told don't have tech support, gave me B & D's toll-free number. Am working with the trimmer with the guard assembly partly in place instead. Works OK but doesn't fit, for sure.
Guest -
July 17, 2023
Verified Purchase
t
t
t -
t days ago
Verified Purchase
eReplacementParts Team
t
Questions & Answers ?
Our customer Service team is at the ready daily to answer your part and product questions.

Ask our Team
We have a dedicated staff with decades of collective experience in helping customers just like you purchase parts to repair their products.
Does this fit my product?Questions & Answers for Guard Assy
No questions have been asked yet
Customer Repair Instructions ?
All our customer repair instructions are solicited directly from other customers just like you who have purchased and replaced this exact part.
String cutoff blade was broken from the guard.
Paul - November 21, 2015
👍 8 of 9 people found this instruction helpful
Tool Type
Trimmer
Difficulty
Easy
Time
Less than 15 minutes
Tools Used
Screwdriver
Parts Used
Remove one screw. Remove old guard and replace with new guard. Secure new guard with screw. Takes all of 30 seconds.
Did you find this story helpful?
Thanks for voting and helping fellow customers!
Trimmer cut off was missing
Joseph - July 5, 2016
👍 1 of 1 people found this instruction helpful
Tool Type
Trimmer
Difficulty
Easy
Time
Less than 15 minutes
Tools Used
Screwdriver
Parts Used
Ordered new guard (as the old guard the auto cut off fell off). Paid 12.00 for new guard to be shipped to my location arrived in 2 days. Back in business. Install it with one screw and slid it on.
Did you find this story helpful?
Thanks for voting and helping fellow customers!
Guard assembly was missing the line cutter edge that controlled the line feed
Michael - July 23, 2018
Tool Type
Grass Trimmer
Difficulty
Easy
Time
Less than 15 minutes
Tools Used
Screwdriver
Parts Used
1. Removal of a single retaining screw in base of guard assembly
2. Insert screw driver into opening on guard base enabling release of a 'retaining' flap
3. Pull guard assembly off base and replace with new guard assembly which snaps into place
4. Insert retaining screw and tighten
2. Insert screw driver into opening on guard base enabling release of a 'retaining' flap
3. Pull guard assembly off base and replace with new guard assembly which snaps into place
4. Insert retaining screw and tighten
Did you find this story helpful?
Thanks for voting and helping fellow customers!
Line cutter was missing from guard
Zsolt - September 28, 2017
Tool Type
Trimmer
Difficulty
Easy
Time
15-30 minutes
Tools Used
Screwdriver, Pliers
Parts Used
Replaced the guard.
Did you find this story helpful?
Thanks for voting and helping fellow customers!
Trimmer line housing broke, cap was worn, lever latch not working.
Timothy - September 12, 2017
Tool Type
Trimmer
Difficulty
Easy
Time
Less than 15 minutes
Tools Used
Screwdriver, Wrench Set
1. Removed the old guard by looking at the new one and seeing where the plastic spring clips were.
2. Installed the new guard. Added the screw to secure.
3. Snapped the new lever into the base of the spool housing.
4. Installed the new spool housing, added the screw with an Allen wrench to secure.
5. Installed the new spool full of trimming line into the housing.
6. Snapped the new cover into the top of the housing, done!
Did you find this story helpful?
Thanks for voting and helping fellow customers!
Trimmer string shield worn out.
Robert - August 22, 2017
Tool Type
Trimmer
Difficulty
Easy
Time
Less than 15 minutes
Tools Used
Screwdriver, Power Drill
Parts Used
Removed screws and slid the old one off. Installed the new one. Part matched perfectly.
Did you find this story helpful?
Thanks for voting and helping fellow customers!
String cutter no longer worked
Janiece - July 5, 2017
Tool Type
Grass Trimmer
Difficulty
Medium
Time
Less than 15 minutes
Tools Used
Screwdriver, Soft mallet
Parts Used
Removed screw from guard, Found it very hard to remove the guard because of plastic clip,Used very large flat screw driver to remove and used soft mallet to put new guard back on because of plastic clip,Then just screwed in in
Did you find this story helpful?
Thanks for voting and helping fellow customers!
The plastic guard on the trimmer head no longer had the blade that cuts the line to proper length
John - June 26, 2017
Tool Type
Trimmer
Difficulty
Easy
Time
Less than 15 minutes
Tools Used
Screwdriver
Parts Used
1. Removed the older guard by taking the one screw out
2. Used a flat head screw driver to release the guard.
3. Aligned the new guard and pushed it into place until I heard a "click."
4. Tightened the new screw so that the guard was firmly in place.
2. Used a flat head screw driver to release the guard.
3. Aligned the new guard and pushed it into place until I heard a "click."
4. Tightened the new screw so that the guard was firmly in place.
Did you find this story helpful?
Thanks for voting and helping fellow customers!
Blade became dull and wouldn't cut string.
Jeff - August 23, 2016
Tool Type
Trimmer
Difficulty
Easy
Time
Less than 15 minutes
Tools Used
Screwdriver
I put the guard assembly on the motor housing. I also needed to replace the spool housing and lever. The lever had to be removed with a hex socket driver.
Did you find this story helpful?
Thanks for voting and helping fellow customers!
Plastic guard broke and line cutter fell off
Mike - August 14, 2016
Tool Type
Trimmer
Difficulty
Easy
Time
Less than 15 minutes
Tools Used
Screwdriver, Utility scissors
Parts Used
1. On the under side of the trimmer there is a phillips head screw holding the guard to the main housing remove it to pull old guard off.
2. On the new guard there is a plastic notch on the right side that needs to be trimmed off to make the new piece fit properly.
3. Remove screw from middle of new guard then slide new guard in to place
4. screw in new screw and you're done.
2. On the new guard there is a plastic notch on the right side that needs to be trimmed off to make the new piece fit properly.
3. Remove screw from middle of new guard then slide new guard in to place
4. screw in new screw and you're done.
Did you find this story helpful?
Thanks for voting and helping fellow customers!
Load More Install Stories
OEM stands for Original Equipment Manufacturer and means the part you’re buying is sourced directly from the manufacturer who made your product. At eReplacementParts, we sell only genuine OEM parts, guaranteeing the part you’re purchasing is of better design and of higher quality than aftermarket parts.
Our product descriptions are a combination of data sourced directly from the manufacturers who made your product as well as content researched and curated by our content & customer service teams. This content is edited and reviewed internally before being made public to customers.
Our customer service team are at the ready daily to answer your part and product questions. We have a dedicated staff with decades of collective experience in helping customers just like you purchase parts to repair their products.
All our part reviews are solicited directly from other customers who have purchased this exact part. While we moderate these reviews for profanity, offensive language or personally identifiable information, these reviews are posted exactly as submitted and no alterations are made by our team.
All our customer repair instructions are solicited directly from other customers just like you who have purchased and replaced this exact part. While we moderate these reviews for profanity, offensive language or personally identifiable information, these reviews are posted exactly as submitted and no alterations are made by our team.
Based on data from past customer purchasing behaviors, these parts are most commonly purchased together along with the part you are viewing. These parts may be necessary or helpful to replace to complete your current repair.
All our installation videos are created and produced in collaboration with our in-house repair technician, Mark Sodja, who has helped millions of eReplacementParts customers over the last 13 years repair their products. Mark has years of experience in selling and repairing both commercial and residential products with a specialty in gas-powered equipment.
This data is collected from customers who submitted a repair instruction after replacing this exact part. Customers can rate how easy the repair was to complete and how long it took. We aggregate this data to provide a repair rating that allows customers to quickly determine the difficulty and time needed to perform their own repair.