
Genuine Karcher replacement part, this item is sold individually.
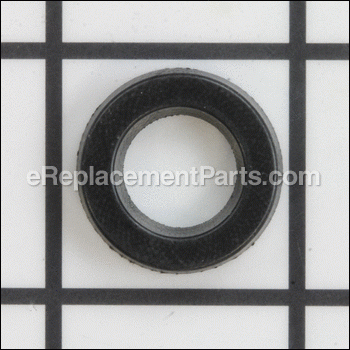
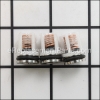
This part acts as a seal to keep the oil in the reservoir and the water in the pump form contaminating each other.
It is installed on the piston.
Grooved Ring 6.365-394.0
OEM part for: Karcher
Part Number: 6.365-394.0
$6.19
In Stock
Jump To:
Product Description ?
- Classification: Part
- Weight: 0.01 lbs.
- Also Known As: Seal, High Pressure Seal
- Shipping: Ships Worldwide
Frequently Purchased Together ?


Compatibility
This part will fit the following 43 machines
Karcher
G 1800 LB (1.133-124.0) Gas Pressure Washer View Diagrams & Manuals
K 520 M-WB (1.069-680.0) Pressure Washer View Diagrams & Manuals
K 520M DI-Plus (1.069-700.0) *CDN Pressure Washer View Diagrams & Manuals
K 520 M DI (1.069-720.0) * BR Pressure Washer View Diagrams & Manuals
K 520M-Plus (1.069-933.0) *MEX Pressure Washer View Diagrams & Manuals
K 520M-WB (1.069-937.0) *CDN Pressure Washer View Diagrams & Manuals
K 4000 G (1.133-201.0) Pressure Washer View Diagrams & Manuals
K 1800 G (1.133-209.0) Pressure Washer View Diagrams & Manuals
K 5000 G (1.133-109.0) Pressure Washer View Diagrams & Manuals
K 5800 GH (1.194-103) Pressure Washer View Diagrams & Manuals
K 6000 GH (1.194-109.0) Pressure Washer View Diagrams & Manuals
K 2300 G (1.194-110.0) Pressure Washer View Diagrams & Manuals
K 1800 G (1.133-114.0) Pressure Washer View Diagrams & Manuals
K 2200 G (1.133-115.0) Pressure Washer View Diagrams & Manuals
K 1800 IB (1.133-121.0) Pressure Washer View Diagrams & Manuals
K 1800 AB (1.133-122.0) Pressure Washer View Diagrams & Manuals
K 2200 IB (1.133-211.0) Pressure Washer View Diagrams & Manuals
K 2400 HH (1.194-301.0) Pressure Washer View Diagrams & Manuals
K 2400 HH (1.194-304.0) Pressure Washer View Diagrams & Manuals
K 502 M (1.069-935.0) Pressure Washer View Diagrams & Manuals
K 502MS-Plus (1.069-936.0) Pressure Washer View Diagrams & Manuals
HD 2500 HK (1.194-115.0) Pressure Washer View Diagrams & Manuals
K 2200 MTD (1.133-120.0) Pressure Washer View Diagrams & Manuals
G 2301 LT (1.133-213.0) Pressure Washer View Diagrams & Manuals
G 2300 IB (1.133-214.0) Pressure Washer View Diagrams & Manuals
G 2600 OR (1.194-506.0) Pressure Washer View Diagrams & Manuals
G 2401 OH (1.194-505.0) Pressure Washer View Diagrams & Manuals
G 2500 HT (1.194-307.0) Pressure Washer View Diagrams & Manuals
G 2000 QT (1.133-601.0) Pressure Washer View Diagrams & Manuals
G 2650 HH (1.194-508.0) Pressure Washer View Diagrams & Manuals
G2500PH (11944010) Pressure Washer View Diagrams & Manuals
K 5.85M PLUS (13967030) Pressure Washer View Diagrams & Manuals
G 2500 VH (11944020) (Version 1) Pressure Washer View Diagrams & Manuals
G 2500 LH (11944030) Pressure Washer View Diagrams & Manuals
G 2650 OH (11945130) Pressure Washer View Diagrams & Manuals
G 2600 VH (11944040) Pressure Washer View Diagrams & Manuals
G 2000 MK (11336210) Pressure Washer View Diagrams & Manuals
G 3000 BH (11946010) Pressure Washer View Diagrams & Manuals
G 2500 OH (11945120) Pressure Washer View Diagrams & Manuals
G 2000 ET (11336200) Pressure Washer View Diagrams & Manuals
G 2600 PH (11944050) Pressure Washer View Diagrams & Manuals
G 2500 VH (11944020) (Version 2) Pressure Washer View Diagrams & Manuals
K4400G (1.133-208.0) Pressure Washer View Diagrams & Manuals
Show More Compatible Models
This item works with the following types of products:
- Pressure Washer Parts
This part replaces obsolete part #: 060-348
Repair Videos ?
Watch the Repair Video for
Grooved Ring

Customer Part Reviews ?
Average Rating (out of 5):
Click to filter by ratings:
5 stars
4
4 stars
0
3 stars
0
2 stars
0
1 stars
0
< PREV
- 1
Finding the parts diagram I needed to order the parts from was very easy to locate on your site.
I ordered several parts to rebuild a pressure washer water pump. All parts were an exact fit. The pressure washer is now back in operation and running great.
Guest -
August 23, 2021
Verified Purchase
Exactly as ordered
Part was new in the Package, fit perfectly, and shipping was quick.
Guest -
September 1, 2020
Verified Purchase
perfect website picture of parts
perfect
Guest -
July 15, 2020
Verified Purchase
great parts
stopped the water from leaking.
Guest -
August 21, 2019
Verified Purchase
t
t
t -
t days ago
Verified Purchase
eReplacementParts Team
t
Questions & Answers ?
Our customer Service team is at the ready daily to answer your part and product questions.

Ask our Team
We have a dedicated staff with decades of collective experience in helping customers just like you purchase parts to repair their products.
Does this fit my product?Questions & Answers for Grooved Ring
No questions have been asked yet
Customer Repair Instructions ?
All our customer repair instructions are solicited directly from other customers just like you who have purchased and replaced this exact part.
Pressure pulses
Christopher - May 6, 2016
👍 5 of 5 people found this instruction helpful
Tool Type
Pressure Washer
Difficulty
Medium
Time
1-2 hours
Tools Used
Screwdriver, Pliers, Socket set, Wrench Set
Watched your you tube video and it made the repair straight forward.
Did you find this story helpful?
Thanks for voting and helping fellow customers!
water leaks from pump
joel - May 11, 2019
👍 2 of 2 people found this instruction helpful
Tool Type
Pressure Washer
Difficulty
Medium
Time
1-2 hours
Tools Used
Socket set
Invert pressure washer and remove four bolts (there's oil in the upper section to lube the bearings)
Split the pump halves and replace the seals.
Reassemble the halves and reinstall the pump to the bottom of the engine (ensure the upper section of the pump is still about 3/4 full of motor oil).
Snug up the four pump bolts.
Turn pressure washer right side up and allow time for the engine oil to drain back into the lower engine.
Connect water hose, pressure wand, and turn on the water.
Start engine (it may smoke a lot for a few minutes) and check for water leaks. Mine dripped some for the first few minutes then stopped after running the washer.
Did you find this story helpful?
Thanks for voting and helping fellow customers!
Karcher G 2650 HH pressure washer leaking water between the two bronze plates (piston guidance and cylinder head) on the pump. Pressure washer was also pulsating.
William - May 24, 2023
👍 1 of 1 people found this instruction helpful
Tool Type
Pressure Washer
Difficulty
Medium
Time
1-2 hours
Tools Used
Socket set
1 Break the cylinder head bolts (do not loosen or remove the bolts since pump oil will leak out)
2 Remove the bolts attaching the pump to the engine.
3 Slide the pump off the keyed engine shaft.
4 Place the pump upright and remove the cylinder head bolts.
5 Separate the two bronze plates (piston guidance and cylinder head)
6 I replaced the three "grooved rings" and the three oil seals. One of the "grooved rings" was obviously damaged and is presumably the cause of the water leaking. I thought this was the most difficult part of the job. The seals are pretty tight and putting the new ones in also requires patience. Removing the oil seals was assisted by a small weep hole on the back side of the piston guidance plate. I poked a small nail thru these weep holes that helped pop-out the oil seals. The new oil seals went in fairly easily. The "grooved rings" were easy to remove but difficult to install the new ones. Had to squeeze the edges to get the seals in which took some effort.
7 I changed the pump oil. The old oil had a milky appearance which I assume is due to some water mixing. Be sure to hold down the wobble (swash) plate as you tip the pump casing to drain the oil. There are ball bearings under the wobble (swash) plate that might dislodge from its retainer plate. The new oil (Karcher 10-40) was clear and looked like normal engine oil.
8 Reassemble the two bronze plates and place them on the pump casing. Note that pressure springs provide resistance and so you have to press the reassembled plates pretty hard as you reinsert the cylinder head bolts. Tighten the bolts so the oil doesn't leak out during reassembly.
9 Slide the reassembled pump on to the keyed engine shaft and tighten the pump mounting bolts. Snug up the cylinder head bolts. I put some grease on the engine shaft first.
10 The repair was successful. No leaks and no pressure pulsations. (Note that I had replaced the overload valve previously which had no effect on the pressure pulsations). In retrospect I would also replace the large o-ring between the pump casing and the piston guidance plate.
Did you find this story helpful?
Thanks for voting and helping fellow customers!
Unit was leaking oil and pulsating when spraying.
David - August 20, 2023
Tool Type
Pressure Washer
Difficulty
Easy
Time
15-30 minutes
Tools Used
Screwdriver, Socket set
Took unit apart. Replaced bad parts and re-installed.
Did you find this story helpful?
Thanks for voting and helping fellow customers!
Pressure washer (Model 2650HH) was spewing out water between halves of valve housing
Daniel - May 4, 2023
Tool Type
Pressure Washer
Difficulty
Medium
Time
1-2 hours
Tools Used
Screwdriver, Pliers, Socket set, Adjustable Wrench, torx #30
1) watched several (multiple times) You Tube videos to understand the inside workings.
2) worked at removing the Actuation Housing. I realized that the key was probably rusted, and with some lubricant removed the housing.
3) Had to get Karcher USA to email me the owners manual and parts lists. (very timely/responsive).
4) three different orders placed, after realizing parts needed replaced.
5) Did not understand when replacing shaft seals (pt no 6.365.393.0) if the groove was to be oriented up or down.
6) Same thing for groove ring (pt no 6.365.394.0)
7) Assembled with new parts, but water still spews out between the 2 housing halves.
8) Water mixed with oil is still present. I will need to disassemble, clean, and consider other part replacement. The PW worked fine with wand activation at the startup, but the water side seems to be leaking into the oil reservoir and forcing oil out. I was surprised to see behind the swash plate (wobble plate). May have to disassemble the to place the seal ring (pt no 7.367-018.0).
Did you find this story helpful?
Thanks for voting and helping fellow customers!
Water was pouring from the washer
Carl - March 17, 2021
Tool Type
Pressure Washer
Difficulty
Medium
Time
30-60 minutes
Tools Used
Screwdriver, Socket set, allen wrench
Replaced the o-ring and pressure springs
Did you find this story helpful?
Thanks for voting and helping fellow customers!
rapid pulsation
arthur - June 26, 2020
Tool Type
Pressure Washer
Difficulty
Medium
Time
1-2 hours
Tools Used
Screwdriver, Wrench Set
found 1 bad check valve
replaced all 3 check valves
replaced all 3 oil seal rings
replaced all 3 grooved rings (lip side out using a small screwdriver to get it in)
cleaned swash plate and bearings
put new oil (karcher 15 w 40 )
reassembled
cleaned and lubed unloader valve
replaced all 3 check valves
replaced all 3 oil seal rings
replaced all 3 grooved rings (lip side out using a small screwdriver to get it in)
cleaned swash plate and bearings
put new oil (karcher 15 w 40 )
reassembled
cleaned and lubed unloader valve
Did you find this story helpful?
Thanks for voting and helping fellow customers!
Pressure washer pressure pulsing very fast with high pressure
William - August 22, 2017
Tool Type
Pressure Washer
Difficulty
Medium
Time
More than 2 hours
Tools Used
Screwdriver, Pliers, Socket set, Wrench Set
1. Purchased all most likely parts likely to cause problem: valves, seals & springs.
2. Disassembled pump. No oil in wobble plate housing - only some water. (Probably piston seal?)
3. Cleaned housings, reused parts with carb cleaner. Added 15-40w oil. Reassembled & installed.
4. Works better than when I bought it, (was rebuilt unit.)
5. I found seals a little tricky to install as they are flared out & you'll probably try to use a screwdriver to install - careful, easy to damage seal.
6.Also, check the spill valve before you remove pump - it can cause erratic (as well as low) pressure.
Did you find this story helpful?
Thanks for voting and helping fellow customers!
I had fluctuating pressure. It would run fine for several seconds that the pressure would drop significantly.
Theodore - July 29, 2017
Tool Type
Pressure Washer
Difficulty
Easy
Time
1-2 hours
Tools Used
Socket set, Wrench Set
I rebuilt the pump with the parts you suggested. Be careful with Karcher pumps. If you replace the nozzles with standard big box store nozzles they can cause this surging. That is what I recently did. Make sure you have the correct capacity nozzles before you rebuild a pump.
Did you find this story helpful?
Thanks for voting and helping fellow customers!
Water leak
carlos - July 14, 2016
Tool Type
Pressure Washer
Difficulty
Medium
Time
30-60 minutes
Tools Used
Screwdriver, Wrench Set
1. Disassemble pump
2. Inspect pieces and parts
3. Found some seals broken and dried
4. Order the parts
5. Clean and put the new spare parts per diagrams and videos
6. ensemble pump per pictures and hand sketches
7. Put new oil pump
8. Test pressure washer
2. Inspect pieces and parts
3. Found some seals broken and dried
4. Order the parts
5. Clean and put the new spare parts per diagrams and videos
6. ensemble pump per pictures and hand sketches
7. Put new oil pump
8. Test pressure washer
Did you find this story helpful?
Thanks for voting and helping fellow customers!
OEM stands for Original Equipment Manufacturer and means the part you’re buying is sourced directly from the manufacturer who made your product. At eReplacementParts, we sell only genuine OEM parts, guaranteeing the part you’re purchasing is of better design and of higher quality than aftermarket parts.
Our product descriptions are a combination of data sourced directly from the manufacturers who made your product as well as content researched and curated by our content & customer service teams. This content is edited and reviewed internally before being made public to customers.
Our customer service team are at the ready daily to answer your part and product questions. We have a dedicated staff with decades of collective experience in helping customers just like you purchase parts to repair their products.
All our part reviews are solicited directly from other customers who have purchased this exact part. While we moderate these reviews for profanity, offensive language or personally identifiable information, these reviews are posted exactly as submitted and no alterations are made by our team.
All our customer repair instructions are solicited directly from other customers just like you who have purchased and replaced this exact part. While we moderate these reviews for profanity, offensive language or personally identifiable information, these reviews are posted exactly as submitted and no alterations are made by our team.
Based on data from past customer purchasing behaviors, these parts are most commonly purchased together along with the part you are viewing. These parts may be necessary or helpful to replace to complete your current repair.
All our installation videos are created and produced in collaboration with our in-house repair technician, Mark Sodja, who has helped millions of eReplacementParts customers over the last 13 years repair their products. Mark has years of experience in selling and repairing both commercial and residential products with a specialty in gas-powered equipment.
This data is collected from customers who submitted a repair instruction after replacing this exact part. Customers can rate how easy the repair was to complete and how long it took. We aggregate this data to provide a repair rating that allows customers to quickly determine the difficulty and time needed to perform their own repair.