eReplacementParts.com
877-346-4815
Broil-Mate Parts

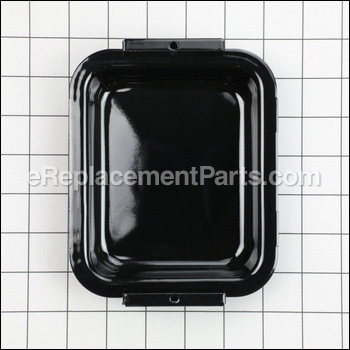
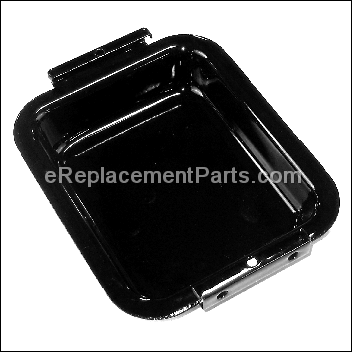
Grease Pan 22009-901

OEM part for: Broil-Mate, Broil King, Sterling, Huntington

Part Number: 22009-901


Install
Videos!
Grid squares measure 1x1 inch
Grease Pan - 22009-901:Broil-MateGrease Pan - 22009-901:Broil-Mate
In Stock
Ships within 1 business day
Easy Less than 15 minutes (3 rated repairs)?
OEM: Original Equipment Manufacturer ?
Broil-MateBroil KingSterlingHuntington
Does this d-block d-md-none fit my product?

Product Description ?

This metal grease pan is an original part sourced directly from Broil-Mate for use with gas grills. The pan is used to collect excess grease that is produced when cooking and allows for easy cleanup. Please check the appropriate diagrams for your model for the correct location and application of this part. One item is included per order.

  • Classification: Part
  • Weight: 0.45 lbs.
  • Shipping: Ships Worldwide

Frequently Purchased Together ?

Compatibility

This part will fit the following 90 machines

Broil-Mate

7020-54 Gas Grill View Diagrams & Manuals
7020-64 Gas Grill View Diagrams & Manuals
7120-64 Gas Grill View Diagrams & Manuals
7130-54 Gas Grill View Diagrams & Manuals
7130-64 Gas Grill View Diagrams & Manuals
7123-64 Gas Grill View Diagrams & Manuals
7123-84 Gas Grill View Diagrams & Manuals
7133-64 Gas Grill View Diagrams & Manuals
7139-84 Gas Grill View Diagrams & Manuals
785964 Gas Grill View Diagrams & Manuals
785164 Gas Grill View Diagrams & Manuals
746164 Gas Grill View Diagrams & Manuals
786164 Gas Grill View Diagrams & Manuals
786167 Gas Grill View Diagrams & Manuals
746189 Gas Grill View Diagrams & Manuals
786184 Gas Grill View Diagrams & Manuals
786187 Gas Grill View Diagrams & Manuals
1161-54 Gas Grill View Diagrams & Manuals
1161-57 Gas Grill View Diagrams & Manuals
1961-54 Gas Grill View Diagrams & Manuals
1961-57 Gas Grill View Diagrams & Manuals
7123-67 Gas Grill - NG View Diagrams & Manuals
7123-87 Gas Grill - NG View Diagrams & Manuals
7133-67 Gas Grill - NG View Diagrams & Manuals
7139-87 Gas Grill - NG View Diagrams & Manuals

Broil King

9976-44 Imperial XL Gas Grill View Diagrams & Manuals
9976-47 Imperial XL Gas Grill View Diagrams & Manuals
9986-44 Imperial 590 Gas Grill View Diagrams & Manuals
9986-47 Imperial 590 Gas Grill View Diagrams & Manuals
9866-44 Imperial 490 Gas Grill View Diagrams & Manuals
9866-47 Imperial 490 Gas Grill View Diagrams & Manuals
9866-84 Imperial 90 Gas Grill View Diagrams & Manuals
9866-87 Imperial 90 Gas Grill View Diagrams & Manuals
9761-54 Regal 420 Gas Grill View Diagrams & Manuals
9761-57 Regal 420 Gas Grill View Diagrams & Manuals
9761-64 Regal 440 Gas Grill View Diagrams & Manuals
9761-67 Regal 440 Gas Grill View Diagrams & Manuals
9761-84 Regal 490 Gas Grill View Diagrams & Manuals
9761-87 Regal 490 Gas Grill View Diagrams & Manuals
9765-84 Regal 490 Pro Gas Grill View Diagrams & Manuals
9765-87 Regal 490 Pro Gas Grill View Diagrams & Manuals
9576-44 Imperial XL Gas Grill View Diagrams & Manuals
9576-47 Imperial XL Gas Grill View Diagrams & Manuals
9576-84NZ Imperial XL Gas Grill View Diagrams & Manuals
9586-44 Imperial 590 Gas Grill View Diagrams & Manuals
9586-47 Imperial 590 Gas Grill View Diagrams & Manuals
9566-44 Imperial 490 Gas Grill View Diagrams & Manuals
9566-47 Imperial 490 Gas Grill View Diagrams & Manuals
9585-44 Regal 590 Pro Gas Grill View Diagrams & Manuals
9585-47 Regal 590 Pro View Diagrams & Manuals
9585-84 Regal 590 Pro Gas Grill View Diagrams & Manuals
9585-87 Regal 590 Pro Gas Grill View Diagrams & Manuals
9571-44 BBQ Grill View Diagrams & Manuals
9571-47 BBQ Grill View Diagrams & Manuals
9561-54 BBQ Grill View Diagrams & Manuals
9561-57 BBQ Grill View Diagrams & Manuals
9561-64 BBQ Grill View Diagrams & Manuals
9561-67 BBQ Grill View Diagrams & Manuals
9561-84 BBQ Grill View Diagrams & Manuals
9561-87 BBQ Grill View Diagrams & Manuals
9565-14 BBQ Grill View Diagrams & Manuals
9565-17 BBQ Grill View Diagrams & Manuals
9565-24 BBQ Grill View Diagrams & Manuals
9565-44 BBQ Grill View Diagrams & Manuals
9565-47 BBQ Grill View Diagrams & Manuals
9565-27 BBQ Grill View Diagrams & Manuals

Sterling

5023-64 Gas Grill View Diagrams & Manuals
5123-64 Gas Grill View Diagrams & Manuals
5123-84 Gas Grill View Diagrams & Manuals
5133-64 Gas Grill View Diagrams & Manuals
5139-84 Gas Grill View Diagrams & Manuals
5133-67 Gas Grill - NG View Diagrams & Manuals
5139-87 Gas Grill - NG View Diagrams & Manuals
5023-67 Gas Grill - NG View Diagrams & Manuals
5123-67 Gas Grill - NG View Diagrams & Manuals
5123-87 Gas Grill - NG View Diagrams & Manuals

Huntington

6666-64 Outdoor Grill View Diagrams & Manuals
6020-54 Outdoor Grill View Diagrams & Manuals
6130-54 Outdoor Grill View Diagrams & Manuals
6020-64 Outdoor Grill View Diagrams & Manuals
6120-64 Outdoor Grill View Diagrams & Manuals
6130-64 Outdoor Grill View Diagrams & Manuals
6962-64 Reddi-Bilt Barbecue View Diagrams & Manuals
6666-67 Gas Grill View Diagrams & Manuals
Show More Compatible Models
Don't see yours? Try searching our site for :

This item works with the following types of products:

  • Outdoor Grill Parts

Repair Videos ?

Articles:
Having trouble getting your grill to light up? A common cause of this issue is a defective ignition switch. We'll sho...
November 08, 2012

Customer Part Reviews ?

5
Average Rating (out of 5):
2 Reviews
Click to filter by ratings:
5 stars
2
4 stars
0
3 stars
0
2 stars
0
1 stars
0
  • Highest Rating
  • Most Recent
< PREV
  • 1
NEXT >
  • part is perfect
    This part fit my grill perfectly and is actually nicer than the original part. Was not able to find this very many places and even with shipping ereplacement was cheapest.
    Guest - December 28, 2021 Verified Purchase
    hard to find part is top notch
    Perfect condition timely arrival, great fit
    MaryAlice - July 16, 2019 Verified Purchase
    t
    t
    t - t days ago Verified Purchase
    eReplacementParts Team
    t

    Questions & Answers ?

    Our customer Service team is at the ready daily to answer your part and product questions.

    photo of team member
    Ask our Team

    We have a dedicated staff with decades of collective experience in helping customers just like you purchase parts to repair their products.

    Does this fit my product?

    Questions & Answers for Grease Pan


    No questions have been asked yet

    Customer Repair Instructions ?

    All our customer repair instructions are solicited directly from other customers just like you who have purchased and replaced this exact part.

    Easy Less than 15 minutes (3 rated repairs)?

    Grill igniter went kaput

    Somnath - July 14, 2020
    Tool Type

    Outdoor Grill

    Difficulty

    Easy

    Time

    Less than 15 minutes

    Tools Used

    Screwdriver, Hand

    1) Unscrewed the igniter from the grill
    2) Pulled the 4 wires out from the old igniter
    3) Inserted wires into new igniter
    4) Popped the AA battery in
    5) Turned gas on
    6) Pushed in the igniter button
    7) Ignited grill
    8) Grilled burgers
    9) Washed down with beer
    10) Happy Customer
    Did you find this story helpful?
    Thanks for voting and helping fellow customers!

    Items missing

    Joe - October 27, 2017
    Tool Type

    Outdoor Grill

    Difficulty

    Easy

    Time

    Less than 15 minutes

    Tools Used

    Installed missing parts
    Did you find this story helpful?
    Thanks for voting and helping fellow customers!

    Cooking grids and grease pan were rusted out

    Robert - April 30, 2017
    Tool Type

    Outdoor Grill

    Difficulty

    Easy

    Time

    15-30 minutes

    Tools Used

    1. Removed the rusty grids.
    2. Shop vacuumed the entire grill (especially the venturi tubes to ensure that they were blocked by any rust flakes).
    3. Cleaned and de-greased the entire grill with a general scrub down.
    4. Hosed off the entire grill with clean water.
    5. Sprayed down the new grids with cooking spray.
    6. Fired up the grill to ensure that everything worked and to complete the drying process. (Note: if the sparker won't light it, check for dampness/drops of water between the lead contact and the venturi tubes. Even the smallest drop of water can prevent the arc required to get a flame)
    7. After the grill stopped smoking, meaning that the grids have been seasoned, then turn off the grill (always at the source first - that way the grill burns off all residual gas)
    8. Let it cool, and then spray the grids again. (Note: I love this grill, but the grids rusted out in about three years. I don't mean a little rust, either. I mean, rusted so bad that I couldn't cook on two of them.)
    I left the grease trap on top of the grill grids. That way I remember to put it under the grill before I cook, and it reminds me to remove the grease trap to clean it after each use.
    Did you find this story helpful?
    Thanks for voting and helping fellow customers!

    OEM stands for Original Equipment Manufacturer and means the part you’re buying is sourced directly from the manufacturer who made your product. At eReplacementParts, we sell only genuine OEM parts, guaranteeing the part you’re purchasing is of better design and of higher quality than aftermarket parts.

    Our product descriptions are a combination of data sourced directly from the manufacturers who made your product as well as content researched and curated by our content & customer service teams. This content is edited and reviewed internally before being made public to customers.

    Our customer service team are at the ready daily to answer your part and product questions. We have a dedicated staff with decades of collective experience in helping customers just like you purchase parts to repair their products.

    All our part reviews are solicited directly from other customers who have purchased this exact part. While we moderate these reviews for profanity, offensive language or personally identifiable information, these reviews are posted exactly as submitted and no alterations are made by our team.

    All our customer repair instructions are solicited directly from other customers just like you who have purchased and replaced this exact part. While we moderate these reviews for profanity, offensive language or personally identifiable information, these reviews are posted exactly as submitted and no alterations are made by our team.

    Based on data from past customer purchasing behaviors, these parts are most commonly purchased together along with the part you are viewing. These parts may be necessary or helpful to replace to complete your current repair.

    All our installation videos are created and produced in collaboration with our in-house repair technician, Mark Sodja, who has helped millions of eReplacementParts customers over the last 13 years repair their products. Mark has years of experience in selling and repairing both commercial and residential products with a specialty in gas-powered equipment.

    This data is collected from customers who submitted a repair instruction after replacing this exact part. Customers can rate how easy the repair was to complete and how long it took. We aggregate this data to provide a repair rating that allows customers to quickly determine the difficulty and time needed to perform their own repair.

    eReplacementParts.com
    7174 South 400 West
    Suite 5
    Midvale, UT 84047
    visa mastercard discover american express PayPal