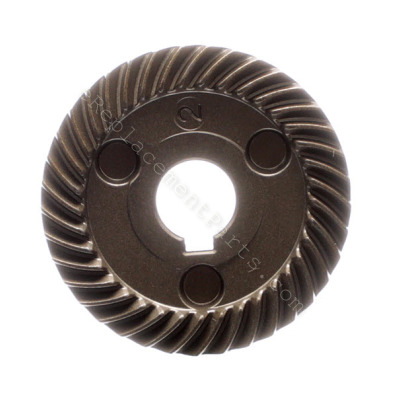
This is a genuine Makita replacement part, it is sold individually. Its is driven by the 227464-5 Drive Gear.
Once you have the Gear Housing apart, this is a good time to make sure the Drive Gear has no wear, also check the bearings to make sure they are in good working order.
It was Awesome, I put it together and it worked like new!¡!
Guest - December 1, 2023
Verified Purchase
Cheap easy and fast
Was very easy to look up the part, price was very reasonable and shipping was quick. Planning on ordering some more parts.
Guest - April 29, 2023
Verified Purchase
Gear set for my Makita 4 1/2" angle grinder
My order arrived in a timely manner, they looked good, fit perfectly and I intend to call on these folks any ty I need parts they have.
Guest - February 28, 2022
Verified Purchase
Like OEM part.
Easy installation, works like new.
Anonymous - December 31, 2021
Verified Purchase
Great part
easy to install, made it work right. Fast shipping
William - June 21, 2021
Verified Purchase
Eazy repair
My grinder is working like new again
Guest - May 21, 2021
Verified Purchase
Quality parts that fixed my Makita right angle grinder
Solid, well-made parts. Easy to install, just watch the YouTube videos that e-replacement parts has links to on the website. Perfect fit and the Makita right-angle grinder seems like it'll be good for years to come, it's brought back from the dead!
Guest - May 12, 2021
Verified Purchase
Repair angle grinder
Replaced both gears in the head assy..fixed my grinder for about 1/10th the cost of a new one..
Removed 4 screws to separate the head from the motor, removed the bearing from above the ring gear, took the c clip off to slide ring gear off . Removed 7/16 nut to slide off the pinion gear, replaced with new gears and reassembled.
Did you find this story helpful?
Thanks for voting and helping fellow customers!
Gears were worn
Sam - July 9, 2017
👍 6 of 6 people found this instruction helpful
Tool Type
Grinder
Difficulty
Easy
Time
15-30 minutes
Tools Used
Screwdriver, Bearing splitter, vice, snap ring pliersspreader
Followed two You Tube Directions from ereplacements. Well done! Here are the links to them.
https://www.youtube.com/watch?v=mp1RnUNaQ4c
https://www.youtube.com/watch?v=noTt1LMKPao
Did you find this story helpful?
Thanks for voting and helping fellow customers!
Internal gears stripped after accidently dropping grinder
Glenn - February 24, 2017
👍 5 of 5 people found this instruction helpful
Tool Type
Grinder
Difficulty
Medium
Time
30-60 minutes
Tools Used
Screwdriver, Pliers, Power Drill, Socket set, Wrench Set, Adjustable Wrench, press, snap ring pliers, jaw puller
First determine the problem. Problem: grinder is slipping under load; losing power. Facts: motor works perfectly. Suspected area of concern: gearbox. Remove both parts of gearbox. Each section is perpendicular to one another, and each is held in place by four screws. One set of screws are machine screws, the other set plastic screws. Do not mix these up. Upon removing gear box from motor housing, inspect drive gear and driven gear. In my case, both were clearly stripped. Due to the fact I dropped my grinder I became worried that I not only damaged the gears, but any bearings in the gearbox. At this point, one could either replace the entire gearbox assembly, or rebuild the existing one. The gearbox assembly was no longer available, so my options were limited. I opted to rebuild the gearbox. High temperature grease covers the inside of the gearbox, and because my gears stripped, the grease has specks of metal from the gears suspended in it. I removed everything from the gearbox until I had just the cast aluminum/magnesium case. I cleaned ALL the old contaminated grease out with a degreasing agent (nothing special, just let it sit for a little while in a mixture of Dawn dish soap and water). Now to replace the gears and bearings. The beveled drive gear is easy to replace. simply remove the nut on the end of the shaft, and remove the old gear. The driven gear is a bit more complicated. There are two bearings on the driven side that needed to be removed. The first was small, yet difficult to remove. It was located near the top where it seats into the housing. There is a delicate snap ring underneath it, making things exceedingly difficult to remove it without damaging other parts. Using a jaw puller, remove the small bearing from the shaft, if necessary, damaging the snap ring in the process. It is nearly impossible to get the jaws of a jaw puller behind this bearing without being obstructed by this pesky snap ring. Upon removing the bearing, remove the snap ring if it is still on the shaft. This snap ring keeps the driven gear in place. At this point the driven gear will simply slide off. It is on a keyed shaft, with a woodruff key locking it to the shaft. Set both the woodruff key and the driven gear aside. At this point, one can simply replace both the gears, reassemble in reverse order, grease the gearbox, and call it done. I however feared I damaged one or more of the bearings. At this point I pressed the shaft out of the gearbox using a 20 ton shop press. Once the shaft was out, The main bearing became accessible. It is held in place with an internal snap ring. Remove the snap ring and pull out the bearing. Be careful however, there is a washer that goes underneath the bearing between it and the housing. Replace the bearing with a new one, assemble in reverse order, replace any other damaged parts as necessary. When greasing the gearbox for reassembly I chose to use Stihl brand gearbox grease. The gearbox in this angle grinder reaches rpm's, temperatures, and other variables similar to those found in gearboxes on Stihl outdoor power equipment that utilize this type of grease. Grease the gearbox liberally, taking extra care to grease the drive and driven gears. Do not over fill the gearbox with grease. Tighten down each set of screws. The grinder is now reassembled. turn the driveshaft by hand. Feel for any binding, sticking, or other conditions which might hamper proper functioning. If all checks out, plug in the angle grinder, and get to work!
Did you find this story helpful?
Thanks for voting and helping fellow customers!
Bevel gears grinding
James - March 25, 2019
👍 2 of 2 people found this instruction helpful
Tool Type
Grinder
Difficulty
Medium
Time
15-30 minutes
Tools Used
Screwdriver, Pliers, Wrench Set, Circlip pliers and vise
1. Removed grinding disc and guard
2. Removed case screws on bevel gear cover, and gear case to body
3. Removed bevel shaft from housing, clamped in vice , removed bearing and circlip
Installed new gear , replace circlip and bearing.
4. Clamp armature gear in vise , remove nut and gear. Install new gear and nut . Tighten snuggly
5. Clean gear housing of old grease and debris, pack with grease re-assemble shaft in housing, more grease.
6. Re-assemble install cover and gear housing to body , re assemble guard and disc
7. Test
1. removed angle drive cap (4 phillips #2)
2. removed drive gear (pliers and 10 mm)
3. removed snap ring
4.removed bearing
5. clean away old grease with metal grindings.
6. new grease and reassemble.
Did you find this story helpful?
Thanks for voting and helping fellow customers!
Load More Install Stories
OEM stands for Original Equipment Manufacturer and means the part you’re buying is sourced directly from the manufacturer who made your product. At eReplacementParts, we sell only genuine OEM parts, guaranteeing the part you’re purchasing is of better design and of higher quality than aftermarket parts.
Our product descriptions are a combination of data sourced directly from the manufacturers who made your product as well as content researched and curated by our content & customer service teams. This content is edited and reviewed internally before being made public to customers.
Our customer service team are at the ready daily to answer your part and product questions. We have a dedicated staff with decades of collective experience in helping customers just like you purchase parts to repair their products.
All our part reviews are solicited directly from other customers who have purchased this exact part. While we moderate these reviews for profanity, offensive language or personally identifiable information, these reviews are posted exactly as submitted and no alterations are made by our team.
All our customer repair instructions are solicited directly from other customers just like you who have purchased and replaced this exact part. While we moderate these reviews for profanity, offensive language or personally identifiable information, these reviews are posted exactly as submitted and no alterations are made by our team.
Based on data from past customer purchasing behaviors, these parts are most commonly purchased together along with the part you are viewing. These parts may be necessary or helpful to replace to complete your current repair.
All our installation videos are created and produced in collaboration with our in-house repair technician, Mark Sodja, who has helped millions of eReplacementParts customers over the last 13 years repair their products. Mark has years of experience in selling and repairing both commercial and residential products with a specialty in gas-powered equipment.
This data is collected from customers who submitted a repair instruction after replacing this exact part. Customers can rate how easy the repair was to complete and how long it took. We aggregate this data to provide a repair rating that allows customers to quickly determine the difficulty and time needed to perform their own repair.