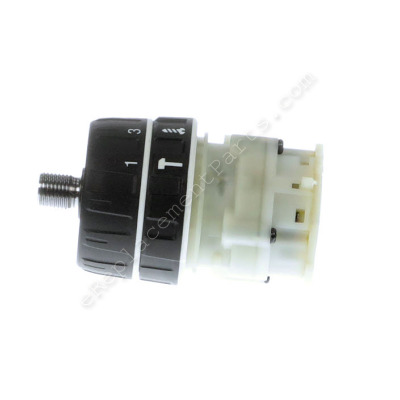
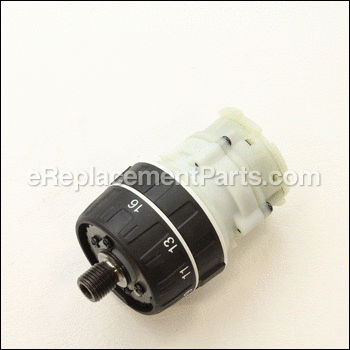
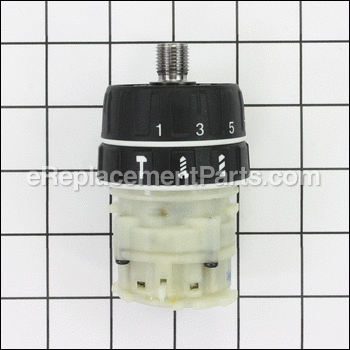

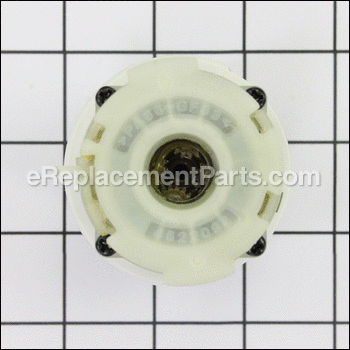


This part is a genuine manufacturer-sourced part, which is specially designed for Makita drills. The gear assembly is an important component to your cordless drill. It consists of the clutch, transmission, and a hammer drill mechanism. The most common symptom that your gear assembly is going bad is that the motor spins, but the chuck does not. When this happens, you will usually hear grinding noises from the transmission at the same time. However, before replacing the gear assembly make sure the gear selector isn't moved between the high and low gears, if so your drill will display the same symptoms. The following tools are required for the repair: torx driver, Phillip’s screwdriver, long-nosed pliers, large screwdriver, hammer, large Allen wrench and small screwdriver. This part is sold individually and is made of metal and hard plastic.
Gear Assembly 126460-9
OEM part for: Makita
Part Number: 126460-9
Jump To:
Frequently Purchased Together ?
Compatibility
This part will fit the following 15 machines
Makita
This item works with the following types of products:
- Cordless Drill Parts
- Drill Parts
- Hammer Drill Parts
This part replaces obsolete part #: 125848-0,
Repair Videos ?

|
Gears Hammered? Learn to remove and replace the gear assembly on your Makita cordless drill. Step-by-step instructions s...
April 05, 2016
|

Customer Part Reviews ?
- 1
Questions & Answers ?
Our customer Service team is at the ready daily to answer your part and product questions.

Ask our Team
We have a dedicated staff with decades of collective experience in helping customers just like you purchase parts to repair their products.
Does this fit my product?Questions & Answers for Gear Assembly
Customer Repair Instructions ?
All our customer repair instructions are solicited directly from other customers just like you who have purchased and replaced this exact part.
Drill was dropped and broke the gear assembly
Tool Type
Hammer Drill
Difficulty
Easy
Time
15-30 minutes
Tools Used
Screwdriver
Parts Used
chuck would not hold drill bits under load
Tool Type
Cordless Drill
Difficulty
Medium
Time
1-2 hours
Tools Used
Screwdriver, 7 inch long 3/8 allen key, hammer
1. Set drill power level on "1", "drill" setting. Important
2. Hand-twist until fully open drill chuck
3. Insert long flat edge screwdriver and turn clockwise (reverse threaded) to remove drill chuck screw.
4. Secure drill to edge of workbench. Insert allen key. Be sure to open the chuck fully by turning by hand several revolutions against resistance. Use hammer to whack allen key and unthread chuck. It may take quite a few tries.
OPEN DRILL CASE AND REMOVE GEAR ASSEMBLY
5. Unscrew drill case using Philips head screwdriver. Separate case. Be sure the trigger stays in proper position.
6. Pull back metal tab resting on armature.
7. Free white plastic gear assembly. Note the bottom of the armature assembly has a notch for alignment in the case. There's also a line on top of the armature for alignment.
8. Insert new gear assembly. It can be fussy.
9. Reassemble case, making sure trigger is working.
10. Once assembled thread on new chuck, being sure to keep the chuck wide open.
11. Insert chuck screw and thread counterclockwise to tighten.
12. Watch YouTube videos.
Grinding gears
Tool Type
Cordless Drill
Difficulty
Medium
Time
30-60 minutes
Tools Used
Screwdriver
Parts Used
Gear was slipping and chuck
Tool Type
Hammer Drill
Difficulty
Easy
Time
15-30 minutes
Tools Used
Screwdriver, Power Drill
Over heated and froze the motor
Tool Type
Hammer Drill
Difficulty
Medium
Time
30-60 minutes
Tools Used
Screwdriver, Wrench Set
2. Looked at posted video
3. Ordered parts
4. Installed parts
5. Drill works great
OEM stands for Original Equipment Manufacturer and means the part you’re buying is sourced directly from the manufacturer who made your product. At eReplacementParts, we sell only genuine OEM parts, guaranteeing the part you’re purchasing is of better design and of higher quality than aftermarket parts.
Our product descriptions are a combination of data sourced directly from the manufacturers who made your product as well as content researched and curated by our content & customer service teams. This content is edited and reviewed internally before being made public to customers.
Our customer service team are at the ready daily to answer your part and product questions. We have a dedicated staff with decades of collective experience in helping customers just like you purchase parts to repair their products.
All our part reviews are solicited directly from other customers who have purchased this exact part. While we moderate these reviews for profanity, offensive language or personally identifiable information, these reviews are posted exactly as submitted and no alterations are made by our team.
All our customer repair instructions are solicited directly from other customers just like you who have purchased and replaced this exact part. While we moderate these reviews for profanity, offensive language or personally identifiable information, these reviews are posted exactly as submitted and no alterations are made by our team.
Based on data from past customer purchasing behaviors, these parts are most commonly purchased together along with the part you are viewing. These parts may be necessary or helpful to replace to complete your current repair.
All our installation videos are created and produced in collaboration with our in-house repair technician, Mark Sodja, who has helped millions of eReplacementParts customers over the last 13 years repair their products. Mark has years of experience in selling and repairing both commercial and residential products with a specialty in gas-powered equipment.
This data is collected from customers who submitted a repair instruction after replacing this exact part. Customers can rate how easy the repair was to complete and how long it took. We aggregate this data to provide a repair rating that allows customers to quickly determine the difficulty and time needed to perform their own repair.