

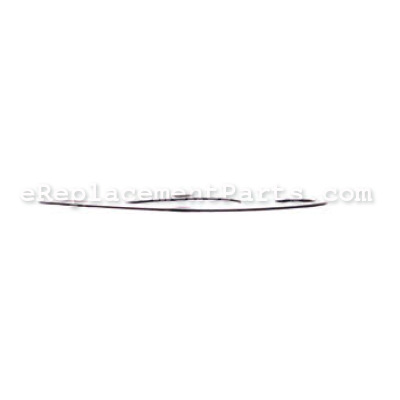


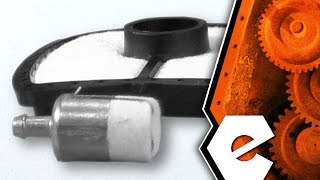
This is an authentic manufacturer sourced replacement part designed for use with Echo backpack blowers. This carburetor gasket provides an air tight seal between the carburetor and the insulator. Over time gaskets tend to deteriorate and would need to be replaced. It is made out of compound material and it is sold individually.
You would need a screwdriver to replace this item.
Gasket 13001606434
OEM part for: Echo, Little Wonder, Craftsman
Part Number: 13001606434
$4.99
In Stock
Jump To:
Product Description ?
- Classification: Part
- Weight: 0.01 lbs.
- Shipping: Ships Worldwide
Frequently Purchased Together ?


Compatibility
This part will fit the following 84 machines
Echo
PB-300E -49616 Backpack Blower View Diagrams & Manuals
PB-300E -49617 Backpack Blower View Diagrams & Manuals
PB-403 (03001001-03999999) Backpack Blower View Diagrams & Manuals
PB-403 (04001001-04999999) Backpack Blower View Diagrams & Manuals
PB-403H (02001001-02999999) Backpack Blower View Diagrams & Manuals
PB-403H (03001001-03999999) Backpack Blower View Diagrams & Manuals
PB-403H (04001001-04999999) Backpack Blower View Diagrams & Manuals
PB-403H (09001001-09999999) Backpack Blower View Diagrams & Manuals
PB-403H (10001001-10999999) Backpack Blower View Diagrams & Manuals
PB-403T (02001001-02999999) Backpack Blower View Diagrams & Manuals
PB-403T (03001001-03999999) Backpack Blower View Diagrams & Manuals
PB-403T (04001001-04999999) Backpack Blower View Diagrams & Manuals
PB-403T (09001001-09999999) Backpack Blower View Diagrams & Manuals
PB-403T (10001001-10999999) Backpack Blower View Diagrams & Manuals
PB-413 (02001001-02999999) Backpack Blower View Diagrams & Manuals
PB-413H (02001001-02999999) Backpack Blower View Diagrams & Manuals
PB-413H (P06413001001-P06413999999) Backpack Blower View Diagrams & Manuals
PB-413H (P08011001001-P08011999999) Backpack Blower View Diagrams & Manuals
PB-4600 (059919-999999) Backpack Blower View Diagrams & Manuals
PB-4600 (Type 1E) Backpack Blower View Diagrams & Manuals
PB-46HT Backpack Blower View Diagrams & Manuals
PB-600 (505401-999999) Backpack Blower View Diagrams & Manuals
PB-6000 (Type 1) Backpack Blower View Diagrams & Manuals
PB-6000 (Type 1E) Backpack Blower View Diagrams & Manuals
PB-601 (501001-506000) Backpack Blower View Diagrams & Manuals
PB-601 (506001-999999) Backpack Blower View Diagrams & Manuals
PB-602 (03001001-03999999) Backpack Blower View Diagrams & Manuals
PB-602 (04001001-04999999) Backpack Blower View Diagrams & Manuals
PB-603 (03001001-03999999) Backpack Blower View Diagrams & Manuals
PB-603 (04001001-04999999) Backpack Blower View Diagrams & Manuals
PB-60HT (001001-568895) Backpack Blower View Diagrams & Manuals
PB-60HT (568896-999999) Backpack Blower View Diagrams & Manuals
PB-610 (02001001-02999999) Backpack Blower View Diagrams & Manuals
PB-611 (02001001-02999999) Backpack Blower View Diagrams & Manuals
SRM-200DA (After S/N 061536) Straight Shaft Trimmer / Brushcutter View Diagrams & Manuals
SRM-200DA (001001 - 061535) Straight Shaft Trimmer / Brushcutter View Diagrams & Manuals
PB-413H (P09512001001-P09512999999) Backpack Blower View Diagrams & Manuals
PB-413HT (02001001-02999999) Backpack Blower View Diagrams & Manuals
PB-413T (09001001-09999999) Backpack Blower View Diagrams & Manuals
PB-413T (10001001-10999999) Backpack Blower View Diagrams & Manuals
PB-413T (P06513001001-P06513999999) Backpack Blower View Diagrams & Manuals
PB-413T (P08111001001-P08111999999) Backpack Blower View Diagrams & Manuals
PB-413T (P09612001001-P09612999999) Backpack Blower View Diagrams & Manuals
PB-4500 (0034075 and Below) Backpack Blower View Diagrams & Manuals
PB-4500 (0034076 and Above) Backpack Blower View Diagrams & Manuals
PB-4600 (001001-059918) Backpack Blower View Diagrams & Manuals
CS-280E (0120269 - 9999999) Chainsaw View Diagrams & Manuals
CS-280EP (120269-9999999) Chainsaw View Diagrams & Manuals
CS-290EVL (0000001 - 0008580) Chainsaw View Diagrams & Manuals
CS-280E (0000001 - 0055489) Chainsaw View Diagrams & Manuals
CS-280E (0055490 - 0106530) Chainsaw View Diagrams & Manuals
CS-280E (0106531 - 0120268) Chainsaw View Diagrams & Manuals
CS-290EVL (After S/N 0008580) Chainsaw View Diagrams & Manuals
CS-290EVLP (Before S/N 008580) Chainsaw View Diagrams & Manuals
CS-290EVLP (After S/N 008580) Chainsaw View Diagrams & Manuals
CS-300EVL Chainsaw View Diagrams & Manuals
LBB-4200 (After S/N 001001) View Diagrams & Manuals
LBB-4200 Backpack Blower Lawn Equipment View Diagrams & Manuals
SV-2A Engine Lawn Equipment View Diagrams & Manuals
SV-2AE Engine Lawn Equipment View Diagrams & Manuals
SRM-200DA Trimmer Lawn Equipment View Diagrams & Manuals
CS-280E (0120269-0313000) Chainsaw Lawn Equipment View Diagrams & Manuals
CS-280E (0313001-9999999) Chainsaw Lawn Equipment View Diagrams & Manuals
CS-280EP (0120269-0313000) Chainsaw Lawn Equipment View Diagrams & Manuals
CS-280EP (0313001-9999999) Chainsaw Lawn Equipment View Diagrams & Manuals
CS-290EVL (008580-999999) Chainsaw Lawn Equipment View Diagrams & Manuals
CS-290EVLP (000000-008580) Chainsaw Lawn Equipment View Diagrams & Manuals
CS-290EVLP (008580-999999) Chainsaw Lawn Equipment View Diagrams & Manuals
PB-300E (0000000-0049617) Backpack Blower Lawn Equipment View Diagrams & Manuals
PB-300E (0049616-9999999) Backpack Blower Lawn Equipment View Diagrams & Manuals
PB-413H (09001001-09999999) Backpack Blower Lawn Equipment View Diagrams & Manuals
PB-413H (10001001-10999999) Backpack Blower Lawn Equipment View Diagrams & Manuals
PB-413T (02001001-02999999) Backpack Blower Lawn Equipment View Diagrams & Manuals
PB-4500 (0000000-0034075) Backpack Blower Lawn Equipment View Diagrams & Manuals
PB-4500 (0034076-9999999) Backpack Blower Lawn Equipment View Diagrams & Manuals
PB-46HT (001001-999999) Backpack Blower Lawn Equipment View Diagrams & Manuals
PB-600 (001001-999999) Backpack Blower Lawn Equipment View Diagrams & Manuals
PB-601 Backpack Blower Lawn Equipment View Diagrams & Manuals
PB-60HT Backpack Blower Lawn Equipment View Diagrams & Manuals
Little Wonder
SV-2A View Diagrams & Manuals
SV-2AE View Diagrams & Manuals
Craftsman
271281512 Brush Cutter View Diagrams & Manuals
Show More Compatible Models
This item works with the following types of products:
- Blower Parts
- Trimmer Parts
- Chain Saw Parts
- Saw Parts
This part replaces obsolete part #: 130016-06430, 13001606430, 13001606431, 13001606433
Repair Videos ?
Articles:
|
Filthy Filters? This article will show you how to install a filter kit on an Echo SRM-225 trimmer....
May 27, 2015
|

Customer Part Reviews ?
Average Rating (out of 5):
Click to filter by ratings:
5 stars
1
4 stars
0
3 stars
0
2 stars
0
1 stars
1
< PREV
- 1
Necessary part of carburetor replacement
One of two gaskets needed for carburetor replacement. Fit as expected. Everything arrived in a timely manner. Great service as usual.
John -
September 11, 2022
Verified Purchase
shipping
The reason I gave 1 star is that you ship via Fedex ground. They are slower than a snail. took 2 weeks to get the gaskets.
Guest -
January 29, 2020
Verified Purchase
t
t
t -
t days ago
Verified Purchase
eReplacementParts Team
t
Questions & Answers ?
Our customer Service team is at the ready daily to answer your part and product questions.

Ask our Team
We have a dedicated staff with decades of collective experience in helping customers just like you purchase parts to repair their products.
Does this fit my product?Questions & Answers for Gasket
No questions have been asked yet
Customer Repair Instructions ?
All our customer repair instructions are solicited directly from other customers just like you who have purchased and replaced this exact part.
defected carburetor
Pat - December 25, 2023
Tool Type
Blower
Difficulty
Easy
Time
Less than 15 minutes
Tools Used
Socket set
removed old carburetor
Did you find this story helpful?
Thanks for voting and helping fellow customers!
Start on choke, then stall
Craig - April 16, 2022
Tool Type
Trimmer
Difficulty
Easy
Time
Less than 15 minutes
Tools Used
Screwdriver, Pliers, Socket set, Easy
Parts Used
Removed air filter, loosen two bolts . Removed carb, reverse order, replaced hose and filter. Started right up! Warmed it up adjusted wide open throttle, and set idle mixture, and idle screw. Done!
Did you find this story helpful?
Thanks for voting and helping fellow customers!
Echo backpack blower would not start and there was a slight fuel leak in the primer bulb area.
David - September 11, 2021
Tool Type
Blower
Difficulty
Medium
Time
1-2 hours
Tools Used
, Allen Wrench
1) Removed air filter housing and carburetor by removing the (2) Allen head screws that secured them to the engine intake.
2) Removed the linkage from the throttle cable to the carburetor.
3) Installed the nylon needle valve limiters (red and white) to the valves. There are no instructions on how to install them. I then researched this on the Internet and could not find any discussion. I made the assumption that the needle valves were set correctly out of the factory. I installed the limiters by pushing them on the valves in the same orientation that the limiters on the original carburetor were.
4) Removed the old gaskets and discarded them.
5) Cleaned air filter housing.
6) Reassembled the air filter housing and carburetor to the engine intake by first installing the throttle linkage to the carburetor and making sure that the proper new gasket was on each side of the carburetor. Note: the front and rear gaskets are not identical.
7) More throughly completed repair by replacing the air filter, spark plug and fuel filter.
8) Started engine and adjusted carburetor to specification (idle speed) with a tachometer. Confirmed that high engine RPM was factory spec.
Did you find this story helpful?
Thanks for voting and helping fellow customers!
Would not crank
Duane - October 27, 2020
Tool Type
Blower
Difficulty
Easy
Time
Less than 15 minutes
Tools Used
Power Drill
Installed new carburetor and started right up
Did you find this story helpful?
Thanks for voting and helping fellow customers!
Fell off my talegate and landed on the carburetor side and cracked the insulator
Richard - October 13, 2020
Tool Type
Blower
Difficulty
Easy
Time
Less than 15 minutes
Tools Used
Screwdriver, allen wrench
Removed the cover on the exhaust area
Removed the screws on the air filter housing, which also holds on the carburetor
Removed the screws to the insulator.
Did all in reverse with new parts
Removed the screws on the air filter housing, which also holds on the carburetor
Removed the screws to the insulator.
Did all in reverse with new parts
Did you find this story helpful?
Thanks for voting and helping fellow customers!
Blower would bog at higher RPM's.
Tom - April 4, 2019
Tool Type
Blower
Difficulty
Easy
Time
30-60 minutes
Tools Used
Screwdriver, Wrench Set, Allen wrench, scraper, utility knife & side cutters.
Removed old carburetor, fuel lines, gaskets, filter and spark plug, replaced with new. Set carb high & low jets, started, fine tuned. Blower runs great!
Did you find this story helpful?
Thanks for voting and helping fellow customers!
Spitting gas out of the muffler on start and leaking gas.
Roger - June 28, 2017
Tool Type
Blower
Difficulty
Medium
Time
1-2 hours
Tools Used
Screwdriver, Socket set, Wrench Set
Parts Used
Replaced carburetor, gasket, air filter:
1) Removed fuel, spark plug, cover, and air filter to get to engine parts.
2) Removed inner workings (carb, muffler).
3) Wiped down / cleaned everything out to dry as much as possible. MAJOR issue / root cause may have just been a horribly flooded engine as the muffler probably had several ounces of gas that was dumped then ultimately burned off.
4) Replaced old with new (carb, gasket, air filter).
5) Put everything else back together.
6) New fuel mix.
7) Started and let run (still spit a little gas) it until no longer spitting.
Did you find this story helpful?
Thanks for voting and helping fellow customers!
carburetor and all other parts concerning the fuel system needed to be replaced
John - May 4, 2017
Tool Type
Blower
Difficulty
Medium
Time
30-60 minutes
Tools Used
Screwdriver, Nutdriver, gasket scraper
I Replaced the old carburetor and all other parts needed to get this old, old mantis tiller to run again. Once all parts were installed, new gas/oil was installed and the way she went. A few minor carb adjustments and the tiller ran like new. Lessons to be learned is, to drain gas out after each season and don't loan it out to anyone. They seam to stay in running condition better when you know how it was used.
Did you find this story helpful?
Thanks for voting and helping fellow customers!
OEM stands for Original Equipment Manufacturer and means the part you’re buying is sourced directly from the manufacturer who made your product. At eReplacementParts, we sell only genuine OEM parts, guaranteeing the part you’re purchasing is of better design and of higher quality than aftermarket parts.
Our product descriptions are a combination of data sourced directly from the manufacturers who made your product as well as content researched and curated by our content & customer service teams. This content is edited and reviewed internally before being made public to customers.
Our customer service team are at the ready daily to answer your part and product questions. We have a dedicated staff with decades of collective experience in helping customers just like you purchase parts to repair their products.
All our part reviews are solicited directly from other customers who have purchased this exact part. While we moderate these reviews for profanity, offensive language or personally identifiable information, these reviews are posted exactly as submitted and no alterations are made by our team.
All our customer repair instructions are solicited directly from other customers just like you who have purchased and replaced this exact part. While we moderate these reviews for profanity, offensive language or personally identifiable information, these reviews are posted exactly as submitted and no alterations are made by our team.
Based on data from past customer purchasing behaviors, these parts are most commonly purchased together along with the part you are viewing. These parts may be necessary or helpful to replace to complete your current repair.
All our installation videos are created and produced in collaboration with our in-house repair technician, Mark Sodja, who has helped millions of eReplacementParts customers over the last 13 years repair their products. Mark has years of experience in selling and repairing both commercial and residential products with a specialty in gas-powered equipment.
This data is collected from customers who submitted a repair instruction after replacing this exact part. Customers can rate how easy the repair was to complete and how long it took. We aggregate this data to provide a repair rating that allows customers to quickly determine the difficulty and time needed to perform their own repair.