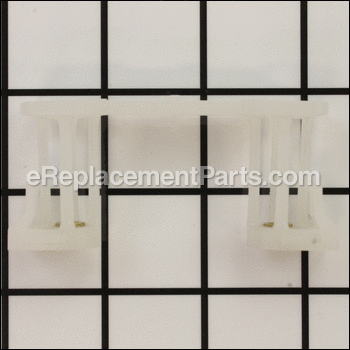

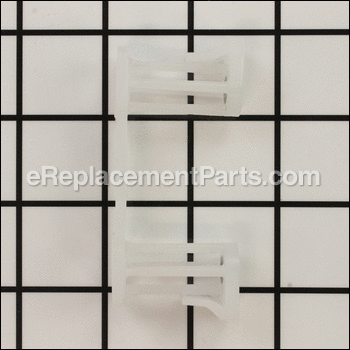

This is an Authentic OEM replacement part designed for use with Makita Finishing Sanders. It acts as a support. This part is made out of Plastic with Two (2) Metal Fittings that help to secure it. Includes One (1) Foot per order.
You would need a Screwdriver and Pliers to complete the job.
• Remove the Sander Pad and a Plate by removing 4 pad mounting screws
• Remove the dust vacuum housing by removing 2 screws
• Remove flywheel from motor shaft by removing one screw from the motor shaft
• Disassemble the main body by removing 4 body screws
• Make sure to clean the sander interior
• Remove and replace broken foot by sliding it out of the mounting slot
• Reassemble the sander
Foot 410918-1
OEM part for: Makita
Part Number: 410918-1
$6.38
In Stock
Jump To:
Product Description ?
- Classification: Part
- Weight: 0.01 lbs.
- Shipping: Ships Worldwide
Frequently Purchased Together ?


Compatibility
This part will fit the following 13 machines
Makita
9035 Finishing Sander View Diagrams & Manuals
9035D Cordless Sander View Diagrams & Manuals
BO4510 (Canada) Finishing Sander View Diagrams & Manuals
BO4551 Finishing Sander View Diagrams & Manuals
BO4552 Finishing Sander View Diagrams & Manuals
BO4562 Finishing Sander View Diagrams & Manuals
BO4530 Finishing Sander View Diagrams & Manuals
BO4550 Finishing Sander View Diagrams & Manuals
BO4510 (USA) Finishing Sander View Diagrams & Manuals
M901 Finishing Sander View Diagrams & Manuals
9035DW Sander View Diagrams & Manuals
BO4552K Sander View Diagrams & Manuals
BO4552KX Sander View Diagrams & Manuals
Show More Compatible Models
This item works with the following types of products:
- Sander Parts
This part replaces obsolete part #: 414312-9, 411343-9
Customer Part Reviews ?
Average Rating (out of 5):
Click to filter by ratings:
5 stars
16
4 stars
1
3 stars
0
2 stars
0
1 stars
0
< PREV
- 1
- 2
Perfect
Came quickly,worked great
Guest -
March 23, 2023
Verified Purchase
Parts replacement for Makita sander
Received order quickly and it was in good condition. Parts fit the Makita sander making it almost like a new tool.
Guest -
August 9, 2022
Verified Purchase
A bonus, Instructions on how to replace the defective part.
Easy to order. Quick delivery, and instructions on how to install the new part. And I really needed the instructions. Success for repair.
Guest -
August 8, 2022
Verified Purchase
Like having a brand new sander
Easy order, quick delivery, painless install.
Guest -
January 31, 2022
Verified Purchase
Easy ordering fast delivery
Just what was needed to get my sander back on service.
Steve -
April 13, 2021
Verified Purchase
Sander Foot
Very quick shipping also price was ressonable price . Came just in time to repair the broken sander foot on my makita finish sander was easily done .
Tod -
January 13, 2021
Verified Purchase
Quick 'n easy!
Perfect fit parts, repair was a snap! Parts arrived timely.
Guest -
November 12, 2020
Verified Purchase
Exact replacement part for Makita sander.
Part arrived quickly and is new-in-bag. Fit perfectly. Sander restored to proper operation.
Guest -
June 17, 2020
Verified Purchase
great part
easy install, works great
Guest -
May 26, 2020
Verified Purchase
Bosch palm sander.
Arrived on time. Direct replacement.
Guest -
April 14, 2020
Verified Purchase
t
t
t -
t days ago
Verified Purchase
eReplacementParts Team
t
Questions & Answers ?
Our customer Service team is at the ready daily to answer your part and product questions.

Ask our Team
We have a dedicated staff with decades of collective experience in helping customers just like you purchase parts to repair their products.
Does this fit my product?Questions & Answers for Foot
No questions have been asked yet
Customer Repair Instructions ?
All our customer repair instructions are solicited directly from other customers just like you who have purchased and replaced this exact part.
Sander became uncontrollable.
Douglas - July 18, 2016
👍 3 of 3 people found this instruction helpful
Tool Type
Sander
Difficulty
Easy
Time
Less than 15 minutes
Tools Used
Screwdriver
Parts Used
1. Remove sander base and offset bearing.
2. Remove (4) screws along sides holding motor housing together.
3. Gently pull one half of the housing away from the other half.
4. Remove the broken feet.
5. Replace with new feet and reassemble.
2. Remove (4) screws along sides holding motor housing together.
3. Gently pull one half of the housing away from the other half.
4. Remove the broken feet.
5. Replace with new feet and reassemble.
Did you find this story helpful?
Thanks for voting and helping fellow customers!
All 4 feet broken - pad fell off!
Dennis - April 30, 2016
👍 3 of 3 people found this instruction helpful
Tool Type
Sander
Difficulty
Easy
Time
Less than 15 minutes
Tools Used
Screwdriver
Parts Used
Remove the screws from the sander housing and carefully separate. Slide the old feet out and install the new ones, then reassemble the housings and install the pad back on.
Did you find this story helpful?
Thanks for voting and helping fellow customers!
Foot assembly on sander had broken. Only one foot of four was intact.
Jim - December 5, 2015
👍 2 of 2 people found this instruction helpful
Tool Type
Sander
Difficulty
Easy
Time
15-30 minutes
Tools Used
Screwdriver, Pliers
Parts Used
Simply separate housings, remove feet (2), replace feet, reassemble. Note: When reattaching sanding pad, do not over tighten mounting screws. Too tight and the sander will not oscillate properly.
Did you find this story helpful?
Thanks for voting and helping fellow customers!
Plastic broken on feet
Linda - August 14, 2020
👍 1 of 1 people found this instruction helpful
Tool Type
Sander
Difficulty
Easy
Time
Less than 15 minutes
Tools Used
Screwdriver
Parts Used
1. Unscrewed 4 screws from sander base, removed broken feet.
2. Removed upper portion (inside sander housing) , then separated palm sander. Removed top end of broken feet by sliding out of sander housing channel. Then installed new feet.
3. After Installing new feet, reassembled sander half’s, replaced upper internal portion.
4. Then reinstalled sander base with 4 screws.
5. Tested after ensuring all removed screws were reinstalled properly and tightened.
6. Works great!
Did you find this story helpful?
Thanks for voting and helping fellow customers!
Broken foot
Julian - May 1, 2017
👍 1 of 1 people found this instruction helpful
Tool Type
Sander
Difficulty
Medium
Time
15-30 minutes
Tools Used
Screwdriver
Parts Used
1. Disassembled the sander, removed and cleaned the motor, feet, and pad assembly.
2. Removed pad from plate.
3. Installed new foot and reassembled the sander. (Take care to in alignment of components as housing will not fit unless all components are properly installed. Do not force housing together!)
2. Removed pad from plate.
3. Installed new foot and reassembled the sander. (Take care to in alignment of components as housing will not fit unless all components are properly installed. Do not force housing together!)
Did you find this story helpful?
Thanks for voting and helping fellow customers!
Broken feet and worn brushes
Jeffery - April 12, 2017
👍 1 of 1 people found this instruction helpful
Tool Type
Sander
Difficulty
Medium
Time
15-30 minutes
Tools Used
, Nut driver with a torx bit
1. Removed the 4 screws that held the pad on
2. Removed the torx head screws that held the case together.
3. Pulled the case apart and replaced all the bearings and motor brushes, as well as the broken feet.
4. Assembled in reverse steps.
2. Removed the torx head screws that held the case together.
3. Pulled the case apart and replaced all the bearings and motor brushes, as well as the broken feet.
4. Assembled in reverse steps.
Did you find this story helpful?
Thanks for voting and helping fellow customers!
Refurb an older Makita BO4550 sander
David - August 7, 2023
Tool Type
Sander
Difficulty
Medium
Time
15-30 minutes
Tools Used
Screwdriver, Pliers
Parts Used
Picked this up used sander to complete a refinishing project. It's an oldie but goodie. It had good bones, extremely well constructed. Ultimately I replaced the sandpaper clamps and retaining clips, the nylon feet that hold the base, the brushes and a seal.
Cleanup was extensive, I used 600 grit wet/dry paper VERY lightly on the armature to remove accumulated oxidation. All the bearings were tight, no attention needed.
Assembled the old sander, fortunately there are plenty of sources of exploded parts list to make sure you gat it back together properly.
In the end, I now have a Makita 1/4 sheet sander that runs like brand new and since all the wearable parts have been replaced should last a very long time. You would be hard pressed to find a new unit with this quality unless you plan to spend a great deal.
Did you find this story helpful?
Thanks for voting and helping fellow customers!
Sanding pad holder broke away from the tool
Thomas - March 31, 2021
Tool Type
Sander
Difficulty
Easy
Time
Less than 15 minutes
Tools Used
Screwdriver
Parts Used
Only tool needed is Phillips #2 screwdriver
Unscrew pad holder from broken feet 4x
Unscrew dust collector housing 2x
Unscrew eccentric from motor shaft 1x
Unscrew and separate case 4x (keep track of which screw goes where)
Slide out old feet. Slide in new feet
Reassemble in opposite order of disassembly.
Notes: pad onto eccentric is a tight fit. Once it’s on, align pad with feet using a probe/icepick as feet need to bend a little to insert screw.
Did you find this story helpful?
Thanks for voting and helping fellow customers!
Switch was not working
Tod - January 20, 2021
Tool Type
Sander
Difficulty
Easy
Time
15-30 minutes
Tools Used
Screwdriver, Pliers
Took apart the sander to change the switch.
Did you find this story helpful?
Thanks for voting and helping fellow customers!
sander didn't vibrate
Timothy - October 31, 2019
Tool Type
Sander
Difficulty
Easy
Time
30-60 minutes
Tools Used
Screwdriver
Parts Used
Replaced broken feet that attach the sanding pad to the motor.
Did you find this story helpful?
Thanks for voting and helping fellow customers!
Load More Install Stories
OEM stands for Original Equipment Manufacturer and means the part you’re buying is sourced directly from the manufacturer who made your product. At eReplacementParts, we sell only genuine OEM parts, guaranteeing the part you’re purchasing is of better design and of higher quality than aftermarket parts.
Our product descriptions are a combination of data sourced directly from the manufacturers who made your product as well as content researched and curated by our content & customer service teams. This content is edited and reviewed internally before being made public to customers.
Our customer service team are at the ready daily to answer your part and product questions. We have a dedicated staff with decades of collective experience in helping customers just like you purchase parts to repair their products.
All our part reviews are solicited directly from other customers who have purchased this exact part. While we moderate these reviews for profanity, offensive language or personally identifiable information, these reviews are posted exactly as submitted and no alterations are made by our team.
All our customer repair instructions are solicited directly from other customers just like you who have purchased and replaced this exact part. While we moderate these reviews for profanity, offensive language or personally identifiable information, these reviews are posted exactly as submitted and no alterations are made by our team.
Based on data from past customer purchasing behaviors, these parts are most commonly purchased together along with the part you are viewing. These parts may be necessary or helpful to replace to complete your current repair.
All our installation videos are created and produced in collaboration with our in-house repair technician, Mark Sodja, who has helped millions of eReplacementParts customers over the last 13 years repair their products. Mark has years of experience in selling and repairing both commercial and residential products with a specialty in gas-powered equipment.
This data is collected from customers who submitted a repair instruction after replacing this exact part. Customers can rate how easy the repair was to complete and how long it took. We aggregate this data to provide a repair rating that allows customers to quickly determine the difficulty and time needed to perform their own repair.