
This is an Original Char-Broil replacement parts used for some of their Grills. This part is made out of Metal and it is Sold Individually. The purpose of bars is to direct grease and drippings away from the burner tubes, which cuts down on flare ups tremendously. An extra benefit of Flavorizer Bars is that they help add that “cooked on a grill” flavor to your food. Bars rust is the combination of heat and moisture and should be replaced of they are damaged our have holes.
No tools are required to replace this Flame Tamer, simply place it in the Bracket over the Burner.
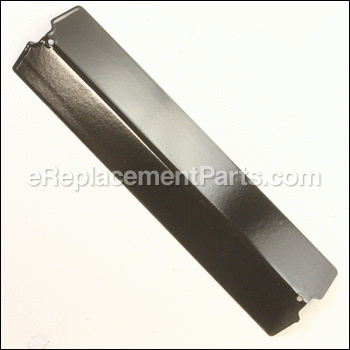
Heat Tent G455-0009-W1
OEM part for: Char-Broil
Part Number: G455-0009-W1
$13.69
In Stock
Jump To:
Product Description ?
- Classification: Part
- Weight: 0.76 lbs.
- Also Known As: Heat Plate, Flame Tamer, Heat Shield
- Shipping: Ships Worldwide
Frequently Purchased Together ?


Compatibility
This part will fit the following 2 machines
Char-Broil
463241113 Commercial Grill View Diagrams & Manuals
463449914 Commercial 4-Burner Grill C-45D View Diagrams & Manuals
This item works with the following types of products:
Repair Videos ?

Articles:
|
Having trouble getting your grill to light up? A common cause of this issue is a defective ignition switch. We'll sho...
November 08, 2012
|

Customer Part Reviews ?
Average Rating (out of 5):
Click to filter by ratings:
5 stars
2
4 stars
0
3 stars
0
2 stars
0
1 stars
0
< PREV
- 1
waiting for the perfect part
This grill had an unusual (not standard) size and design. So grateful we were able to find it on Replacement Parts!
Lynda -
February 11, 2021
Verified Purchase
Easy Repair
We are happy with the part we received. Quickly installed and we are able to grill again -- without having to purchase a new grill!
Guest -
June 8, 2020
Verified Purchase
t
t
t -
t days ago
Verified Purchase
eReplacementParts Team
t
Questions & Answers ?
Our customer Service team is at the ready daily to answer your part and product questions.

Ask our Team
We have a dedicated staff with decades of collective experience in helping customers just like you purchase parts to repair their products.
Does this fit my product?Questions & Answers for Heat Tent
Do you have 26" heat tents
Fred
asked on 2023-03-06
Hello Fred, Thank you for your inquiry. We are very sorry but we are not able to search for parts by size, only by model number or part number, as a lot of the time the manufacturer does not always provide us with the sizes. Please provide your model number and we would be happy to provide the correct heat tents for you. We look forward to hearing from you.
eReplacementParts Team March 06, 2023
What are the dimesons of the heat vaporizer?
John
for model number 21401734
asked on 2022-07-19
Hi John,
Thank you for your question. The heat tent measures 15.27 inches long by 3.76 inches wide by 0.81 inches high. If you need help placing an order for it, customer service is open 7 days a week and anyone will be happy to assist you. Please feel free to give us a call. We look forward to hearing from you!
eReplacementParts Team July 19, 2022
What are the dimesons of the heat tent?
John
asked on 2022-07-18
Hello Richard, thank you for the question. The length is 15 1/4" and 3 3/4" wide. If you need help placing an order, customer service is open 7 days a week. Please feel free to give us a call. We look forward to hearing from you!
eReplacementParts Team July 18, 2022
Customer Repair Instructions ?
All our customer repair instructions are solicited directly from other customers just like you who have purchased and replaced this exact part.
Rusted parts
Michael - March 27, 2017
👍 3 of 3 people found this instruction helpful
Tool Type
Outdoor Grill
Difficulty
Easy
Time
15-30 minutes
Tools Used
Screwdriver
Removed the old rusted parts and replaced with the news ones. Was as easy procedure. I spent more time cleaning the bottom of the grill than I did in replacing the parts.
Did you find this story helpful?
Thanks for voting and helping fellow customers!
We live near the ocean and I grill a lot. That means the steel parts in my grill rust out after a few years. The exterior stainless parts and frame are fine. Solution? Install new burners, flame tamer
Bradley - December 29, 2015
👍 2 of 2 people found this instruction helpful
Tool Type
Outdoor Grill
Difficulty
Easy
Time
Less than 15 minutes
Tools Used
Pliers
The old rusted parts had crumbled. I removed the debris and replaced the flame tubes onto the burners which I had previously replaced. The only tool needed was a pair of pliers to hold the clips as I installed them. The flame tamers are not secured at all and simply drop in place. Total repair time less than 5 minutes. All parts I ordered were correct, complete and fit precisely. I spent about $100 total on 4 burners and flame tamers plus the 3 flame tubes. I now have a functionally new grill. Replacing it would have been over $500. I'm good to go for another 3 or 4 years of regular grilling
Did you find this story helpful?
Thanks for voting and helping fellow customers!
Burned out flame tamers and rusted main burners
Donald - November 20, 2017
👍 1 of 1 people found this instruction helpful
Tool Type
Outdoor Grill
Difficulty
Easy
Time
15-30 minutes
Tools Used
Screwdriver, Pliers
I ran the video to see how to do the replacement and simply followed the directions and in 15 minutes I was done.
Did you find this story helpful?
Thanks for voting and helping fellow customers!
Internal components about 4 years old, holes in fame tubes, carryover rails rusted out, temp gauge broken, igniter switch broke.
John - October 25, 2017
👍 1 of 1 people found this instruction helpful
Tool Type
Outdoor Grill
Difficulty
Easy
Time
30-60 minutes
Tools Used
Pliers, Shop Vac
1. Removed the grill grates
2. Removed the flame tamers and discarded them.
3. Removed the burnt crust from the cotter keys and pulled out the keys holding the burner and the crossover tubes.
4. Removed the old parts.
5. Scraped and vacuumed the interior pit.
6. Removed the wires and the nut from the back of the old igniter switch.
7. Replaced the switch in the reverse order.
8. Installed the burner tubes, they slide right into the position, added the rear cotter key.
9. Installed the crossover rails and the cotter keys.
10. Removed and installed the new temp gauge.
11. Installed the new flame tamer.
12. Slid the grill grates back on.
13. Tested, "A" OK. Works great now.
Did you find this story helpful?
Thanks for voting and helping fellow customers!
Worn parts.
Timothy - October 10, 2017
👍 1 of 1 people found this instruction helpful
Tool Type
Outdoor Grill
Difficulty
Easy
Time
15-30 minutes
Tools Used
Screwdriver, Pliers, Cotter pin puller
Remove the burners, the crossover tubes, the thermostat and replaced everything.
Did you find this story helpful?
Thanks for voting and helping fellow customers!
All of the burners, flame tamer, and cross tubes were rusted beyond repair
michael - September 16, 2017
👍 1 of 1 people found this instruction helpful
Tool Type
Outdoor Grill
Difficulty
Easy
Time
15-30 minutes
Tools Used
Screwdriver, Pliers
Removed the rusted broken items, when the tubes didn't go in like the videos explained I loosened the clamps holding the 4 propane valves, then all four tubes went in really easy. took about 20 minutes once I got the valve clamps loosened.
Did you find this story helpful?
Thanks for voting and helping fellow customers!
the burners were shot
Mike - September 14, 2017
👍 1 of 1 people found this instruction helpful
Tool Type
Outdoor Grill
Difficulty
Medium
Time
30-60 minutes
Tools Used
Screwdriver
I removed all of the old burners & debris from the grill. In order to get the new burners to line up with the dials I had to pull the dials & remove the screws so the burners could be aligned. after I figured that out it went smooth. It is as good as new now!
Did you find this story helpful?
Thanks for voting and helping fellow customers!
They were rusted
Robert - June 25, 2017
👍 1 of 1 people found this instruction helpful
Tool Type
Outdoor Grill
Difficulty
Easy
Time
Less than 15 minutes
Tools Used
Parts Used
Took the old ones off and installed the new ones
Did you find this story helpful?
Thanks for voting and helping fellow customers!
Heat tents had burned through and started to disintegrate.
Richard - July 4, 2019
Tool Type
Outdoor Grill
Difficulty
Easy
Time
Less than 15 minutes
Tools Used
, Hands
Parts Used
Removed the grill units replaced the heat tents, reinstalled the grills. Done in less than five minutes.
Did you find this story helpful?
Thanks for voting and helping fellow customers!
4 main burner tubes, carry over tube assembly and heat tent were rusted and not functional
William - July 25, 2018
Tool Type
Outdoor Grill
Difficulty
Easy
Time
30-60 minutes
Tools Used
Screwdriver, Pliers
1 Removed all rusted parts to be replaced and cleaned fire box with Shop Vac. This was done prior to placing order which helped me determine exactly what I needed. Approximately 30min.
2 When I received the parts I started with the main burner tubes following the instructions included each tube was inserted and a cotter pin placed on the back end of each tube secured them. Needle Nose pliers made this easy.
3 The carry over tube assembly was next but before you can complete this part you need to screw a small eyelet screw in the front of each burner tube. When this is completed the carry over tubes can be put in place and secured with a cotter pin.
4 The final step was to place the 4 heat tents over each burner. They simply fit into a niche in the fire box over each burner. Approximately 30 min.
Did you find this story helpful?
Thanks for voting and helping fellow customers!
Load More Install Stories
OEM stands for Original Equipment Manufacturer and means the part you’re buying is sourced directly from the manufacturer who made your product. At eReplacementParts, we sell only genuine OEM parts, guaranteeing the part you’re purchasing is of better design and of higher quality than aftermarket parts.
Our product descriptions are a combination of data sourced directly from the manufacturers who made your product as well as content researched and curated by our content & customer service teams. This content is edited and reviewed internally before being made public to customers.
Our customer service team are at the ready daily to answer your part and product questions. We have a dedicated staff with decades of collective experience in helping customers just like you purchase parts to repair their products.
All our part reviews are solicited directly from other customers who have purchased this exact part. While we moderate these reviews for profanity, offensive language or personally identifiable information, these reviews are posted exactly as submitted and no alterations are made by our team.
All our customer repair instructions are solicited directly from other customers just like you who have purchased and replaced this exact part. While we moderate these reviews for profanity, offensive language or personally identifiable information, these reviews are posted exactly as submitted and no alterations are made by our team.
Based on data from past customer purchasing behaviors, these parts are most commonly purchased together along with the part you are viewing. These parts may be necessary or helpful to replace to complete your current repair.
All our installation videos are created and produced in collaboration with our in-house repair technician, Mark Sodja, who has helped millions of eReplacementParts customers over the last 13 years repair their products. Mark has years of experience in selling and repairing both commercial and residential products with a specialty in gas-powered equipment.
This data is collected from customers who submitted a repair instruction after replacing this exact part. Customers can rate how easy the repair was to complete and how long it took. We aggregate this data to provide a repair rating that allows customers to quickly determine the difficulty and time needed to perform their own repair.