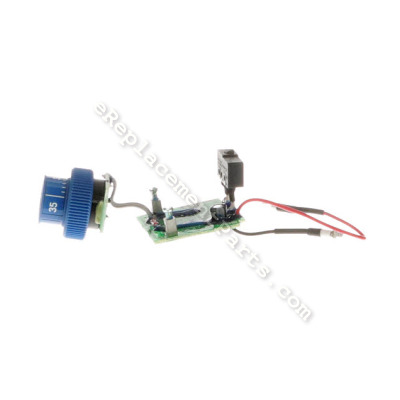

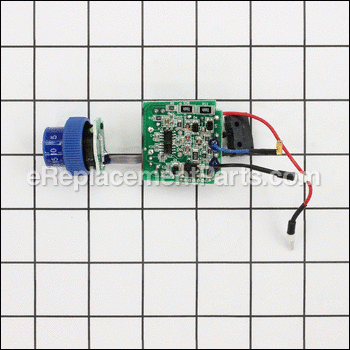
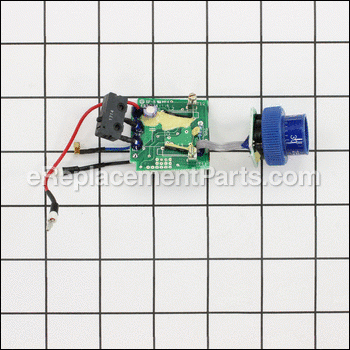


This electronic speed switch is a high quality item that is sourced directly from original equipment manufacturer for use on Dremel rotary tools. It allows user to adjust the speed of the tool by turning the wheel. Please note one switch is included per order that will require a screwdriver set to replace it.
Electronic Speed Switch 2610004636
OEM part for: Dremel, Bosch
Part Number: 2610004636
$25.66
Usually ships in 7 - 12 business days
7 - 12 business days
Jump To:
Frequently Purchased Together ?
Compatibility
This part will fit the following 2 machines
Dremel
4000 Variable-Speeds Rotary Tool View Diagrams & Manuals
4000 (F013400001) Bare Tool 120v Usa 4000 View Diagrams & Manuals
This item works with the following types of products:
- Multi-Tool Parts
Repair Videos ?
Watch the Repair Video for
Electronic Speed Switch

Articles:
|
Step-by-step instructions for removing and installing the speed control switch on your Dremel rotary tool....
September 11, 2017
|

Customer Part Reviews ?
Average Rating (out of 5):
Click to filter by ratings:
5 stars
5
4 stars
0
3 stars
0
2 stars
0
1 stars
0
< PREV
- 1
Dremel speed switch
This part was exactly what I needed to get my Dremel 4000 back to operating like new. No more pulsing spindle speed. The online instillation video was helpful also.
Guest -
September 1, 2021
Verified Purchase
Works like charm!
Easy to install using a youtube video. All in, took about 10 minutes. Product works great!!!
Guest -
June 2, 2020
Verified Purchase
easy repair that save me from replacement
The perfect part replacement
Mitchel -
March 30, 2020
Verified Purchase
Correct part! Worked great!
Thanks
Guest -
November 16, 2019
Verified Purchase
Perfect
Instaled and work like new
Guest -
April 19, 2019
Verified Purchase
t
t
t -
t days ago
Verified Purchase
eReplacementParts Team
t
Questions & Answers ?
Our customer Service team is at the ready daily to answer your part and product questions.

Ask our Team
We have a dedicated staff with decades of collective experience in helping customers just like you purchase parts to repair their products.
Does this fit my product?Questions & Answers for Electronic Speed Switch
No questions have been asked yet
Customer Repair Instructions ?
All our customer repair instructions are solicited directly from other customers just like you who have purchased and replaced this exact part.
Dremel stopped working and wouldn't turn back on.
Thomas - April 13, 2019
👍 2 of 2 people found this instruction helpful
Tool Type
MultiTool
Difficulty
Medium
Time
30-60 minutes
Tools Used
Screwdriver, Pliers
Parts Used
My dremel 4000 stopped working in between uses while trying to complete a project. Nothing out of the ordinary happened like overheating so I decided to try the switch replacement.
The replacement was of medium difficulty because the wires more or less have to be put back exactly where they were before in order to get the unit back together again. Take lots of pictures as you slowly take it apart to see where they should go when you're putting it back together. Also, YouTube has some good videos on how to do it as well.
The replacement was of medium difficulty because the wires more or less have to be put back exactly where they were before in order to get the unit back together again. Take lots of pictures as you slowly take it apart to see where they should go when you're putting it back together. Also, YouTube has some good videos on how to do it as well.
Did you find this story helpful?
Thanks for voting and helping fellow customers!
Stopped running
Kerry - February 11, 2016
👍 5 of 8 people found this instruction helpful
Tool Type
MultiTool
Difficulty
Easy
Time
15-30 minutes
Tools Used
Screwdriver, none
Parts Used
Open the tool. Take out old the switch assembly. Make sure all wires clear closing of housing. Put back the way you took it out. Close and plug in turn on. If not working still recheck all wire connections.
Did you find this story helpful?
Thanks for voting and helping fellow customers!
The variable speed controller fried
Jim - October 6, 2018
👍 1 of 1 people found this instruction helpful
Tool Type
MultiTool
Difficulty
Easy
Time
Less than 15 minutes
Tools Used
Screwdriver, Pliers
Parts Used
1. Remove nose collar, motor brush spring plugs and brushes, and the 6 (?) case screws.
2. Lift off half the case. You must note the position of the wires, and spindle lock and spring.
3. Unscrew/remove plug wire from circuit board.
4. Remove speed controller board - note wire routing to motor. Lifting of the motor out of place will help.
5.Install new controller and assemble tool in reverse order. Ensure motor spins freely before assembly of case. Don't forget the spindle lock and spring, The clear plastic dial guard will re-install and fit perfectly so keep at it until it does. Do not over tighten case screws.
Did you find this story helpful?
Thanks for voting and helping fellow customers!
Power switch went out.
Jay - May 15, 2020
Tool Type
MultiTool
Difficulty
Medium
Time
30-60 minutes
Tools Used
Screwdriver, Pliers, Small flathead for wire connection to power cord.
Parts Used
Removed cover and pulled out old switch and disconnected it. Connected new switch and tucked wires back in and slid back in.
Did you find this story helpful?
Thanks for voting and helping fellow customers!
Stopped running
William - April 17, 2019
Tool Type
MultiTool
Difficulty
Medium
Time
30-60 minutes
Tools Used
Screwdriver
Parts Used
Followed instruction in earlier post along with answer to another post for location of grounding wire that goes to one of the brush holders.
Did you find this story helpful?
Thanks for voting and helping fellow customers!
would not run
greg - January 19, 2019
Tool Type
MultiTool
Difficulty
Medium
Time
15-30 minutes
Tools Used
Screwdriver
Parts Used
watched u tube video
Did you find this story helpful?
Thanks for voting and helping fellow customers!
Did not want to run or turn on.
Andy - November 14, 2017
Tool Type
MultiTool
Difficulty
Medium
Time
15-30 minutes
Tools Used
Screwdriver
Parts Used
Replaced the speed switch.
Did you find this story helpful?
Thanks for voting and helping fellow customers!
The unit locked up 10 yrs ago while cutting aluminum
wallace - September 18, 2017
Tool Type
MultiTool
Difficulty
Medium
Time
30-60 minutes
Tools Used
Screwdriver, Star bit and tweezers
1. Disassembled unit
2. Wire power cord to new switch assembly
3. Attached brush holders to field
4. Attached field to switch
5. Routed wires to specific points so unit will close and run
6. Place all button and lock knobs in place.
7. Reassembled unit
(Pay Close Attention To Where The Wires Are Routed, if they are not just right the outer casing will not close cleanly and the motor will not run)
Did you find this story helpful?
Thanks for voting and helping fellow customers!
Speed controller failed
Raymond - December 14, 2016
Tool Type
MultiTool
Difficulty
Easy
Time
Less than 15 minutes
Tools Used
Screwdriver
Parts Used
Removed brushes
Removed casing
Removed loose frame components
Popped the brush housing loose
Tipped motor out and removed old speed control
Follow the above steps in reverse
Removed casing
Removed loose frame components
Popped the brush housing loose
Tipped motor out and removed old speed control
Follow the above steps in reverse
Did you find this story helpful?
Thanks for voting and helping fellow customers!
OEM stands for Original Equipment Manufacturer and means the part you’re buying is sourced directly from the manufacturer who made your product. At eReplacementParts, we sell only genuine OEM parts, guaranteeing the part you’re purchasing is of better design and of higher quality than aftermarket parts.
Our product descriptions are a combination of data sourced directly from the manufacturers who made your product as well as content researched and curated by our content & customer service teams. This content is edited and reviewed internally before being made public to customers.
Our customer service team are at the ready daily to answer your part and product questions. We have a dedicated staff with decades of collective experience in helping customers just like you purchase parts to repair their products.
All our part reviews are solicited directly from other customers who have purchased this exact part. While we moderate these reviews for profanity, offensive language or personally identifiable information, these reviews are posted exactly as submitted and no alterations are made by our team.
All our customer repair instructions are solicited directly from other customers just like you who have purchased and replaced this exact part. While we moderate these reviews for profanity, offensive language or personally identifiable information, these reviews are posted exactly as submitted and no alterations are made by our team.
Based on data from past customer purchasing behaviors, these parts are most commonly purchased together along with the part you are viewing. These parts may be necessary or helpful to replace to complete your current repair.
All our installation videos are created and produced in collaboration with our in-house repair technician, Mark Sodja, who has helped millions of eReplacementParts customers over the last 13 years repair their products. Mark has years of experience in selling and repairing both commercial and residential products with a specialty in gas-powered equipment.
This data is collected from customers who submitted a repair instruction after replacing this exact part. Customers can rate how easy the repair was to complete and how long it took. We aggregate this data to provide a repair rating that allows customers to quickly determine the difficulty and time needed to perform their own repair.