
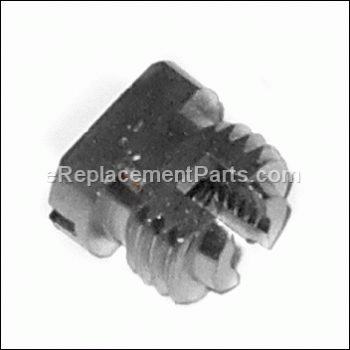
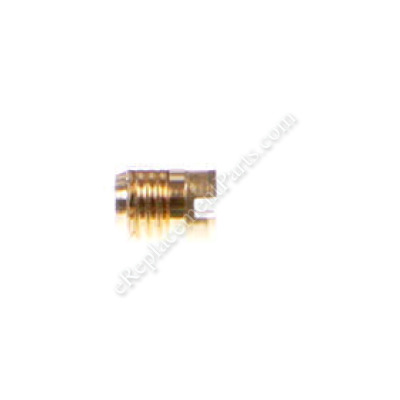

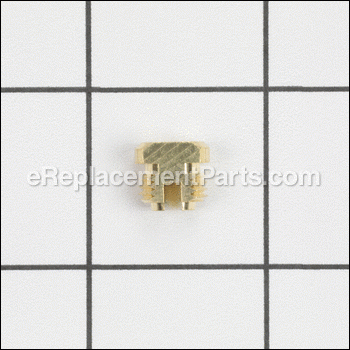

This genuine component is designed for DeLonghi coffee makers. It is an identical replacement for a damaged or a missing dowel that was installed on a new unit. This high-quality part is made of durable metal and is sold as an individual item. Check the appropriate diagrams for your specific model to ensure the proper repair procedure.
Dowel 6213210451
OEM part for: DeLonghi
Part Number: 6213210451
$8.32
In Stock
Jump To:
Frequently Purchased Together ?


Compatibility
This part will fit the following 24 machines
DeLonghi
BAR42E Espresso/Cappuccino Maker View Diagrams & Manuals
ECO310BK Coffee Maker View Diagrams & Manuals
EC155 Cappuccino Maker View Diagrams & Manuals
EC270 Coffee Maker View Diagrams & Manuals
EC460 Cappuccino Maker View Diagrams & Manuals
EC702 Coffee Maker View Diagrams & Manuals
EC220CD Coffee Maker View Diagrams & Manuals
EC330 Coffee Maker View Diagrams & Manuals
ECO310BK Icona Pump Espresso Machine View Diagrams & Manuals
EC270 (132103085) Espresso Pump View Diagrams & Manuals
EC330 (132106032) Espresso Pump View Diagrams & Manuals
ECO310W (0132106089) Icona Manual Espresso Machine View Diagrams & Manuals
BCO430 Cappuccino Espresso And Coffee Maker View Diagrams & Manuals
BAR42 (132152004) Espresso Pump View Diagrams & Manuals
BAR18 (132103076) Espresso Pump View Diagrams & Manuals
EC460 (132104080) Espresso Maker View Diagrams & Manuals
EC155 Espresso Coffee Maker View Diagrams & Manuals
BAR42E (132152004) Espresso Pump View Diagrams & Manuals
EC140BEXC (132103072) Espresso Coffee Maker View Diagrams & Manuals
EC220CD (132151070) 15-Bar Pump Driven Espresso Maker View Diagrams & Manuals
BCO430BM Cappuccino Espresso And Coffee Maker View Diagrams & Manuals
EC702 (132154017) Espresso/Cappuccino Maker View Diagrams & Manuals
BCO432 (132510002) Family Espresso Machine View Diagrams & Manuals
ECO310R (0132106088) Icona Manual Espresso Machine View Diagrams & Manuals
Show More Compatible Models
This item works with the following types of products:
- Espresso Parts
- Coffee Maker Parts
This part replaces obsolete part #: 7032103900
Questions & Answers ?
Our customer Service team is at the ready daily to answer your part and product questions.

Ask our Team
We have a dedicated staff with decades of collective experience in helping customers just like you purchase parts to repair their products.
Does this fit my product?Questions & Answers for Dowel
No questions have been asked yet
Customer Repair Instructions ?
All our customer repair instructions are solicited directly from other customers just like you who have purchased and replaced this exact part.
The machine's lower-boiler output valve was leaking before running a cycle due to the lower boiler being broken and the valve spring missing.
Rylee - March 9, 2022
Tool Type
Coffee Maker
Difficulty
Easy
Time
Less than 15 minutes
Tools Used
Screwdriver
1.) Used a 3mm flathead bit on a long, but skinny screwdriver to unscrew the top heating base from the machine via the black base that surrounds where the water outputs.
2.) Used a Phillips Head #0 bit to remove the two small screws on the back of the machine connected to the top heating base.
3.) Removed the top heating base.
4.) [CAUTION]If there's water still in the boiler, it will leak. If the boiler is hot, steam may exit, so let the machine cool down before continuing this step[CAUTION] Used an H3.5 (Hex) bit to remove the lower boiler from the upper boiler. It may also help to unplug the connectors from the upper-boiler for easier removal. Take a picture as you go to make it easier to put the wires back in the right places.
5.) After removing the upper boiler, remove the lower boiler.
6.) Grab the new boiler and put together the spring valve contraption. Place the valve ring inside the smaller end of the spring, then the valve, and carefully place the spring into where the dowel would go, with the valve going in first.
7.) Then screw in the dowel.
8.) Place the repaired or newly put together lower boiler back into its position.
9.) Screw the top boiler back to the bottom boiler with the H3.5 (Hex) bit. If you removed the wires, place them back in their respectful positions.
10.) Re-attach the top heating base.
11.) Screw the two small screws back into the back of the heating base with the PH#0 bit.
12.) Screw the three screws that connect the black base to the heating base with a 3mm flathead.
Did you find this story helpful?
Thanks for voting and helping fellow customers!
Nothing, just as describe and correct part
Anca - April 22, 2019
Tool Type
Coffee Maker
Difficulty
Easy
Time
Less than 15 minutes
Tools Used
Screwdriver
Parts Used
Old dowel broke removed the screw place spring an put new dowel. Now the machine works correctly as described.
Did you find this story helpful?
Thanks for voting and helping fellow customers!
OEM stands for Original Equipment Manufacturer and means the part you’re buying is sourced directly from the manufacturer who made your product. At eReplacementParts, we sell only genuine OEM parts, guaranteeing the part you’re purchasing is of better design and of higher quality than aftermarket parts.
Our product descriptions are a combination of data sourced directly from the manufacturers who made your product as well as content researched and curated by our content & customer service teams. This content is edited and reviewed internally before being made public to customers.
Our customer service team are at the ready daily to answer your part and product questions. We have a dedicated staff with decades of collective experience in helping customers just like you purchase parts to repair their products.
All our part reviews are solicited directly from other customers who have purchased this exact part. While we moderate these reviews for profanity, offensive language or personally identifiable information, these reviews are posted exactly as submitted and no alterations are made by our team.
All our customer repair instructions are solicited directly from other customers just like you who have purchased and replaced this exact part. While we moderate these reviews for profanity, offensive language or personally identifiable information, these reviews are posted exactly as submitted and no alterations are made by our team.
Based on data from past customer purchasing behaviors, these parts are most commonly purchased together along with the part you are viewing. These parts may be necessary or helpful to replace to complete your current repair.
All our installation videos are created and produced in collaboration with our in-house repair technician, Mark Sodja, who has helped millions of eReplacementParts customers over the last 13 years repair their products. Mark has years of experience in selling and repairing both commercial and residential products with a specialty in gas-powered equipment.
This data is collected from customers who submitted a repair instruction after replacing this exact part. Customers can rate how easy the repair was to complete and how long it took. We aggregate this data to provide a repair rating that allows customers to quickly determine the difficulty and time needed to perform their own repair.