
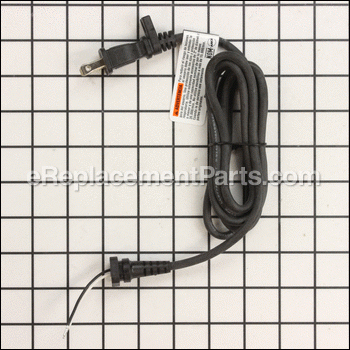
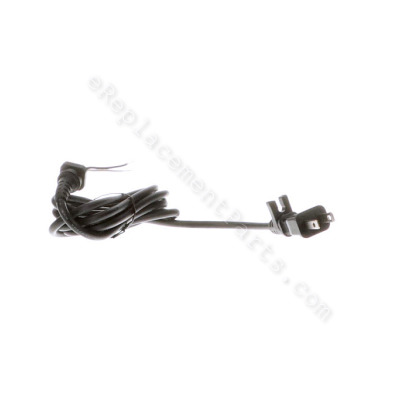


This replacement power cord is supplied form original equipment manufacturer. It is specially made for Dremel rotary multi-tools. I plays a key role by delivering the electricity from the outlet to the tool. This cord is rubber insulated and it is sold individually. It does include a rubber grommet/sleeve.
To complete this repair you would need a screwdriver.
• Remove housing screws
• Remove the housing
• Disconnect wires from the old cord
• Remove old cord
• Secure the new power cord in place
• Reattach wires
• Reassemble and test the unit
Power Supply Cord 2615294041
OEM part for: Dremel, Bosch
Part Number: 2615294041
$8.35
Usually ships in 7 - 12 business days
7 - 12 business days
Jump To:
Product Description ?
- Classification: Part
- Weight: 0.24 lbs.
- Shipping: Ships Worldwide
Frequently Purchased Together ?
Compatibility
This part will fit the following 17 machines
Dremel
275 (F013027500) Corded Multi-Tool View Diagrams & Manuals
300 (F013030000) Corded Multi-Tool View Diagrams & Manuals
395 (F0130395CA) Corded Multi-Tool View Diagrams & Manuals
400 XPR Variable Speed Rotary Tool View Diagrams & Manuals
6300 Multi-Max Oscillating Tool View Diagrams & Manuals
395 (Type 3) Corded Multi-Tool View Diagrams & Manuals
3000 VS Rotary Tool View Diagrams & Manuals
275T6 Multipro Multi-Tool View Diagrams & Manuals
285T6 Multipro Multi-Tool View Diagrams & Manuals
395T6 Multipro Multi-Tool View Diagrams & Manuals
380-6 High Speed Rotary Tool View Diagrams & Manuals
200 (F013020001) 200 Series Rotary Tool View Diagrams & Manuals
100 (F013010001) 100 Series Rotary Tool View Diagrams & Manuals
6300 (F013630000) 120v Bare Tool Oscillating Multi-Max Us View Diagrams & Manuals
100 (F013010000) Series Single Speed Bare Tool 100 View Diagrams & Manuals
300 (F013030005) Series Bare Tool 300 View Diagrams & Manuals
3000 (F013300000) Series Bare Tool 120v Usa 3000 View Diagrams & Manuals
Show More Compatible Models
This item works with the following types of products:
- Multi-Tool Parts
- Oscillating Tool Parts
This part replaces obsolete part #: 2612594041
Customer Part Reviews ?
Average Rating (out of 5):
Click to filter by ratings:
5 stars
11
4 stars
1
3 stars
0
2 stars
0
1 stars
0
< PREV
- 1
- 2
Exactly what I needed
My prior power cord got destroyed by a mouse so I thought I would take a chance at trying to replace it. It was straightforward and this was exactly what I needed. Within a half hour I had everything apart, back together and working.
Kristine -
October 31, 2023
Verified Purchase
Power supply cord for dremel
CS: This cord is a prefect matchup and easy to install.
Guest -
October 26, 2022
Verified Purchase
Power Needed
Perfect and easy replacement part with great pricing. Will continue to do business with this company. (Fast shipper).
Guest -
August 10, 2021
Verified Purchase
Dremel replacement cord
perfect!
Guest -
May 8, 2021
Verified Purchase
Power Cord
Looks like oem part.
Guest -
June 16, 2020
Verified Purchase
I have purchased many parts and always received the exact part I needed and would highly recommend ereplacementparts.com
Part came quickly, fit perfectly, was a breeze to install.
Guest -
March 28, 2020
Verified Purchase
Good fit easy repair
Exactly the same
Guest -
March 9, 2020
Verified Purchase
Very good
Fast shipping, great part to replace a 20 year old cord, very easy. Much better than the original hard cracking cord
Guest -
February 4, 2020
Verified Purchase
Perfect fit
Quick shipping and exact replacement
Guest -
November 5, 2019
Verified Purchase
Fast shipping; perfect replacement
This replacement cord arrived quickly and is of high quality. Installation was easy. Thanks!
Guest -
May 30, 2019
Verified Purchase
t
t
t -
t days ago
Verified Purchase
eReplacementParts Team
t
Questions & Answers ?
Our customer Service team is at the ready daily to answer your part and product questions.

Ask our Team
We have a dedicated staff with decades of collective experience in helping customers just like you purchase parts to repair their products.
Does this fit my product?Questions & Answers for Power Supply Cord
No questions have been asked yet
Customer Repair Instructions ?
All our customer repair instructions are solicited directly from other customers just like you who have purchased and replaced this exact part.
Replace A/C cord.
Don - December 30, 2015
👍 7 of 10 people found this instruction helpful
Tool Type
MultiTool
Difficulty
Easy
Time
15-30 minutes
Tools Used
Screwdriver
Parts Used
Clean the outside of the dermel tool.
Remove screws and collet collar.
Separate cover halves.
Remove bad a/c cord, take notice as to the location of the white and black wires.
Install new a/c cord replacing the white and black wires in the correct position.
Replace the covers and install screws and collet cover.
Remove screws and collet collar.
Separate cover halves.
Remove bad a/c cord, take notice as to the location of the white and black wires.
Install new a/c cord replacing the white and black wires in the correct position.
Replace the covers and install screws and collet cover.
Did you find this story helpful?
Thanks for voting and helping fellow customers!
Cord was damaged and brushes were worn
Paul - February 2, 2018
👍 1 of 1 people found this instruction helpful
Tool Type
MultiTool
Difficulty
Medium
Time
15-30 minutes
Tools Used
Screwdriver, Pliers
Parts Used
Removed chuck adjustment nut from tool and plastic threaded bushing from spindle end of tool. Removed the brushes.
Then removed 4 screws holding case together. Split and removed top half of case. Used small flat tip screw driver to release cord leads from tool. Removed old cord then installed new. Put case back together then installed new brushes.
Then removed 4 screws holding case together. Split and removed top half of case. Used small flat tip screw driver to release cord leads from tool. Removed old cord then installed new. Put case back together then installed new brushes.
Did you find this story helpful?
Thanks for voting and helping fellow customers!
Damaged/Cut power cord
Kevin - September 6, 2017
👍 1 of 1 people found this instruction helpful
Tool Type
MultiTool
Difficulty
Easy
Time
Less than 15 minutes
Tools Used
Screwdriver, Pliers, T-15 Torx bit,narrow flathead screwdriver,needlenose pliers
Parts Used
1. Unscrew and Remove brush/spring covers on both sides.
2. Remove and set aside brush&springs from both sides noting orientation of brushes.
3. Twist off and set aside collet nut (<< 4. Twist off and set aside plastic top cover.
5. Gently pry apart back cover (same side with Torx screws) using flathead screw driver.
6. Note location of B&W wires and holes they go into on Electronic Speed Switch.
7. Gently pull B&W wires out of Electronic Speed Switch with needle nose pliers.
8. Align replacement power cord inside housing.
9. Reattach B&W wires to Electronic Speed Switch.
10. Reassemble covers, brush&springs, etc...
Did you find this story helpful?
Thanks for voting and helping fellow customers!
Dremel shaft no longer could lock
Eric - October 28, 2016
👍 1 of 1 people found this instruction helpful
Tool Type
MultiTool
Difficulty
Easy
Time
15-30 minutes
Tools Used
Screwdriver
- Opened up the case
- Removed brushes
- Removed armature
- Removed old lock
- Removed old power cord (I had damaged it as part of an earlier project)
- Install new powercord
- Install lock
- Install armature
- Installed the brushes and here is an easy part to screw up. The brushes have a contour to them. Match the contour to where they will contact the armature. If you don't they will bind the assembly and it won't spin freely.
- Reinstall the case making sure to put the wires into the slots to the case doesn't cut the wires
- Check that the shaft spins freely.
- Plug in and test
Did you find this story helpful?
Thanks for voting and helping fellow customers!
My Dremel multimax tool would not start.
Jim - July 17, 2016
👍 1 of 1 people found this instruction helpful
Tool Type
MultiTool
Difficulty
Easy
Time
15-30 minutes
Tools Used
Screwdriver
Parts Used
I followed the directions sent with the new power cord and when I finished installing new power cord, I plugged it in and it started. I was real happy.
Did you find this story helpful?
Thanks for voting and helping fellow customers!
the power cord was frayed
Herbert - July 2, 2020
Tool Type
MultiTool
Difficulty
Medium
Time
30-60 minutes
Tools Used
Screwdriver, Wrench Set
Parts Used
replaced the power cord
Did you find this story helpful?
Thanks for voting and helping fellow customers!
Power cord needed replacement.
George - April 4, 2020
Tool Type
MultiTool
Difficulty
Medium
Time
1-2 hours
Tools Used
Screwdriver
Parts Used
The tool needed to be opened and then the old cord came out just fine. It took three tries to get the new cord installed. First two times the tool refused to spin. Tool was quite old; wires did not attach well enough on the first couple of tries.
Did you find this story helpful?
Thanks for voting and helping fellow customers!
Power cord frayed at strain relief
Lewis - December 24, 2019
Tool Type
MultiTool
Difficulty
Easy
Time
Less than 15 minutes
Tools Used
Screwdriver
Parts Used
1) opened dremel tool
2) removed old cord
3) pushed in pre-tinned leads
4) closed dremel tool
2) removed old cord
3) pushed in pre-tinned leads
4) closed dremel tool
Did you find this story helpful?
Thanks for voting and helping fellow customers!
Was running erratic slowing down
Richard - July 13, 2019
Tool Type
MultiTool
Difficulty
Easy
Time
30-60 minutes
Tools Used
Screwdriver, wire strippers soldering iron
replaced the brushes and brush cover doors, plus replaced the power cord which had cracked.
Repair was easy enough thanks to ereplacement parts having the exact matching parts. Couldn't find procedure to release power cord wires, so cut and soldered new cord with shrink on the wires. Didn't take long and runs like new.
Repair was easy enough thanks to ereplacement parts having the exact matching parts. Couldn't find procedure to release power cord wires, so cut and soldered new cord with shrink on the wires. Didn't take long and runs like new.
Did you find this story helpful?
Thanks for voting and helping fellow customers!
power supply cord had dead short .
Eugene - May 1, 2019
Tool Type
MultiTool
Difficulty
Easy
Time
15-30 minutes
Tools Used
, torx screwdriver
Parts Used
removed old power cord after checking with a ohm meter,showed a dead short,keept blowing the breaker in the breaker box. replaced new power cord and now runs again like new..
Did you find this story helpful?
Thanks for voting and helping fellow customers!
Load More Install Stories
OEM stands for Original Equipment Manufacturer and means the part you’re buying is sourced directly from the manufacturer who made your product. At eReplacementParts, we sell only genuine OEM parts, guaranteeing the part you’re purchasing is of better design and of higher quality than aftermarket parts.
Our product descriptions are a combination of data sourced directly from the manufacturers who made your product as well as content researched and curated by our content & customer service teams. This content is edited and reviewed internally before being made public to customers.
Our customer service team are at the ready daily to answer your part and product questions. We have a dedicated staff with decades of collective experience in helping customers just like you purchase parts to repair their products.
All our part reviews are solicited directly from other customers who have purchased this exact part. While we moderate these reviews for profanity, offensive language or personally identifiable information, these reviews are posted exactly as submitted and no alterations are made by our team.
All our customer repair instructions are solicited directly from other customers just like you who have purchased and replaced this exact part. While we moderate these reviews for profanity, offensive language or personally identifiable information, these reviews are posted exactly as submitted and no alterations are made by our team.
Based on data from past customer purchasing behaviors, these parts are most commonly purchased together along with the part you are viewing. These parts may be necessary or helpful to replace to complete your current repair.
All our installation videos are created and produced in collaboration with our in-house repair technician, Mark Sodja, who has helped millions of eReplacementParts customers over the last 13 years repair their products. Mark has years of experience in selling and repairing both commercial and residential products with a specialty in gas-powered equipment.
This data is collected from customers who submitted a repair instruction after replacing this exact part. Customers can rate how easy the repair was to complete and how long it took. We aggregate this data to provide a repair rating that allows customers to quickly determine the difficulty and time needed to perform their own repair.