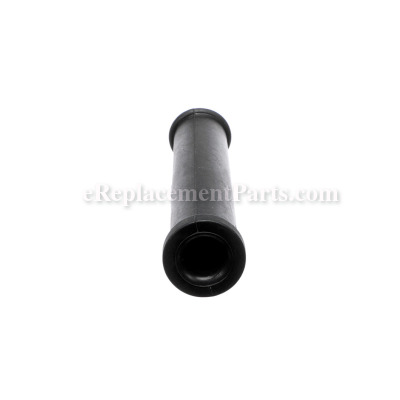
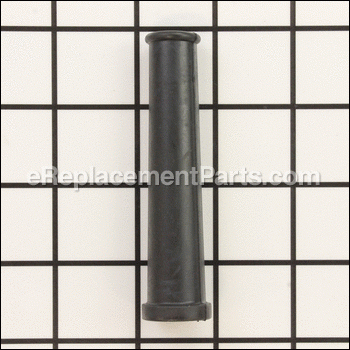


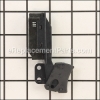
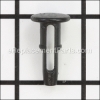
This cord guard / strain reliever is a genuine Makita replacement part. It covers the final portion of cord before entering the tool, providing extra rigidness and preventing cord damage. Over time these cord guards break down and require replacement. The guard is constructed of heavy duty rubber compound for toughness.
This cord guard is compatible with the tools listed below. It is not guaranteed to fit any other power tool models.
Cord Guard 682505-8
OEM part for: Makita
Part Number: 682505-8
$3.99
In Stock
Jump To:
Product Description ?
- Genuine O.E.M. Makita replacement cord guard
- Protects from cord damage
- Constructed of tough rubber
- Classification: Part
- Weight: 0.01 lbs.
- Also Known As: Strain Relief, Cord Protector, Cord Cover, Cord Grip
- Shipping: Ships Worldwide
Frequently Purchased Together ?


Compatibility
This part will fit the following 181 machines
Makita
LS1013 Miter Saw View Diagrams & Manuals
LS1212 Miter Saw View Diagrams & Manuals
5007NB Circular Saw View Diagrams & Manuals
9403 Belt Sander View Diagrams & Manuals
5740NB Circular Saw View Diagrams & Manuals
2414B Chop Saw View Diagrams & Manuals
2708 Table Saw View Diagrams & Manuals
3612 Router View Diagrams & Manuals
3612C Router View Diagrams & Manuals
4110C Angle Cutter View Diagrams & Manuals
9627 Grinder View Diagrams & Manuals
9000BL Grinder View Diagrams & Manuals
5014NB Chainsaw View Diagrams & Manuals
5016NB Chainsaw View Diagrams & Manuals
2711 Table Saw View Diagrams & Manuals
LS1011N Compound Miter Saw View Diagrams & Manuals
LS1011 Compound Miter Saw View Diagrams & Manuals
LS1020 Miter Saw View Diagrams & Manuals
LS1030N Miter Saw View Diagrams & Manuals
LS1030 Miter Saw View Diagrams & Manuals
LS1040 Miter Saw View Diagrams & Manuals
LS1045 Miter Saw View Diagrams & Manuals
LS1211 Miter Saw View Diagrams & Manuals
9015B Grinder View Diagrams & Manuals
9016B Grinder View Diagrams & Manuals
9029 Grinder View Diagrams & Manuals
9069 Angle Grinder View Diagrams & Manuals
HM1100C Demolition Hammer View Diagrams & Manuals
HR5001C Rotary Hammer View Diagrams & Manuals
1806B Planer View Diagrams & Manuals
2414NB Chop Saw View Diagrams & Manuals
HM1303 Demolition Hammer View Diagrams & Manuals
HM1303B Demolition Hammer View Diagrams & Manuals
HR5000 Rotary Hammer View Diagrams & Manuals
LS1440 Miter Saw View Diagrams & Manuals
2040 Planer View Diagrams & Manuals
6910 Impact Wrench View Diagrams & Manuals
HM1500 Demolition Hammer View Diagrams & Manuals
LC1230 Chop Saw View Diagrams & Manuals
5008NB Circular Saw View Diagrams & Manuals
5037NB Circular Saw View Diagrams & Manuals
5201NA Circular Saw View Diagrams & Manuals
5277B Circular Saw View Diagrams & Manuals
9015DB Angle Grinder View Diagrams & Manuals
9067L Angle Grinder View Diagrams & Manuals
GA7001L Angle Grinder View Diagrams & Manuals
GA7911 Angle Sander View Diagrams & Manuals
HM1500B Demolition Hammer View Diagrams & Manuals
LS1220 Compound Miter Saw View Diagrams & Manuals
9921 Belt Sander View Diagrams & Manuals
HM1301 Demolition Hammer View Diagrams & Manuals
2414DB Portable Cut Off Saw View Diagrams & Manuals
3803A Groove Cutter View Diagrams & Manuals
420S Dust Collector View Diagrams & Manuals
5007NBA Circular Saw View Diagrams & Manuals
5037NBA Circular Saw View Diagrams & Manuals
5177B Hypoid Saw View Diagrams & Manuals
5402A Circular Saw View Diagrams & Manuals
9016DB Angle Grinder View Diagrams & Manuals
9060L Angle Sander View Diagrams & Manuals
6922NB Shear Wrench View Diagrams & Manuals
5057B Circular Saw View Diagrams & Manuals
7104L Chain Mortiser View Diagrams & Manuals
2030N Planer Jointer View Diagrams & Manuals
5007S Circular Saw View Diagrams & Manuals
5077B Hypoid Saw View Diagrams & Manuals
LS1214 Dual Slide Compound Miter Saw View Diagrams & Manuals
9015A Angle Grinder View Diagrams & Manuals
5277NB Hypoid Saw View Diagrams & Manuals
LS1221 Compound Miter Saw View Diagrams & Manuals
5007FAK Circular Saw View Diagrams & Manuals
5007FK Circular Saw View Diagrams & Manuals
LS1013F Miter Saw View Diagrams & Manuals
LS1013FL Compound Miter Saw View Diagrams & Manuals
LS1040F Compound Miter Saw View Diagrams & Manuals
LS1013L Compound Miter Saw View Diagrams & Manuals
5008FA Circular Saw View Diagrams & Manuals
LS1000 10 inch Miter Saw View Diagrams & Manuals
9607BL 6000RPM Grinder View Diagrams & Manuals
LS1214FL 12" Dual Slide Compound Miter Saw View Diagrams & Manuals
LS1214L 12" Dual Slide Compound Miter Saw with Laser View Diagrams & Manuals
5104 14A 10-1/4" Circular Saw View Diagrams & Manuals
5007NBK Type 1 7-1/4" 15A Heavy-Gauge Aluminium Base Circular Saw View Diagrams & Manuals
GA6010Z 10.5A 6" Cutoff / Angle Grinder View Diagrams & Manuals
GA5020 10.5A 5" SJS Angle Grinder View Diagrams & Manuals
GA5010Z 10.5A 5" Angle Grinder View Diagrams & Manuals
2401B 10" Miter Saw View Diagrams & Manuals
2030 (Type 1) 12" Planer-Jointer View Diagrams & Manuals
2030 (Type 2) 12" Planer-Jointer View Diagrams & Manuals
LS1430 14" Miter Saw View Diagrams & Manuals
LS1400 14" Miter Saw View Diagrams & Manuals
5057KB 7-1/4" Circular Saw View Diagrams & Manuals
RP1800 3-1/4 HP Plunge Router View Diagrams & Manuals
RP2301FC 3-1/4 HP Plunge Router View Diagrams & Manuals
SP6000K1 6-1/2" Plunge Circular Saw with 55" Guide Rail View Diagrams & Manuals
GA5020Y Super Joint Angle Grinder View Diagrams & Manuals
5007FA 7-1/4" Circular Saw with Brake View Diagrams & Manuals
5007F 7-1/4" Circular Saw with Brake View Diagrams & Manuals
9609B 7" Disc Grinder View Diagrams & Manuals
9607B 7" Disc Grinder View Diagrams & Manuals
GA6020 6" Angle Grinder View Diagrams & Manuals
8900N Demolition Hammer View Diagrams & Manuals
2004 Planer View Diagrams & Manuals
2040-2 Planer View Diagrams & Manuals
2400B Saw View Diagrams & Manuals
4100NH2ZX1 (Type 1) Saw View Diagrams & Manuals
4100NH2ZX1 (Type 2) Saw View Diagrams & Manuals
4100NH2ZX1 (Type 3) Saw View Diagrams & Manuals
4100NH2ZX (Type 2) Saw View Diagrams & Manuals
4100NH2ZX (Type 3) Saw View Diagrams & Manuals
4100NSZX1 (Type 1) Saw View Diagrams & Manuals
4100NSZX1 (Type 2) Saw View Diagrams & Manuals
4100NSZX1 (Type 3) Saw View Diagrams & Manuals
4100NSZX (Type 1) Saw View Diagrams & Manuals
4100NSZX (Type 2) Saw View Diagrams & Manuals
4100NSZX (Type 3) Saw View Diagrams & Manuals
5007NBA-K Saw View Diagrams & Manuals
5008B Saw View Diagrams & Manuals
5008FA (Type 2) Saw View Diagrams & Manuals
5008NBA Saw View Diagrams & Manuals
5008NBA (Type 2) Saw View Diagrams & Manuals
5008NBA (Type 3) Saw View Diagrams & Manuals
5008NB (Type 2) Saw View Diagrams & Manuals
5008NB (Type 3) Saw View Diagrams & Manuals
5008NB (Type 4) Saw View Diagrams & Manuals
6910 (Type 2) Impact Driver View Diagrams & Manuals
9027L Grinder View Diagrams & Manuals
9060DBL Sander View Diagrams & Manuals
9067DB Grinder View Diagrams & Manuals
9607NB (Type 1) Grinder View Diagrams & Manuals
9607NB (Type 2) Grinder View Diagrams & Manuals
CA5000X Saw View Diagrams & Manuals
GA5010 Grinder View Diagrams & Manuals
GA6010 Grinder View Diagrams & Manuals
GA6010ZX2 Grinder View Diagrams & Manuals
GA6020YX1 Grinder View Diagrams & Manuals
GA7910 (Type 1) Sander View Diagrams & Manuals
GA7910 (Type 2) Sander View Diagrams & Manuals
GA7910 (Type 3) Sander View Diagrams & Manuals
HM0810T Misc View Diagrams & Manuals
HM1300 Misc View Diagrams & Manuals
HR5000K (Type 1) Misc View Diagrams & Manuals
LC1210 Saw View Diagrams & Manuals
LS1013L (Type 1) Saw View Diagrams & Manuals
LS1013L (Type 2) Saw View Diagrams & Manuals
LS1013 (Type 1) Saw View Diagrams & Manuals
LS1013 (Type 2) Saw View Diagrams & Manuals
LS1013 (Type 3) Saw View Diagrams & Manuals
LS1013 (Type 4) Saw View Diagrams & Manuals
LS1040 (Type 1) Saw View Diagrams & Manuals
LS1040 (Type 2) Saw View Diagrams & Manuals
LS1040 (Type 3) Saw View Diagrams & Manuals
LS1040 (Type 4) Saw View Diagrams & Manuals
LS1040 (Type 5) Saw View Diagrams & Manuals
LS1214F Saw View Diagrams & Manuals
LS1214L (Type 1) Saw View Diagrams & Manuals
LS1214L (Type 2) Saw View Diagrams & Manuals
LS1214LX1 (Type 1) Saw View Diagrams & Manuals
LS1214LX1 (Type 2) Saw View Diagrams & Manuals
LS1214 (Type 1) Saw View Diagrams & Manuals
LS1214 (Type 2) Saw View Diagrams & Manuals
RF1101KIT3 Misc View Diagrams & Manuals
RP1801F (Type 1) Misc View Diagrams & Manuals
RP1801F (Type 2) Misc View Diagrams & Manuals
SP6000 Saw View Diagrams & Manuals
SP6000J Saw View Diagrams & Manuals
SP6000J1 Saw View Diagrams & Manuals
SP6000K Saw View Diagrams & Manuals
SP6000 (Type 1) Saw View Diagrams & Manuals
SP6000 (Type 2) Saw View Diagrams & Manuals
SP6000 (Type 3) Saw View Diagrams & Manuals
SP6000 (Type 4) Saw View Diagrams & Manuals
SP6000X1 (Type 1) Saw View Diagrams & Manuals
SP6000X1 (Type 2) Saw View Diagrams & Manuals
SP6000X1 (Type 3) Saw View Diagrams & Manuals
SP6000X1 (Type 4) Saw View Diagrams & Manuals
SP6000X2 (Type 1) Saw View Diagrams & Manuals
SP6000X2 (Type 2) Saw View Diagrams & Manuals
SP6000X2 (Type 3) Saw View Diagrams & Manuals
SP6000X2 (Type 4) Saw View Diagrams & Manuals
UC4020A Saw View Diagrams & Manuals
Show More Compatible Models
This item works with the following types of products:
- Miter Saw Parts
- Saw Parts
- Circular Saw Parts
- Sander Parts
- Chop Saw Parts
- Table Saw Parts
- Router Parts
- Grinder Parts
- Chain Saw Parts
- Demolition Hammer Parts
- Rotary Hammer Parts
- Planer Parts
- Impact Wrench Parts
- Shear Parts
- Jointer Parts
Repair Videos ?
Watch the Repair Video for
Cord Guard

Customer Part Reviews ?
Average Rating (out of 5):
Click to filter by ratings:
5 stars
7
4 stars
0
3 stars
0
2 stars
0
1 stars
0
< PREV
- 1
exactly what i wanted. price was right
Exactly what i wanted . price was right . fit perfectly
Guest -
May 2, 2022
Verified Purchase
Perfect fit replacement part!
Like new - installation made simple with the help of a youtube demonstration.
Guest -
September 23, 2019
Verified Purchase
Great part
Back in business
Guest -
September 17, 2019
Verified Purchase
exactly right
Arrived promptly and worked perfectly.
Guest -
September 13, 2019
Verified Purchase
worked as expected
part fit perfect
james -
July 18, 2019
Verified Purchase
Cord Protector
Very Good Product
Gerard -
May 6, 2019
Verified Purchase
fine
worked fine
Guest -
April 25, 2019
Verified Purchase
t
t
t -
t days ago
Verified Purchase
eReplacementParts Team
t
Questions & Answers ?
Our customer Service team is at the ready daily to answer your part and product questions.

Ask our Team
We have a dedicated staff with decades of collective experience in helping customers just like you purchase parts to repair their products.
Does this fit my product?Questions & Answers for Cord Guard
No questions have been asked yet
Customer Repair Instructions ?
All our customer repair instructions are solicited directly from other customers just like you who have purchased and replaced this exact part.
Power cord was frayed and needed replacement
Fred - August 10, 2017
👍 2 of 2 people found this instruction helpful
Tool Type
Miter Saw
Difficulty
Medium
Time
More than 2 hours
Tools Used
Screwdriver, Wrench Set, wire stripper and cutter
1. Removed 4 phillips head screws to remove handle assembly from saw.
2. Removed 5 phillips head screws to open handle assembly and provide access to wiring
3. Removed power cord and its connection to a connector component and the switch.
4. Cut new wires as needed to make connections
5. Noted that the new strain relief was not the correct size. Discovered that this was due to the labeling on the miter saw which indicated that it was a model LS 1030 when it was actually a model LS 1030N. Was able to determine this from drawings which were accurate.
6. Used old strain reliever which was in good condition
7. Then disaster: One of the handle assembly screws fell into the armature casing. The armature unit could not be removed as it appeared to be stuck in the casing. This condition has been reported by others. After a couple of days trying magnets, shaking the casing, using wires, etc. I finally was able to see where the screw was stuck with a flashlight shining on the casing air vents. Once seeing the screw I was then able to remove it.
8. Then took a little time to discover how a retention spring functioned together with the safety release button on the unit.
9. Voila! Repair complete and the saw started and has been resurrected from the dead!!
Did you find this story helpful?
Thanks for voting and helping fellow customers!
Cord was worn
Mark - October 2, 2017
👍 1 of 1 people found this instruction helpful
Tool Type
Circular Saw
Difficulty
Easy
Time
15-30 minutes
Tools Used
Screwdriver
Parts Used
Removed the handle cover
Removed the cord clamp
Removed the cord wires from the switch
Slid the new cord relief onto the new cord
Connected the new cord wires to the switch
Screw in the cord clamp
Screwed the handle cover on
Removed the cord clamp
Removed the cord wires from the switch
Slid the new cord relief onto the new cord
Connected the new cord wires to the switch
Screw in the cord clamp
Screwed the handle cover on
Did you find this story helpful?
Thanks for voting and helping fellow customers!
The 5007 Makita saw had been thrown away with a broken handle, lever missing, and cord cut.
Vaughn - August 31, 2018
Tool Type
Circular Saw
Difficulty
Easy
Time
15-30 minutes
Tools Used
Screwdriver, Wire stripper, crimping pliers
1. Removed the switch assembly and the old cord.
2. Crimped new ring terminals on the new cord.
3. Installed new cord with cord guard
4. Installed new handle cover using M3 x .7 x 25mm screws
5. Installed new lever and screw
6. Put a new blade on it and it cuts great.
2. Crimped new ring terminals on the new cord.
3. Installed new cord with cord guard
4. Installed new handle cover using M3 x .7 x 25mm screws
5. Installed new lever and screw
6. Put a new blade on it and it cuts great.
Did you find this story helpful?
Thanks for voting and helping fellow customers!
Died suddenly. Figured it was something with the switch.
E - June 8, 2018
Tool Type
Miter Saw
Difficulty
Easy
Time
15-30 minutes
Tools Used
Screwdriver
Replaced the cord (very worn and cracked) and replaced the switch inside. It was the switch (Switch SP115F-1 (651895-0) = $15.28) that was bad. Took the motor off then the handle/button cover, cut the new cord wires to length, attached, then put in the switch (you'll need to buy the electrical flat slide female connection for the wire that goes to the switch, the other wire is a screw down attachment. - I have that stuff on hand - very cheap from any hardware store), you'll see it when you take off the cover. The biggest problem was getting the spring to stay in place that holds the switch handle out. A small flat-head screwdriver did the trick.
Did you find this story helpful?
Thanks for voting and helping fellow customers!
Very old but fully serviceable saw. Hate to replace it!
Gregory - April 25, 2018
Tool Type
Miter Saw
Difficulty
Medium
Time
30-60 minutes
Tools Used
Screwdriver, Pliers, Socket set
1. Removed the handle / motor housing and installed a new power cord, both longer and larger gauge wire, including a ground wire, using the new cord guard. The original cord did not have a ground wire, now this is installed and tied to the cast metal part of the outer motor housing.
2. Disassembled the miter box and installed a new chip guard (these tend to break so I bought 2).
3. Installed new brushes and saved the old ones, as a backup set.
Everything works great. Took maybe 30 minutes.
2. Disassembled the miter box and installed a new chip guard (these tend to break so I bought 2).
3. Installed new brushes and saved the old ones, as a backup set.
Everything works great. Took maybe 30 minutes.
Did you find this story helpful?
Thanks for voting and helping fellow customers!
the switch was bad and the electrical cord was broken
Michael - March 25, 2018
Tool Type
Circular Saw
Difficulty
Easy
Time
15-30 minutes
Tools Used
Screwdriver, Pliers
Disassembled the handle.
Removed the swiitch.
Attached the new cord and cord guard.
Re-installed the switch.
Reassembled the handle.
Saw works perfect.
Removed the swiitch.
Attached the new cord and cord guard.
Re-installed the switch.
Reassembled the handle.
Saw works perfect.
Did you find this story helpful?
Thanks for voting and helping fellow customers!
The Safety guard handle was broken off and cord was in bad shape.
William - February 12, 2018
Tool Type
Circular Saw
Difficulty
Easy
Time
30-60 minutes
Tools Used
Screwdriver
Removed a total of 5 screws off of the handle and open and exposed power cord housing, removed two set screws and replaced old cord with new.
Put installed new handle to blade guard with set screw.
Installed the new locking screw on face plate use to set angles on sew.
Put installed new handle to blade guard with set screw.
Installed the new locking screw on face plate use to set angles on sew.
Did you find this story helpful?
Thanks for voting and helping fellow customers!
Maintenance
Kenneth - February 5, 2018
Tool Type
Saw
Difficulty
Medium
Time
30-60 minutes
Tools Used
Screwdriver
1 Review fasteners used on tool and select tools
2 Disassemble
3 Replace worn and broken parts
4 Reassemble
5 Test
2 Disassemble
3 Replace worn and broken parts
4 Reassemble
5 Test
Did you find this story helpful?
Thanks for voting and helping fellow customers!
Trigger was loose in the handle and wouldn't work predictably. The housing was broken where the trigger mounts, allowing the movement.
Thomas - December 15, 2017
Tool Type
Circular Saw
Difficulty
Medium
Time
1-2 hours
Tools Used
Screwdriver, Wrench Set, Snap ring pliers
You will have to take the saw mostly apart for this repair, but parts cost a lot less than a new saw if you don't mind the repair work. Start by removing the blade, washers, and bolt. Remove the foot from the saw by removing the pivot screw/nut at the front and the adjustment bolt from the rear (remove the set screw on the lever, then the lever, then the nut and bolt. Remove the blade guard by removing the snap ring, stop button, and return spring. Remove the drive pud (what the blade bolts to) by removing the four retaining screws. Remove the blade housing by removing the screws from the backside. Remove the handle cover. Remove the white plastic cover behind the blade housing. Pull the armature out of the field coil (might have to tap on the back of the motor housing to get the bearing out of the bore, otherwise it's held in with magnetic force). Carefully remove the wiring from the handle for the cord, trigger, and light. Remove the field coil screws and the coil (turning the housing over and thumping it against a wood block with release it; it's pressure fit). Reinstall the field coil into the new motor housing (line up the screw holes and tap it in with a drift ot screwdriver until it seats). Reinstall the field coil screws. Carefully route the wiring through the guides in the housing. If the cord needs replacement now's a good time. The rest of reassembly is just the reverse of disassembly. Be sure to test the saw when done. These are relatively simple tools to repair, just take your time and snap some pictures if you need to.
Did you find this story helpful?
Thanks for voting and helping fellow customers!
Cord insulation was cracked from age
Roger - November 23, 2017
Tool Type
Circular Saw
Difficulty
Medium
Time
15-30 minutes
Tools Used
Screwdriver, Wire stripper / crimper
Parts Used
1. Removed handle
2. Removed old cord
3. Cut and stripped insulation from new cord
4. Added and crimped wire connectors
5. Installed new power cord and cord guard
6. Replace handle
2. Removed old cord
3. Cut and stripped insulation from new cord
4. Added and crimped wire connectors
5. Installed new power cord and cord guard
6. Replace handle
Did you find this story helpful?
Thanks for voting and helping fellow customers!
Load More Install Stories
OEM stands for Original Equipment Manufacturer and means the part you’re buying is sourced directly from the manufacturer who made your product. At eReplacementParts, we sell only genuine OEM parts, guaranteeing the part you’re purchasing is of better design and of higher quality than aftermarket parts.
Our product descriptions are a combination of data sourced directly from the manufacturers who made your product as well as content researched and curated by our content & customer service teams. This content is edited and reviewed internally before being made public to customers.
Our customer service team are at the ready daily to answer your part and product questions. We have a dedicated staff with decades of collective experience in helping customers just like you purchase parts to repair their products.
All our part reviews are solicited directly from other customers who have purchased this exact part. While we moderate these reviews for profanity, offensive language or personally identifiable information, these reviews are posted exactly as submitted and no alterations are made by our team.
All our customer repair instructions are solicited directly from other customers just like you who have purchased and replaced this exact part. While we moderate these reviews for profanity, offensive language or personally identifiable information, these reviews are posted exactly as submitted and no alterations are made by our team.
Based on data from past customer purchasing behaviors, these parts are most commonly purchased together along with the part you are viewing. These parts may be necessary or helpful to replace to complete your current repair.
All our installation videos are created and produced in collaboration with our in-house repair technician, Mark Sodja, who has helped millions of eReplacementParts customers over the last 13 years repair their products. Mark has years of experience in selling and repairing both commercial and residential products with a specialty in gas-powered equipment.
This data is collected from customers who submitted a repair instruction after replacing this exact part. Customers can rate how easy the repair was to complete and how long it took. We aggregate this data to provide a repair rating that allows customers to quickly determine the difficulty and time needed to perform their own repair.