
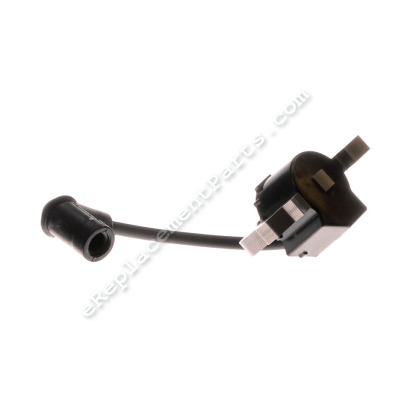


This replacement ignition coil assembly is a high quality item that is designed for use on Honda engines that are commonly installed on Toro lawn and garden equipment. The ignition module also known as armature-magneto provides current for the ignition system by producing pulses of high voltage for the spark plugs. One durable metal coil with rubber insulated wire and the spark plug boot is included per order. To complete this repair you would need screwdriver set.
Coil Assembly- Ignition 30500-ZL8-014
OEM part for: Honda, Toro
Part Number: 30500-ZL8-014
$75.93
Usually ships in 7 - 12 business days
7 - 12 business days
Jump To:
Frequently Purchased Together ?
Compatibility
This part will fit the following 150 machines
Honda
GC135 (Type VXP5)(VIN# GCAJ-1000001-9999999) Small Engine View Diagrams & Manuals
GC135 (Type WKT2)(VIN# GCAJ-1000001-9999999) Small Engine View Diagrams & Manuals
GC135 (Type WME2)(VIN# GCAJ-1000001-9999999) Small Engine View Diagrams & Manuals
GC160 (Type PHA)(VIN# GCAH-1000001-9999999) Small Engine View Diagrams & Manuals
GC160 (Type PXA)(VIN# GCAH-1000001-9999999) Small Engine View Diagrams & Manuals
GC160 (Type QBC)(VIN# GCAH-1000001-9999999) Small Engine View Diagrams & Manuals
GC160 (Type QHA)(VIN# GCAH-1000001-9999999) Small Engine View Diagrams & Manuals
GC160 (Type QHA1)(VIN# GCAH-1000001-9999999) Small Engine View Diagrams & Manuals
GC160 (Type QHA2)(VIN# GCAH-1000001-9999999) Small Engine View Diagrams & Manuals
GC160 (Type QHAJ)(VIN# GCAH-1000001-9999999) Small Engine View Diagrams & Manuals
GC160 (Type WKT2)(VIN# GCAH-1000001-9999999) Small Engine View Diagrams & Manuals
GC160 (Type WME2)(VIN# GCAH-1000001-9999999) Small Engine View Diagrams & Manuals
GC160LE (Type VXA)(VIN# GCABE-1000001) Small Engine View Diagrams & Manuals
GCV135 (Type A1A)(VIN# GJAF-1000001-9999999) Small Engine View Diagrams & Manuals
GCV135 (Type A1D)(VIN# GJAF-1000001-1011083) Small Engine View Diagrams & Manuals
GCV135 (Type A2A)(VIN# GJAF-1000001-9999999) Small Engine View Diagrams & Manuals
GCV135 (Type A2D)(VIN# GJAF-1000001-1000165) Small Engine View Diagrams & Manuals
GCV135 (Type A2R)(VIN# GJAF-1000001-9999999) Small Engine View Diagrams & Manuals
GCV135 (Type N7E2)(VIN# GJAF-1000001-9999999) Small Engine View Diagrams & Manuals
GCV135A (Type N1A)(VIN# GJAFA-1000001-9999999) Small Engine View Diagrams & Manuals
GCV135A (Type N5A)(VIN# GJAFA-1000001-9999999) Small Engine View Diagrams & Manuals
GCV160 (Type A1A)(VIN# GJAE-1000001-9999999) Small Engine View Diagrams & Manuals
GCV160 (Type A2A)(VIN# GJAE-1000001-9999999) Small Engine View Diagrams & Manuals
GCV160 (Type A2R)(VIN# GJAE-1000001-9999999) Small Engine View Diagrams & Manuals
GC135 (Type PHA)(VIN# GCAJ-1000001-9999999) Small Engine View Diagrams & Manuals
GC135 (Type PXA)(VIN# GCAJ-1000001-9999999) Small Engine View Diagrams & Manuals
GC135 (Type QHA)(VIN# GCAJ-1000001-9999999) Small Engine View Diagrams & Manuals
GC135 (Type QHA1)(VIN# GCAJ-1000001-9999999) Small Engine View Diagrams & Manuals
GC135 (Type QHA2)(VIN# GCAJ-1000001-9999999) Small Engine View Diagrams & Manuals
GC135 (Type VHA)(VIN# GCAJ-1000001-9999999) Small Engine View Diagrams & Manuals
GC135 (Type VXA)(VIN# GCAJ-1000001-9999999) Small Engine View Diagrams & Manuals
GCV160 (Type N7A1)(VIN# GJAE-1000001-9999999) Small Engine View Diagrams & Manuals
GCV160A (Type A1A)(VIN# GJAEA-1000001-5386302) Small Engine View Diagrams & Manuals
GCV160A (Type A1AE)(VIN# GJAEA-1000001) Small Engine View Diagrams & Manuals
GCV160A (Type A1AF)(VIN# GJAEA-1000001-5386302) Small Engine View Diagrams & Manuals
GCV160A (Type A1AS)(VIN# GJAEA-1000001) Small Engine View Diagrams & Manuals
GCV160A (Type A2A)(VIN# GJAEA-1000001-6699999) Small Engine View Diagrams & Manuals
GCV160A (Type A3A)(VIN# GJAEA-1000001-6699999) Small Engine View Diagrams & Manuals
GCV160A (Type S1A)(VIN# GJAEA-1000001-5386302) Small Engine View Diagrams & Manuals
GCV160A (Type S1A1)(VIN# GJAEA-1000001-6699999) Small Engine View Diagrams & Manuals
GCV160A (Type S1M)(VIN# GJAEA-1000001-5386302) Small Engine View Diagrams & Manuals
GCV160A (Type S3A)(VIN# GJAEA-1000001-5386302) Small Engine View Diagrams & Manuals
GCV160A (Type S3A2)(VIN# GJAEA-1000001) Small Engine View Diagrams & Manuals
GCV160A (Type S3H)(VIN# GJAEA-1000001-5386302) Small Engine View Diagrams & Manuals
GCV160A (Type STA1)(VIN# GJAEA-1000001-6699999) Small Engine View Diagrams & Manuals
GCV160A (Type STL1)(VIN# GJAEA-1000001) Small Engine View Diagrams & Manuals
GCV160LA (Type A1A)(VIN# GJAEA-5386303) Small Engine View Diagrams & Manuals
GCV160A (Type N7A1)(VIN# GJAEA-1000001-5386302) Small Engine View Diagrams & Manuals
GCV160LA (Type A1AF)(VIN# GJAEA-5386303) Small Engine View Diagrams & Manuals
GC160 (Type VHA)(VIN# GCAH-1000001-9999999) Small Engine View Diagrams & Manuals
GC160 (Type VXA)(VIN# GCAH-1000001-9999999) Small Engine View Diagrams & Manuals
GCV160 (Type N1)(VIN# GJAE-1000001-9999999) Small Engine View Diagrams & Manuals
GCV160 (Type N2)(VIN# GJAE-1000001-9999999) Small Engine View Diagrams & Manuals
GCV160LA (Type N7A1)(VIN# GJAEA-5386303) Small Engine View Diagrams & Manuals
GCV160LA (Type N7S1)(VIN# GJAEA-5386303) Small Engine View Diagrams & Manuals
GCV160LA (Type S1A)(VIN# GJAEA-5386303) Small Engine View Diagrams & Manuals
GCV160LA (Type S1M)(VIN# GJAEA-5386303) Small Engine View Diagrams & Manuals
GCV160LA (Type S3A)(VIN# GJAEA-5386303) Small Engine View Diagrams & Manuals
GCV160LA (Type S3H)(VIN# GJAEA-5386303) Small Engine View Diagrams & Manuals
GCV160LA0 (Type A1A)(VIN# GJARA-1000001) Small Engine View Diagrams & Manuals
GCV160LA0 (Type A1AF)(VIN# GJARA-1000001) Small Engine View Diagrams & Manuals
GCV160LA0 (Type N7A1)(VIN# GJARA-1000001) Small Engine View Diagrams & Manuals
GCV160LA0 (Type N7S1)(VIN# GJARA-1000001) Small Engine View Diagrams & Manuals
GCV160LA0 (Type S1A)(VIN# GJARA-1000001) Small Engine View Diagrams & Manuals
GCV160LA0 (Type S1M)(VIN# GJARA-1000001) Small Engine View Diagrams & Manuals
GCV160LA0 (Type S3A)(VIN# GJARA-1000001) Small Engine View Diagrams & Manuals
GCV160LA0 (Type S3H)(VIN# GJARA-1000001) Small Engine View Diagrams & Manuals
GCV160LE (Type A7H1)(VIN# GJAAE-1000001) Small Engine View Diagrams & Manuals
GCV160LA0 (Type S3T)(VIN# GJARA-1000001) Small Engine View Diagrams & Manuals
GCV160LE (Type N7A1)(VIN# GJAAE-1000001) Small Engine View Diagrams & Manuals
GCV160LE (Type A2A9)(VIN# GJAAE-1000001) Small Engine View Diagrams & Manuals
GCV160LE (Type A4A9)(VIN# GJAAE-1000001) Small Engine View Diagrams & Manuals
GSV190LA (Type A3T)(VIN# GJACA-1035731) Small Engine View Diagrams & Manuals
HRB216 (Type HXA)(VIN# MAAA-1000001) Lawn Mower View Diagrams & Manuals
HRB216 (Type HXAA)(VIN# MAAA-1000001) Lawn Mower View Diagrams & Manuals
HRB216 (Type TDA)(VIN# MAAA-1000001) Lawn Mower View Diagrams & Manuals
HRB216 (Type TDAA)(VIN# MAAA-1000001) Lawn Mower View Diagrams & Manuals
HRB216 (Type TXA)(VIN# MAAA-1000001) Lawn Mower View Diagrams & Manuals
HRB216 (Type TXAA)(VIN# MAAA-1000001) Lawn Mower View Diagrams & Manuals
HRR216 (Type PDA)(VIN# MZCG-6000001 to MZCG-6152286) Lawn Mower View Diagrams & Manuals
HRR216 (Type S3DA)(VIN# MZCG-6000001 to MZCG-6157470) Lawn Mower View Diagrams & Manuals
HRR216 (Type SDA)(VIN# MZCG-6000001 to MZCG-6299999) Lawn Mower View Diagrams & Manuals
HRR216K2 (Type PDAA)(VIN# MZCG-6700001 to MZCG-7199999) Lawn Mower View Diagrams & Manuals
HRR216K2 (Type SDAA)(VIN# MZCG-6700001 to MZCG-7199999) Lawn Mower View Diagrams & Manuals
HRR216K2 (Type TDAA)(VIN# MZCG-6700001 to MZCG-7199999) Lawn Mower View Diagrams & Manuals
HRR216K2 (Type TKAA)(VIN# MZCG-6700001 to MZCG-7199999) Lawn Mower View Diagrams & Manuals
HRR216K3 (Type PDA)(VIN# MZCG-7200001 to MZCG-7599999) Lawn Mower View Diagrams & Manuals
HRR216K3 (Type TDA)(VIN# MZCG-7200001 to MZCG-7599999) Lawn Mower View Diagrams & Manuals
HRR216K4 (Type PDA)(VIN# MZCG-7700001 to MZCG-7799999) Lawn Mower View Diagrams & Manuals
HRR216K4 (Type TDA)(VIN# MZCG-7700001 to MZCG-7799999) Lawn Mower View Diagrams & Manuals
HRR216K5 (Type PDAA)(VIN# MZCG-7800001 to MZCG-7999999) Lawn Mower View Diagrams & Manuals
HRR216K5 (Type VKAA)(VIN# MZCG-7800001 to MZCG-7999999) Lawn Mower View Diagrams & Manuals
HRR216K6 (Type PDAA)(VIN# MZCG-8000001 to MZCG-8199999) Lawn Mower View Diagrams & Manuals
HRR216K6 (Type VKAA)(VIN# MZCG-8000001 to MZCG-8199999) Lawn Mower View Diagrams & Manuals
HRR216K7 (Type PDAA)(VIN# MZCG-8200001) Lawn Mower View Diagrams & Manuals
HRR216K7 (Type VKAA)(VIN# MZCG-8200001) Lawn Mower View Diagrams & Manuals
HRR216K8 (Type PKAA)(VIN# MZCG-8400001) Lawn Mower View Diagrams & Manuals
HRR216K8 (Type VKAA)(VIN# MZCG-8400001) Lawn Mower View Diagrams & Manuals
HRS216 (Type PDA)(VIN# MZBZ-6000001 to MZBZ-6067704) Lawn Mower View Diagrams & Manuals
HRS216 (Type SDA)(VIN# MZBZ-6000001 to MZBZ-6065864) Lawn Mower View Diagrams & Manuals
HRS216K1 (Type PDA)(VIN# MZBZ-6100001 to MZBZ-6299999) Lawn Mower View Diagrams & Manuals
HRS216K1 (Type PDAA)(VIN# MZBZ-6100001 to MZBZ-6199999) Lawn Mower View Diagrams & Manuals
HRS216K1 (Type SDA)(VIN# MZBZ-6100001 to MZBZ-6299999) Lawn Mower View Diagrams & Manuals
HRS216K1 (Type SDAA)(VIN# MZBZ-6100001 to MZBZ-6199999) Lawn Mower View Diagrams & Manuals
HRS216K2 (Type PDAA)(VIN# MZBZ-6300001 to MZBZ-6369999) Lawn Mower View Diagrams & Manuals
HRS216K2 (Type SDAA)(VIN# MZBZ-6300001 to MZBZ-6369999) Lawn Mower View Diagrams & Manuals
HRS216K3 (Type PDAA)(VIN# MZBZ-6370001 to MZBZ-6399999) Lawn Mower View Diagrams & Manuals
HRS216K3 (Type SDAA)(VIN# MZBZ-6370001 to MZBZ-6399999) Lawn Mower View Diagrams & Manuals
HRS216K4 (Type PDAA)(VIN# MZBZ-6400001) Lawn Mower View Diagrams & Manuals
HRS216K4 (Type SDAA)(VIN# MZBZ-6400001) Lawn Mower View Diagrams & Manuals
HRT216 (Type S3DA)(VIN# MZCG-6000001 to MZCG-6195898) Lawn Mower View Diagrams & Manuals
HRT216 (Type SDA)(VIN# MZCG-6000001 to MZCG-6195138) Lawn Mower View Diagrams & Manuals
HRT216K1 (Type PDA)(VIN# MZCG-6300001 to MZCG-6599999) Lawn Mower View Diagrams & Manuals
HRT216K1 (Type PDA/A)(VIN# MZCG-6600001 to MZCG-6699999) Lawn Mower View Diagrams & Manuals
HRT216K1 (Type PDAA/A)(VIN# MZCG-6600001 to MZCG-6699999) Lawn Mower View Diagrams & Manuals
HRT216K1 (Type S3DA)(VIN# MZCG-6300001 to MZCG-6599999) Lawn Mower View Diagrams & Manuals
HRT216K1 (Type S3DA/A)(VIN# MZCG-6600001 to MZCG-6699999) Lawn Mower View Diagrams & Manuals
HRT216K1 (Type SDA)(VIN# MZCG-6300001 to MZCG-6599999) Lawn Mower View Diagrams & Manuals
HRT216K1 (Type SDA/A)(VIN# MZCG-6600001 to MZCG-6699999) Lawn Mower View Diagrams & Manuals
HRT216K1 (Type SDAA/A)(VIN# MZCG-6600001 to MZCG-6699999) Lawn Mower View Diagrams & Manuals
HRT216K1 (Type TDAA/A)(VIN# MZCG-6600001 to MZCG-6699999) Lawn Mower View Diagrams & Manuals
HRT216K2 (Type TDAA)(VIN# MZCG-6700001 to MZCG-7199999) Lawn Mower View Diagrams & Manuals
HRX217K1 (Type HXA)(VIN# MAGA-1400001 to MAGA-1499999) Lawn Mower View Diagrams & Manuals
HRX217K2 (Type HXAA)(VIN# MAGA-1500001) Lawn Mower View Diagrams & Manuals
HRX217K2 (Type VKAA)(VIN# MAGA-1500001) Lawn Mower View Diagrams & Manuals
HRX217K3 (Type HZAA)(VIN# MAGA-2020001) Lawn Mower View Diagrams & Manuals
HRX217K3 (Type VKAA)(VIN# MAGA-2020001) Lawn Mower View Diagrams & Manuals
HRZ216 (Type TDAA)(VIN# MAFA-1000001) Lawn Mower View Diagrams & Manuals
HS520 (Type A)(VIN# SZBG-6000001 to SZBG-6099999) Snowblower View Diagrams & Manuals
HS520 (Type AA)(VIN# SZBG-6000001 to SZBG-6699999) Snowblower View Diagrams & Manuals
HS520 (Type AS)(VIN# SZBG-6000001 to SZBG-6099999) Snowblower View Diagrams & Manuals
HS520 (Type ASA)(VIN# SZBG-6000001 to SZBG-6099999) Snowblower View Diagrams & Manuals
HRR216K8-VKA Lawn Mower View Diagrams & Manuals
GC160LA (Type PHA)(VIN# GCAHA-3599750-9999999) Engine View Diagrams & Manuals
GCV190LA (Type S3C)(VIN# GJAAA-1607129-9999999) Engine View Diagrams & Manuals
GCV190LA (Type S3L)(VIN# GJAAA-1607129-9999999) Engine View Diagrams & Manuals
GSV190LA (Type S3T)(VIN# GJACA-1035731-9999999) Engine View Diagrams & Manuals
GCV160A0 (Type S3TE)(VIN# GJAPA-1000001-9999999) Engine View Diagrams & Manuals
HS720 (Type ASA)(VIN# GCAAA-1000001-9999999) Snow Blower View Diagrams & Manuals
HRX217K2 (Type HMAA)(VIN# GJAAA-1000001-9999999) Lawn Mower View Diagrams & Manuals
HRX217K4 (Type VKAA)(VIN# GJAAA-1000001-9999999) Lawn Mower View Diagrams & Manuals
HRX217K5 (Type VKAA)(VIN# GJAAA-1000001-9999999) Lawn Mower View Diagrams & Manuals
EN2000 (Type A)(VIN# GCAH-1000001-9999999) Generator View Diagrams & Manuals
EN2000 (Type AL)(VIN# GCAH-1000001-9999999) Generator View Diagrams & Manuals
EN2500 (Type A)(VIN# GCAH-1000001-9999999) Generator View Diagrams & Manuals
EN2500 (Type AL)(VIN# GCAH-1000001-9999999) Generator View Diagrams & Manuals
EN2500 (Type AL/A)(VIN# GCAHA-1000001-9999999) Generator View Diagrams & Manuals
EN2500 (Type AN)(VIN# GCAHA-1000001-9999999) Generator View Diagrams & Manuals
GCV135 (Type A1A)(VIN# GJAF-1000001-9999999) Small Engine View Diagrams & Manuals
Toro
20192 (290000001-290999999)(2009) Lawn Mower View Diagrams & Manuals
Show More Compatible Models
This item works with the following types of products:
- Engine Parts
- Lawn Mower Parts
- Snowblower Parts
This part replaces obsolete part #: 30500-ZL8-004
Customer Part Reviews ?
Average Rating (out of 5):
Click to filter by ratings:
5 stars
5
4 stars
0
3 stars
0
2 stars
0
1 stars
0
< PREV
- 1
Part was exactly what I needed.
Had to remove more than expected to get coil off. Replacement part same exactly as original,installed, motor fired right up.
Guest -
July 7, 2022
Verified Purchase
Great part shipped fast
Great part shipped fast
Guest -
October 22, 2021
Verified Purchase
Great part
My part came in quickly and now lawnmower is back running. Will order from ereplacement again
David -
September 22, 2020
Verified Purchase
Worked great. Service was great.
I have no complaints
Guest -
September 1, 2020
Verified Purchase
Easy repair, perfect fit, worked perfect again
Replaced the ignition coil on my TROY Belt with a Honda GCV160 engine. Set the gap between the coil heads and the magneto(?) with a business card. Put everything back together. Started with one pull and ran perfectly. Took two weeks to get the part after the order was placed but I can't fault eReplacement with that.
Guest -
July 30, 2020
Verified Purchase
t
t
t -
t days ago
Verified Purchase
eReplacementParts Team
t
Questions & Answers ?
Our customer Service team is at the ready daily to answer your part and product questions.

Ask our Team
We have a dedicated staff with decades of collective experience in helping customers just like you purchase parts to repair their products.
Does this fit my product?Questions & Answers for Coil Assembly- Ignition
No questions have been asked yet
Customer Repair Instructions ?
All our customer repair instructions are solicited directly from other customers just like you who have purchased and replaced this exact part.
Engine started fine, but it sputtered and died when it got hot. I checked the carburetor, spark plug, and air filter. They were all good. The coil had broken down. When it was replaced the machine
Bill - September 17, 2016
👍 10 of 11 people found this instruction helpful
Tool Type
Lawn Mower
Difficulty
Easy
Time
Less than 15 minutes
Tools Used
Wrench Set
Parts Used
Take off the rope starter. ( 3 nuts). Pull back the cover/gas tank to expose the flywheel. Disconnect the spark plug wire and the ground/ kill switch wire. Remove the coil's two mounting bolts and the coil. Put the new coil in place making sure it is in contact with the flywheel. Gap the distance between the coil and the flywheel magnets about the thickness of a business card. Reassemble the machine.
Did you find this story helpful?
Thanks for voting and helping fellow customers!
Lawn mower would not start
jacob - June 20, 2016
👍 10 of 12 people found this instruction helpful
Tool Type
Lawn Mower
Difficulty
Easy
Time
Less than 15 minutes
Tools Used
Socket set, Adjustable Wrench, Feeler guage
First I removed the air cleaner cover and removed the the old air cleaner and installed the new one. I then removed the coil assembly from the unit and installed the new on, and gapped distance between the coil and the magnets on the flywheel at 0.024 I then replace the spark plug and gapped the new one at 0.030 and installed it in the engine. Engine runs very well now.
Did you find this story helpful?
Thanks for voting and helping fellow customers!
No spark
Daniel - June 4, 2017
👍 5 of 5 people found this instruction helpful
Tool Type
Engine
Difficulty
Easy
Time
15-30 minutes
Tools Used
Wrench Set
Parts Used
Removed the cover and fuel tank(Empty)
Removed the coil and spark plug wire
Bolted the new coil on the engine and gapped it at 0.010
Place the wire on the spark plug
Replace the fuel tank and the cover
Removed the coil and spark plug wire
Bolted the new coil on the engine and gapped it at 0.010
Place the wire on the spark plug
Replace the fuel tank and the cover
Did you find this story helpful?
Thanks for voting and helping fellow customers!
Lawn mower would not start due to no spark
John - July 7, 2016
👍 8 of 11 people found this instruction helpful
Tool Type
Lawn Mower
Difficulty
Easy
Time
15-30 minutes
Tools Used
Socket set, Home made spacers
Parts Used
Removed the top cover and gas tank, carefully placed them so draining the gas was not needed.
Disconnected the spark plug wire
Disconnected the spark cutoff wire
Removed the two bolts that held the coil assembly
Install the new coil assembly using two thin cardboard spacers to set the gap to the flywheel
Tighten the bolts
Connect the wires
Replace the gas tank and cover assembly
Disconnected the spark plug wire
Disconnected the spark cutoff wire
Removed the two bolts that held the coil assembly
Install the new coil assembly using two thin cardboard spacers to set the gap to the flywheel
Tighten the bolts
Connect the wires
Replace the gas tank and cover assembly
Did you find this story helpful?
Thanks for voting and helping fellow customers!
Broken attachment points on starter recoil. Cut ignition / spark plug wire.
Riley - January 21, 2016
👍 5 of 7 people found this instruction helpful
Tool Type
Lawn Mower
Difficulty
Easy
Time
Less than 15 minutes
Tools Used
Socket set, Wrench Set
I removed the old coil, and set it .010 from the magnets on the flywheel. After that I removed the three screws from the broken starter, then replace the new starter
Did you find this story helpful?
Thanks for voting and helping fellow customers!
Lawn mower backfired and wouldn't start
Michael - May 28, 2019
👍 2 of 2 people found this instruction helpful
Tool Type
Lawn Mower
Difficulty
Easy
Time
15-30 minutes
Tools Used
Socket set, Feeler gauge
Parts Used
Removed plastic housing (3 10mm nuts).
Removed plug wire and kill wire.
Removed two 10 mm bolts holding coil.
Installed new coil with 0.30 mm gap between each pole and the flywheel.
Removed plug wire and kill wire.
Removed two 10 mm bolts holding coil.
Installed new coil with 0.30 mm gap between each pole and the flywheel.
Did you find this story helpful?
Thanks for voting and helping fellow customers!
Lawnmower engine would not start.
Marian - May 12, 2020
Tool Type
Lawn Mower
Difficulty
Easy
Time
15-30 minutes
Tools Used
Socket set, Adjustable Wrench
Removed top of engine where recoil rope starter was.
Lifted gas tank off engine.
Removed old ignition coil assembly which had a broken spark plug boot.
Inserted the new ignition coil assembly in the same mounting bolts loosely with a business card placed between the ignition coil assembly and the magneto.
Checked to make sure spacing was even and then tightened nuts to keep assembly in place.
Removed business card, placed fuel tank and recoil rope assembly back in place.
Replaced old spark plug with new honda plug. Connected spark plug boot to plug.
Engine started and ran perfect after the replacement.
Did you find this story helpful?
Thanks for voting and helping fellow customers!
Won't start
Jacque - April 6, 2019
👍 1 of 2 people found this instruction helpful
Tool Type
Lawn Mower
Difficulty
Hard
Time
30-60 minutes
Tools Used
Power Drill, None
Parts Used
Need carborator repair kit to complete repair.
Did you find this story helpful?
Thanks for voting and helping fellow customers!
Poor spark after replacing the spark plug.
Toby - August 2, 2018
👍 2 of 4 people found this instruction helpful
Tool Type
Lawn Mower
Difficulty
Easy
Time
Less than 15 minutes
Tools Used
Socket set
Parts Used
1. Removed starter rope assembly by removing 3 nuts.
2. Disconnected the spark plug wire.
3. Disconnected the ignition coil ground wire.
4. Removed two bolts on the ignition coil.
5. Removed the ignition coil.
6. Loosely installed new ignition coil by bolting it down without tightening to much.
7. Utilized several sheets of paper to build up to the appropriate gap (compare thickness to feeler gauge) and pressed them tightly between ignition coil and flywheel and tighten the two bolts down.
8. Reconnect everything and work backwards to assemble.
Did you find this story helpful?
Thanks for voting and helping fellow customers!
no spark
KEVIN - March 15, 2019
👍 1 of 3 people found this instruction helpful
Tool Type
Lawn Mower
Difficulty
Easy
Time
15-30 minutes
Tools Used
Pliers, Wrench Set
Parts Used
tested coil,tested bad,replaced
Did you find this story helpful?
Thanks for voting and helping fellow customers!
OEM stands for Original Equipment Manufacturer and means the part you’re buying is sourced directly from the manufacturer who made your product. At eReplacementParts, we sell only genuine OEM parts, guaranteeing the part you’re purchasing is of better design and of higher quality than aftermarket parts.
Our product descriptions are a combination of data sourced directly from the manufacturers who made your product as well as content researched and curated by our content & customer service teams. This content is edited and reviewed internally before being made public to customers.
Our customer service team are at the ready daily to answer your part and product questions. We have a dedicated staff with decades of collective experience in helping customers just like you purchase parts to repair their products.
All our part reviews are solicited directly from other customers who have purchased this exact part. While we moderate these reviews for profanity, offensive language or personally identifiable information, these reviews are posted exactly as submitted and no alterations are made by our team.
All our customer repair instructions are solicited directly from other customers just like you who have purchased and replaced this exact part. While we moderate these reviews for profanity, offensive language or personally identifiable information, these reviews are posted exactly as submitted and no alterations are made by our team.
Based on data from past customer purchasing behaviors, these parts are most commonly purchased together along with the part you are viewing. These parts may be necessary or helpful to replace to complete your current repair.
All our installation videos are created and produced in collaboration with our in-house repair technician, Mark Sodja, who has helped millions of eReplacementParts customers over the last 13 years repair their products. Mark has years of experience in selling and repairing both commercial and residential products with a specialty in gas-powered equipment.
This data is collected from customers who submitted a repair instruction after replacing this exact part. Customers can rate how easy the repair was to complete and how long it took. We aggregate this data to provide a repair rating that allows customers to quickly determine the difficulty and time needed to perform their own repair.