
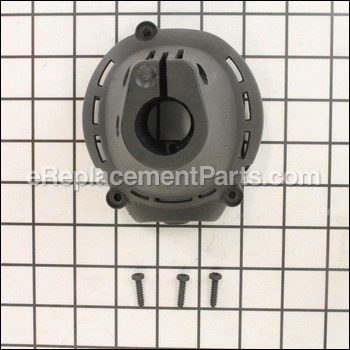


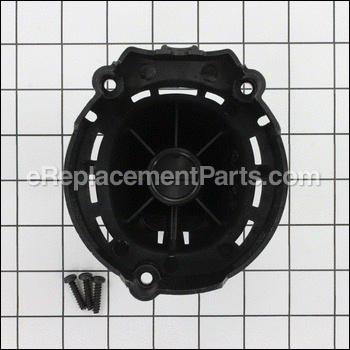
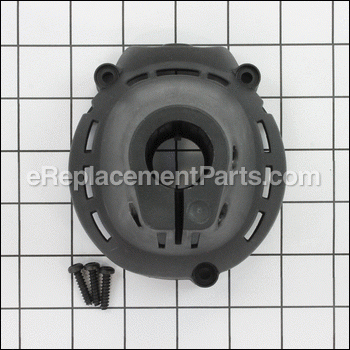

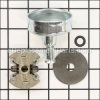
This is available as an individual replacement part. The clutch cover fits over the clutch assembly and attaches to the starter housing with three star screws that are included. It is made out of plastic and will require a Torx screwdriver to replace this part if it becomes broken. This clutch cover is an original part for trimmers made by Bolens, MTD, Troy-Bilt, Yard Man, and Cub Cadet.
Clutch Cover 753-06181
OEM part for: Bolens, Troy-Bilt, MTD, Craftsman, Yard Man, Cub Cadet, Murray, Yard Machines
Part Number: 753-06181
$3.99
In Stock
Jump To:
Frequently Purchased Together ?
Compatibility
This part will fit the following 126 machines
Troy-Bilt
TB22EC (41ADT22C966) 25cc 2-Cycle Curved Shaft Trimmer View Diagrams & Manuals
TB32EC (41ADZ32C766) Trimmer View Diagrams & Manuals
TB32EC (41BDZ32C766) Trimmer View Diagrams & Manuals
YM21CS Trimmer View Diagrams & Manuals
TB25SEC (41AD25SA766) Trimmer View Diagrams & Manuals
TB22EC (41ADZ22C766) Trimmer View Diagrams & Manuals
TB22EC (41ADZ22C966) Trimmer View Diagrams & Manuals
TB22EC (41BDT22C866) Trimmer View Diagrams & Manuals
TB22EC (41BDZ22C766) Trimmer View Diagrams & Manuals
TB22EC (41CDT22C866) Trimmer View Diagrams & Manuals
TB22EC (41CDZ22C766) Trimmer View Diagrams & Manuals
TB22 (41BDZ25C766) Trimmer View Diagrams & Manuals
TB25CEC (41AD25CA766) Trimmer View Diagrams & Manuals
TB32EC (41CDZ32C766) Trimmer View Diagrams & Manuals
TB35EC (41BDZ35C766) Trimmer View Diagrams & Manuals
TB35EC (41CDZ35C766) Trimmer View Diagrams & Manuals
TB35EC (41DDZ35C766) Trimmer View Diagrams & Manuals
Bolens
BL110 (41AD110G965) Trimmer View Diagrams & Manuals
41BD110G965 (BL 110) Handheld String Trimmer View Diagrams & Manuals
41BD160G965 (BL 160) Handheld String Trimmer View Diagrams & Manuals
BL160 (41AD160G965) Trimmer View Diagrams & Manuals
BL160 (41BD160G965) Trimmer View Diagrams & Manuals
MTD
41AD160G965 Handheld Trimmer View Diagrams & Manuals
41AD251G900 Handheld Trimmer View Diagrams & Manuals
41AD260G900 Handheld Trimmer View Diagrams & Manuals
MS2550 (41ADZ20C768) Trimmer View Diagrams & Manuals
MS2550 (41BDZ20C768) Trimmer View Diagrams & Manuals
M2510 (41ADZ03C758) 2-Cycle Gas Trimmer View Diagrams & Manuals
M2500 (41ADZ01C758,) Gas Trimmer View Diagrams & Manuals
MS2560 (41BDZ22C768) Gas String Trimmer View Diagrams & Manuals
BL110 41CD120G965 Gas String Trimmer View Diagrams & Manuals
BL160 41CD170G965 Gas String Trimmer View Diagrams & Manuals
41AD322C799 Trimmer View Diagrams & Manuals
41AD326C799 Trimmer View Diagrams & Manuals
41ADY20C799 Trimmer View Diagrams & Manuals
41ADY22C799 Trimmer View Diagrams & Manuals
41ADZ11G799 Trimmer View Diagrams & Manuals
41ADZ12G799 Trimmer View Diagrams & Manuals
41ADZ20C799 Trimmer View Diagrams & Manuals
41ADZ20C899 (C459) Trimmer View Diagrams & Manuals
41ADZ22C799 Trimmer View Diagrams & Manuals
41ADZ2CC799 (316.794450)(2012) Trimmer View Diagrams & Manuals
41ADZ32C799 Trimmer View Diagrams & Manuals
41ADZ3CC799 Trimmer View Diagrams & Manuals
41BDZ11G799 Trimmer View Diagrams & Manuals
41BDZ12G799 Trimmer View Diagrams & Manuals
41BDZ20C799 Trimmer View Diagrams & Manuals
41BDZ22C799 Trimmer View Diagrams & Manuals
41CDZ12G799 Trimmer View Diagrams & Manuals
41CDZ20C799 Trimmer View Diagrams & Manuals
41CDZ22C799 Trimmer View Diagrams & Manuals
41DDZ22C799 Trimmer View Diagrams & Manuals
41EDZ20C799 Trimmer View Diagrams & Manuals
H2500 41BDZ01C735 Gas String Trimmer View Diagrams & Manuals
M2560 41BDZ22C758 Gas String Trimmer View Diagrams & Manuals
RM2599 (41ADPS1C983) Misc Tool View Diagrams & Manuals
RM2599 (41BDPS1C983) Misc Tool View Diagrams & Manuals
RM2510 (41AD110G983) Trimmer View Diagrams & Manuals
RM2510 (41CD110G983) Trimmer View Diagrams & Manuals
RM2510 Trimmer View Diagrams & Manuals
RM2520 (41ADZ20C983) Trimmer View Diagrams & Manuals
RM2520 (41BDZ20C983) Trimmer View Diagrams & Manuals
RM2520 (41CDZ20C983) Trimmer View Diagrams & Manuals
RM2560 (41AD160G883) Trimmer View Diagrams & Manuals
RM2560 (41AD160G983) Trimmer View Diagrams & Manuals
RM2560 (41BD160G983) Trimmer View Diagrams & Manuals
RM2560 (41CD160G983) Trimmer View Diagrams & Manuals
RM2560 41ED160G983 Gas String Trimmer View Diagrams & Manuals
RM2570 (41ADZ22C983) Trimmer View Diagrams & Manuals
RM2570 (41BDZ22C983) Trimmer View Diagrams & Manuals
RM2570 (41CDZ22C983) Trimmer View Diagrams & Manuals
Craftsman
316711020 Trimmer View Diagrams & Manuals
316791020 Trimmer View Diagrams & Manuals
316711021 Trimmer View Diagrams & Manuals
316711022 Trimmer View Diagrams & Manuals
316711190 Trimmer View Diagrams & Manuals
316711191 Trimmer View Diagrams & Manuals
316711370 Trimmer View Diagrams & Manuals
316711470 Trimmer View Diagrams & Manuals
316711471 Trimmer View Diagrams & Manuals
316990110 Trimmer View Diagrams & Manuals
316791160 Trimmer View Diagrams & Manuals
316794450 Trimmer View Diagrams & Manuals
316990100 Trimmer View Diagrams & Manuals
316711023 Weedwacker Gas Trimmer View Diagrams & Manuals
316711192 Trimmer View Diagrams & Manuals
316711193 Line Trimmers/weedwackers, Gas View Diagrams & Manuals
316711390 Trimmer View Diagrams & Manuals
316740820 Trimmer View Diagrams & Manuals
316740890 Trimmer View Diagrams & Manuals
316794370 Trimmer View Diagrams & Manuals
316794460 Trimmer View Diagrams & Manuals
316794470 Trimmer View Diagrams & Manuals
316794371 Trimmer View Diagrams & Manuals
CMXGJAMD25PS (41AD25PS793) Pole Saw View Diagrams & Manuals
316.79102 (41AD322C799) String Trimmer (Sears) View Diagrams & Manuals
C459.51212 (41ADZ20C899) String Trimmer Canada View Diagrams & Manuals
CMXGTAMD25CC (41AD25CC793) String Trimmer View Diagrams & Manuals
CMXGTAMD25SC (41AD25SC793) String Trimmer View Diagrams & Manuals
CMXGTAMDA25C (41ADA25C791) String Trimmer View Diagrams & Manuals
CMXGTAMDAZ25 (41ADAZ25791) String Trimmer View Diagrams & Manuals
CMXGTAMDZ20C (41ADZ20C791) String Trimmer View Diagrams & Manuals
CMXGKAMDE25C (41ADE25C793) Stick Edger View Diagrams & Manuals
Yard Man
YM71SS (41ADY71C901) Trimmer View Diagrams & Manuals
YM21CS Trimmer View Diagrams & Manuals
YM71SS 41ady71c901 Gas String Trimmer View Diagrams & Manuals
Cub Cadet
CS202 (41ADZ20C912) (2012) 41ADZ20C912 Gas String Trimmer View Diagrams & Manuals
CC212 (41ADZ21C912) (2013) 41ADZ21C912 Gas String Trimmer View Diagrams & Manuals
CC212 (41BDZ21C912) (2013) 41BDZ21C912 Gas String Trimmer View Diagrams & Manuals
CS202 (41ADZ20C912) (2013) 41ADZ20C912 Gas String Trimmer View Diagrams & Manuals
Murray
M2550 Trimmer View Diagrams & Manuals
M2560 Trimmer View Diagrams & Manuals
Yard Machines
Y25 (41AD251C900) Trimmer View Diagrams & Manuals
Y25 (41AD251G900) Trimmer View Diagrams & Manuals
Y2500 (41AD25CC800) Trimmer View Diagrams & Manuals
Y2500 (41AD25CC900) Trimmer View Diagrams & Manuals
Y2500 (41BD25CC900) Trimmer View Diagrams & Manuals
Y2550EC (41AD25SC800) Trimmer View Diagrams & Manuals
Y2550EC (41AD25SC900) Trimmer View Diagrams & Manuals
Y2550EC (41BD25SC900) Trimmer View Diagrams & Manuals
Y2700EC (41AD270C800) Trimmer View Diagrams & Manuals
Y2700EC Trimmer View Diagrams & Manuals
Y60 (41AD260G900) Trimmer View Diagrams & Manuals
Y 2700 EC (41AD270C900) String Trimmer View Diagrams & Manuals
Y 2510 (41AD110G900) String Trimmer View Diagrams & Manuals
Y 2560 (41AD160G900) String Trimmer View Diagrams & Manuals
Show More Compatible Models
This item works with the following types of products:
- Trimmer Parts
Customer Part Reviews ?
Average Rating (out of 5):
Click to filter by ratings:
5 stars
4
4 stars
1
3 stars
0
2 stars
0
1 stars
0
< PREV
- 1
worked perfec no problem.
arrive on good condition and fix perfecly and my trimmer working very good thank you the part I order was a perfec fix.
Guest -
May 4, 2023
Verified Purchase
Work great no prolem
Right on time
Guest -
October 2, 2021
Verified Purchase
Weed eater part
It was the exact part I needed and thank god it came either screws, my old part got blown off my work table and I couldn’t find the original screws
Guest -
July 23, 2020
Verified Purchase
Weed eater
This weed eater belonged to our daughter and the string had gotten wrapped around and she melted the clutch assembly. Received part within a few days of ordering. Was the correct part needed and weed eater is good as new for less than fifteen dollars. . I feel very satisfied with the customer service. 5 stars
Paul -
May 31, 2019
Verified Purchase
Easy repair
Right part worked great fast dey
Guest -
August 14, 2020
Verified Purchase
t
t
t -
t days ago
Verified Purchase
eReplacementParts Team
t
Questions & Answers ?
Our customer Service team is at the ready daily to answer your part and product questions.

Ask our Team
We have a dedicated staff with decades of collective experience in helping customers just like you purchase parts to repair their products.
Does this fit my product?Questions & Answers for Clutch Cover
No questions have been asked yet
Customer Repair Instructions ?
All our customer repair instructions are solicited directly from other customers just like you who have purchased and replaced this exact part.
Clutch assembly springs snapped internally
Kevin - June 8, 2017
👍 2 of 2 people found this instruction helpful
Tool Type
Trimmer
Difficulty
Easy
Time
15-30 minutes
Tools Used
Screwdriver, Adjustable Wrench, Allen wrench
1. Remove lower string assemble curved arm for easier positioning on work bench
2. Remove 1 set screw holding upper shaft to black clutch cover, loosen bolt and nut holding upper shaft to clutch cover, slowly pull shaft from black clutch cover.
3. Remove 3 screws securing the black outer cover and gently remove cover.Use care, wires and throttle cable remain attached.
4. Using Allen wrench,remove recessed screw holding clutch cover (silver in color) and pull off.
5. Clutch is screwed onto the shaft, left to loosen, right to tighten. I use a large Crescent wrench and a small screwdriver inserted in to the pull rope assembly to prevent the shaft from turning while loosening.
5. Reassemble in reverse order.
Note: When reinstalling the black outer clutch cover, look at the position of the wires and throttle cable, make sure they don't interfere with throttle handle, squeeze the throttle handle several times to insure smooth operation.
Did you find this story helpful?
Thanks for voting and helping fellow customers!
Clutch assembly springs broke and came apart.
alfred - August 16, 2016
👍 2 of 2 people found this instruction helpful
Tool Type
Trimmer
Difficulty
Easy
Time
Less than 15 minutes
Tools Used
Screwdriver
1. Removed trimmer shaft.
2. Removed clutch cover.
3. Removed spark plug and inserted rope into cylinder to keep crank from spinning.
4. Removed old clutch and replaced with new.
5. Reversed steps 3,2,1.
Easy Peasy
2. Removed clutch cover.
3. Removed spark plug and inserted rope into cylinder to keep crank from spinning.
4. Removed old clutch and replaced with new.
5. Reversed steps 3,2,1.
Easy Peasy
Did you find this story helpful?
Thanks for voting and helping fellow customers!
Very hard to start and keep running. A new spark plug didn't fix it.
Edward - July 4, 2021
Tool Type
Trimmer
Difficulty
Easy
Time
15-30 minutes
Tools Used
Screwdriver, Nutdriver, Torx bits
Swapped out the carburetor and replaced the spark plug. Trimmer started easily and ran great, just like old times! I then replaced the clutch cover that I had cracked several years ago. It only involved removing 5 screws. That part of the repair was easy as well. This trimmer is probably close to 15 years old but now it works great again!
Did you find this story helpful?
Thanks for voting and helping fellow customers!
Trimmer clutch exploded!
Wayne - July 13, 2020
Tool Type
Trimmer
Difficulty
Easy
Time
Less than 15 minutes
Tools Used
Screwdriver, Power Drill, Adjustable Wrench
Followed the video eReplacementParts.com had on their website to the letter. Worked perfectly.
Did you find this story helpful?
Thanks for voting and helping fellow customers!
Nothing
Jamie - June 25, 2020
Tool Type
Trimmer
Difficulty
Medium
Time
1-2 hours
Tools Used
Screwdriver, Pliers, Socket set, Wrench Set, Nutdriver
All went fine
Did you find this story helpful?
Thanks for voting and helping fellow customers!
Vibration in shaft
Ronald - August 12, 2018
Tool Type
Trimmer
Difficulty
Medium
Time
15-30 minutes
Tools Used
Power Drill
Parts Used
Remove the powerhead from the shaft replace the starter housing
Did you find this story helpful?
Thanks for voting and helping fellow customers!
Clutch came apart, damaged plastic clutch cover.
Edwin - April 13, 2018
Tool Type
Trimmer
Difficulty
Easy
Time
15-30 minutes
Tools Used
Screwdriver, 15T 10T torx
Removed clutch cover from powerhead, T15.removed clutch cover from shaft ,T15 removed clutch assembly from engine. T10 Cleaned engine , Installed new clutch assembly and clutch cover, lube drive shaft. Reinstall clutch cover to powerhead. Crank trimmer and test.
Did you find this story helpful?
Thanks for voting and helping fellow customers!
Clutch assembly prongs broken.
johnnie - August 17, 2017
Tool Type
Trimmer
Difficulty
Easy
Time
15-30 minutes
Tools Used
Screwdriver, Wrench Set, Adjustable Wrench
1. Remove three cover screws.
2. Separated the shaft housing.
3. Removed the old parts.
4. Attached the new ones.
5. Reassembled and tested.
2. Separated the shaft housing.
3. Removed the old parts.
4. Attached the new ones.
5. Reassembled and tested.
Did you find this story helpful?
Thanks for voting and helping fellow customers!
Clutch housing broke
douglas - June 8, 2017
Tool Type
Trimmer
Difficulty
Easy
Time
15-30 minutes
Tools Used
, Torx wrench
Parts Used
Removed old clutch housing-replaced it with new one.
Did you find this story helpful?
Thanks for voting and helping fellow customers!
OEM stands for Original Equipment Manufacturer and means the part you’re buying is sourced directly from the manufacturer who made your product. At eReplacementParts, we sell only genuine OEM parts, guaranteeing the part you’re purchasing is of better design and of higher quality than aftermarket parts.
Our product descriptions are a combination of data sourced directly from the manufacturers who made your product as well as content researched and curated by our content & customer service teams. This content is edited and reviewed internally before being made public to customers.
Our customer service team are at the ready daily to answer your part and product questions. We have a dedicated staff with decades of collective experience in helping customers just like you purchase parts to repair their products.
All our part reviews are solicited directly from other customers who have purchased this exact part. While we moderate these reviews for profanity, offensive language or personally identifiable information, these reviews are posted exactly as submitted and no alterations are made by our team.
All our customer repair instructions are solicited directly from other customers just like you who have purchased and replaced this exact part. While we moderate these reviews for profanity, offensive language or personally identifiable information, these reviews are posted exactly as submitted and no alterations are made by our team.
Based on data from past customer purchasing behaviors, these parts are most commonly purchased together along with the part you are viewing. These parts may be necessary or helpful to replace to complete your current repair.
All our installation videos are created and produced in collaboration with our in-house repair technician, Mark Sodja, who has helped millions of eReplacementParts customers over the last 13 years repair their products. Mark has years of experience in selling and repairing both commercial and residential products with a specialty in gas-powered equipment.
This data is collected from customers who submitted a repair instruction after replacing this exact part. Customers can rate how easy the repair was to complete and how long it took. We aggregate this data to provide a repair rating that allows customers to quickly determine the difficulty and time needed to perform their own repair.