
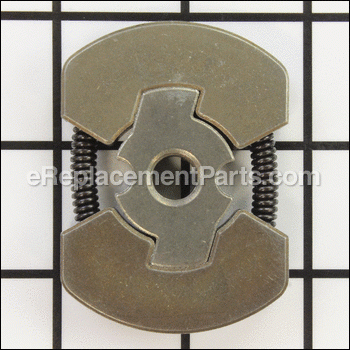
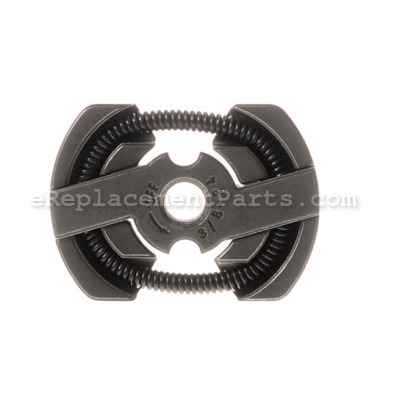


This is an OEM sourced replacement part used on gas trimmers. A centrifugal clutch is a part that uses centrifugal force to connect two concentric shafts, with the driving shaft nested inside the driven shaft. Today’s centrifugal clutches will function even when they shouldn’t, far beyond the point of when they need to be replaced. Keeping an eye on equipment performance will determine when the centrifugal clutch requires attention. Please note the clutch drum, spacer and washer are all sold separately. This clutch is made out of metal and it is sold individually.
To replace this item you would need a screwdriver and pliers.
Clutch Assembly 300960002
OEM part for: Ryobi, Homelite
Part Number: 300960002
$5.32
In Stock
Jump To:
Product Description ?
- Dimensions
- Length 2-5/16 Inches
- Width From Spring to Spring 1-1/2 Inches
- Classification: Part
- Weight: 0.21 lbs.
- Shipping: Ships Worldwide
Frequently Purchased Together ?


Compatibility
This part will fit the following 149 machines
Ryobi
RY29550 30cc String Trimmer View Diagrams & Manuals
RY30120 30cc String Trimmer View Diagrams & Manuals
RY30140 30cc String Trimmer View Diagrams & Manuals
BC30 (RY30160) 30cc Brushcutter View Diagrams & Manuals
RY30220 30cc String Trimmer View Diagrams & Manuals
RY30220A 30cc String Trimmer View Diagrams & Manuals
RY30220B 30cc String Trimmer View Diagrams & Manuals
RY30240 30cc String Trimmer View Diagrams & Manuals
RY30240B 30cc String Trimmer View Diagrams & Manuals
RY30260 30cc Brushcutter View Diagrams & Manuals
RY30260B 30cc Brushcutter View Diagrams & Manuals
RY30524 30cc String Trimmer View Diagrams & Manuals
RY30530 30cc String Trimmer and Brushcutter View Diagrams & Manuals
RY30544 30cc String Trimmer View Diagrams & Manuals
RY30550 30cc String Trimmer and Brushcutter View Diagrams & Manuals
RY30564 30cc Brushcutter View Diagrams & Manuals
RY30570 30cc String Trimmer and Brushcutter View Diagrams & Manuals
RY30931 30 cc String Trimmer and Brushcutter View Diagrams & Manuals
RY30951 30cc String Trimmer and Brushcutter View Diagrams & Manuals
RY30971 30cc String Trimmer and Brushcutter View Diagrams & Manuals
RY39500 26cc Hedge Trimmer View Diagrams & Manuals
RY52014 TP30 Gas Pruner View Diagrams & Manuals
RY52502 Gas Pruner View Diagrams & Manuals
RY52504 Gas Pruner View Diagrams & Manuals
RY52903 Gas Pruner View Diagrams & Manuals
RY52905 Gas Pruner View Diagrams & Manuals
RY26500 Trimmer View Diagrams & Manuals
CS30 (RY26500) Trimmer View Diagrams & Manuals
RY26901 Trimmer View Diagrams & Manuals
RY26520 Trimmer View Diagrams & Manuals
RY26921 Trimmer View Diagrams & Manuals
RY26540 Brush Cutter View Diagrams & Manuals
RY26941 Brush Cutter View Diagrams & Manuals
RY28000 26cc String Trimmer View Diagrams & Manuals
RY28020 (CS26) 26cc String Trimmer View Diagrams & Manuals
RY28040 (SS26) 26cc String Trimmer View Diagrams & Manuals
RY26000 26cc Power Head View Diagrams & Manuals
RY13010 4 Cycle Wheeled Trimmer View Diagrams & Manuals
RY13050 4 Cycle Wheeled Edger View Diagrams & Manuals
RY13050A 4 Cycle Wheeled Edger View Diagrams & Manuals
RY34000 4 Cycle Gas Powerhead View Diagrams & Manuals
RY34420 Gas String Trimmer View Diagrams & Manuals
RY34421 4 Cycle Gas String Trimmer View Diagrams & Manuals
RY34440 (S430) Gas String Trimmer View Diagrams & Manuals
RY34441 4 Cycle Gas String Trimmer View Diagrams & Manuals
RY64400 4 Cycle Cultivator View Diagrams & Manuals
RY30963 30cc String Trimmer View Diagrams & Manuals
RY30943 30cc String Trimmer View Diagrams & Manuals
RY30923 30cc String Trimmer View Diagrams & Manuals
RY30562 30cc String Trimmer View Diagrams & Manuals
RY30542 30cc String Trimmer View Diagrams & Manuals
RY30522 30cc String Trimmer View Diagrams & Manuals
RY34001 4 Cycle Gas Powerhead Trimmer View Diagrams & Manuals
RY34442 Gas Trimmer View Diagrams & Manuals
RY28021 String Trimmer View Diagrams & Manuals
RY28041 String Trimmer View Diagrams & Manuals
RY28005 26cc String Trimmer View Diagrams & Manuals
RY28025 26cc String Trimmer View Diagrams & Manuals
RY28045 26cc String Trimmer View Diagrams & Manuals
RY34005 30cc Power Head View Diagrams & Manuals
RY52604 Gas Pruner View Diagrams & Manuals
RY28140 (SS26) String Trimmer View Diagrams & Manuals
RY28100 String Trimmer View Diagrams & Manuals
RY28120 String Trimmer View Diagrams & Manuals
RY34426 30cc String Trimmers View Diagrams & Manuals
RY34446 30cc String Trimmers View Diagrams & Manuals
RY34006 30cc Power Head Trimmer View Diagrams & Manuals
RY13015 30cc 4-Cycle Wheeled Trimmer View Diagrams & Manuals
RY39505 Hedge Trimmer View Diagrams & Manuals
RY34425 String Trimmer View Diagrams & Manuals
RY34445 String Trimmer View Diagrams & Manuals
RY13016 4-Cycle Wheeled Trimmer View Diagrams & Manuals
RY28060 26CC Brush Cutter View Diagrams & Manuals
RY28065 26CC Brushcutter View Diagrams & Manuals
RY28121 26CC String Trimmers View Diagrams & Manuals
RY28141 26CC String Trimmers View Diagrams & Manuals
RY28160 26CC Brushcutter View Diagrams & Manuals
RY28161 26CC Brushcutter View Diagrams & Manuals
RY34007 30CC Power Head Trimmer View Diagrams & Manuals
RY34427 30CC String Trimmer View Diagrams & Manuals
RY34447 30CC String Trimmer View Diagrams & Manuals
RY52907 Gas Pruner TP26 View Diagrams & Manuals
RY28101 RY28101 26CC String Trimmers View Diagrams & Manuals
TP26 TP26 Gas Pruner View Diagrams & Manuals
RY52502 (TP30) Gas Pruner View Diagrams & Manuals
RY52604 (TP26) Gas Pruner View Diagrams & Manuals
RY28020 26cc String Trimmer View Diagrams & Manuals
RY52903 (TP30) Gas Pruner View Diagrams & Manuals
RY34007 (RY34427)(RY34447)(090432017)(090432018)(090432019) 30cc String Trimmers View Diagrams & Manuals
RY52905 (TP30) Gas Pruner View Diagrams & Manuals
RY52504 (TP30) Gas Pruner View Diagrams & Manuals
RY52907 (TP26) Gas Pruner View Diagrams & Manuals
RY4CPH (090432025) 30cc String Trimmers View Diagrams & Manuals
RY30160 30cc Brushcutter View Diagrams & Manuals
UT33600 (090330011) 26cc String Trimmer Ut-33600 26cc String Trimmer View Diagrams & Manuals
RY34007 (RY34427)(RY34447)(090432020)(090432021)(090432022) 30cc String Trimmers View Diagrams & Manuals
RY28040 26cc String Trimmer View Diagrams & Manuals
RY4CPH (090432034) 30cc String Trimmers View Diagrams & Manuals
UT33650 (090330012) 26cc String Trimmer Ut-33650 26cc String Trimmer View Diagrams & Manuals
RY34440 30cc String Trimmer View Diagrams & Manuals
RY28140 26cc String Trimmers View Diagrams & Manuals
RY4CPH (090432031) 30cc String Trimmers View Diagrams & Manuals
UT-33600 String Trimmer 26cc View Diagrams & Manuals
UT-33600 (090330011)(2016-11) String Trimmer 26cc Rev 02 View Diagrams & Manuals
UT-33650 String Trimmer 26cc View Diagrams & Manuals
UT-33650 (090330012)(2016-11) String Trimmer 26cc Rev 02 View Diagrams & Manuals
RY34007 (RY34427)(RY34447)(090432018) Ry34007, Ry34427, Ry34447 30cc String Trimmers Mfg. No. 090432017, 090432018, And 090432019 View Diagrams & Manuals
RY4CCS Ry4ccs 30cc String Trimmers Mfg. No. 090432041 9-23-20 (Rev:01) View Diagrams & Manuals
RY4CCSVNM Ry4ccsvnm 30cc String Trimmer Mfg. No. 095432104 3-9-21 (Rev:03) View Diagrams & Manuals
RY4CSS Ry4css 30cc String Trimmers Mfg. No. 090432040 9-23-20 (Rev:01) View Diagrams & Manuals
RY4CSSVNM Ry4cssvnm 30cc String Trimmer Mfg. No. 095432103 3-9-21 (Rev:03) View Diagrams & Manuals
Homelite
UT-50500 Edger View Diagrams & Manuals
UT-50901 Edger View Diagrams & Manuals
UT22600 26cc String Trimmer View Diagrams & Manuals
UT22650 26cc String Trimmer View Diagrams & Manuals
UT40502 Mightylite Hedge Trimmer View Diagrams & Manuals
UT40903 Mightylite Hedge Trimmer View Diagrams & Manuals
UT32600 Curved Shaft String Trimmer View Diagrams & Manuals
UT32650 Straight Shaft String Trimmer View Diagrams & Manuals
UT-21566 Mightylite Versatool String Trimmer View Diagrams & Manuals
UT32601 Gas Trimmer View Diagrams & Manuals
UT21967 26cc Mightylite Versa Tool String Trimmer View Diagrams & Manuals
UT32601A 26cc String Trimmers View Diagrams & Manuals
UT32651A 26cc String Trimmers View Diagrams & Manuals
UT32605A 26cc String Trimmers View Diagrams & Manuals
UT32655A 26cc String Trimmers View Diagrams & Manuals
UT32605 26cc String Trimmers View Diagrams & Manuals
UT32655 26cc String Trimmers View Diagrams & Manuals
UT33600 26cc String Trimmer View Diagrams & Manuals
UT33650 26CC String Trimmer View Diagrams & Manuals
RY30140 30cc String Trimmer View Diagrams & Manuals
RY30220 30cc String Trimmer View Diagrams & Manuals
RY30160 30cc Brushcutter View Diagrams & Manuals
RY30220A 30cc String Trimmer View Diagrams & Manuals
RY30240B 30cc String Trimmer View Diagrams & Manuals
RY30220B 30cc String Trimmer View Diagrams & Manuals
RY30240 30cc String Trimmer View Diagrams & Manuals
RY30524 30cc String Trimmer View Diagrams & Manuals
RY30544 30cc String Trimmer View Diagrams & Manuals
RY30260B 30cc Brushcutter View Diagrams & Manuals
RY30570 30cc String Trimmer And Brushcutter View Diagrams & Manuals
RY30931 30cc String Trimmer And Brushcutter View Diagrams & Manuals
RY30522 30cc String Trimmer View Diagrams & Manuals
RY30550 30cc String Trimmer And Brushcutter View Diagrams & Manuals
RY30542 30cc String Trimmer View Diagrams & Manuals
RY30530 30cc String Trimmer And Brushcutter View Diagrams & Manuals
RY30562 30cc Brushcutter View Diagrams & Manuals
RY30260 30cc Brushcutter View Diagrams & Manuals
RY30564 30cc Brushcutter View Diagrams & Manuals
Show More Compatible Models
This item works with the following types of products:
- Trimmer Parts
- Hedge Trimmer Parts
- Pruner Parts
- Edger Parts
- Cultivator Parts
Repair Videos ?

Articles:
|
This article explains how to remove the clutch from most line and string trimmers. Tips are provided for removing tricky...
October 21, 2009
|

Customer Part Reviews ?
Average Rating (out of 5):
Click to filter by ratings:
5 stars
2
4 stars
1
3 stars
0
2 stars
0
1 stars
0
< PREV
- 1
GREAT PART
FITS GOOD,THANK YOU VERY MUCH
iGlobal -
October 22, 2020
Verified Purchase
Great part
Perfect fit
Guest -
March 30, 2020
Verified Purchase
Was a easy replace. But it was not my problem. Went and got a battery one.
Great condition quick delivery. But it was not that
Guest -
July 27, 2020
Verified Purchase
t
t
t -
t days ago
Verified Purchase
eReplacementParts Team
t
Questions & Answers ?
Our customer Service team is at the ready daily to answer your part and product questions.

Ask our Team
We have a dedicated staff with decades of collective experience in helping customers just like you purchase parts to repair their products.
Does this fit my product?Questions & Answers for Clutch Assembly
No questions have been asked yet
Customer Repair Instructions ?
All our customer repair instructions are solicited directly from other customers just like you who have purchased and replaced this exact part.
Head stopped rotating
Thomas - July 26, 2016
👍 6 of 8 people found this instruction helpful
Tool Type
Trimmer
Difficulty
Medium
Time
15-30 minutes
Tools Used
Screwdriver, Monkey wrench instead of spanner wrench
1. Removed lower shaft
2. Removed upper shaft (4 Torx screws)
3. Removed spark plug and inserted rope
4. Removed drum & connector (1 Torx screw)
5. Removed clutch with monkey wrench
6. Re-installed everything in reverse order
Works like new!
2. Removed upper shaft (4 Torx screws)
3. Removed spark plug and inserted rope
4. Removed drum & connector (1 Torx screw)
5. Removed clutch with monkey wrench
6. Re-installed everything in reverse order
Works like new!
Did you find this story helpful?
Thanks for voting and helping fellow customers!
Clutch not working
Willi - May 22, 2016
👍 3 of 4 people found this instruction helpful
Tool Type
Pruner
Difficulty
Easy
Time
30-60 minutes
Tools Used
Screwdriver, Pliers
Parts Used
Remove the complete starter assembly. Then remove the spark plug and insert a small lent of rope into the cylinder. Then turn the drive shaft until the piston hits the rope and stops. Remove the clutch drum by unscrewing the screw in the middle of the drum. To remove the clutch, put a screwdriver on a edge of the clutch and strike the screwdriver, the clutch will loosen. Remove the old clutch, then thread the new on on hand tight. Then reassemble the rest of the parts in reverse order.
Did you find this story helpful?
Thanks for voting and helping fellow customers!
Clutch discs broken
Paul - August 26, 2017
👍 1 of 1 people found this instruction helpful
Tool Type
Trimmer
Difficulty
Easy
Time
Less than 15 minutes
Tools Used
Screwdriver, hammer
1. Found the Clutch discs were obsolete. (Homelite bc900 and many other trimmers I found in my research.)
2. I discovered while researching that the clutch parts breakdown used the same clutch washer and the same drum, but it used a different clutch which wasn't obsolete. Purchased new clutch, drum, and the two different sized washers. Parts were for Ryobi BC30.
3. Removed the clutch drum by loosening captive torx screw in end of drum, sliding off the drum.
4. Removed the clutch each of the two clutch discs by tapping a screwdriver with a hammer to spin then off.
5. Removed old clutch washers.
6. Replaced washers and clutch in order for other model trimmer.
7. Tighten clutch with adjustable plier.
8. Installed new drum.
Did you find this story helpful?
Thanks for voting and helping fellow customers!
Took trimmer apart.
Joel - July 7, 2020
Tool Type
Trimmer
Difficulty
Medium
Time
30-60 minutes
Tools Used
Screwdriver, Pliers, Torque driver
Parts Used
Installed New part. Reassembled
Did you find this story helpful?
Thanks for voting and helping fellow customers!
Clutch arms broke
Bob - May 14, 2020
Tool Type
Trimmer
Difficulty
Medium
Time
30-60 minutes
Tools Used
Screwdriver, Pliers, Star-driver
Had to replace clutch with updated design. Had to replace clutch housing due to wear from broken arms.
Did you find this story helpful?
Thanks for voting and helping fellow customers!
Starter assembly melted
Aleksey - May 31, 2019
Tool Type
Trimmer
Difficulty
Medium
Time
1-2 hours
Tools Used
Screwdriver, Pliers, Wrench Set, Nutdriver
Used parts diagram from this site.
Main trick was a clutch removal from the shaft.
I didn't realize that a clutch is threaded to the shaft and broke it during removal.
New clutch from this site actually shows an arrow that indicates a direction of rotation for a clutch to be removed. Original clutch didn't have that.
Main trick was a clutch removal from the shaft.
I didn't realize that a clutch is threaded to the shaft and broke it during removal.
New clutch from this site actually shows an arrow that indicates a direction of rotation for a clutch to be removed. Original clutch didn't have that.
Did you find this story helpful?
Thanks for voting and helping fellow customers!
Clutch drum stripped
Robert - May 27, 2018
Tool Type
Trimmer
Difficulty
Easy
Time
15-30 minutes
Tools Used
Adjustable Wrench, Torx driver, spark plug wrench, rope
Removed drive from shaft
Removed spark plug
Pushed rope into cylinder to stop motor rotation
Removed clutch drum (torx driver)
Removed clutch (adjustable wrench)
Installed in reverse
Removed spark plug
Pushed rope into cylinder to stop motor rotation
Removed clutch drum (torx driver)
Removed clutch (adjustable wrench)
Installed in reverse
Did you find this story helpful?
Thanks for voting and helping fellow customers!
Bad vibration due to broken clutch
Dave - August 16, 2017
Tool Type
Trimmer
Difficulty
Easy
Time
30-60 minutes
Tools Used
Pliers, Power Drill, Socket set, Nutdriver, Spark plug socket and small rope
Remove spark plug and feed small rope into spark plug hole to stop piston from turning over.
Remove T25 screw holding clutch drum to crankshaft
Turn clutch counter clockwise to unscrew from shaft
Replace part in reverse sequence with new parts
Remove T25 screw holding clutch drum to crankshaft
Turn clutch counter clockwise to unscrew from shaft
Replace part in reverse sequence with new parts
Did you find this story helpful?
Thanks for voting and helping fellow customers!
Clutch was burned up
Charles - July 5, 2017
Tool Type
Edger
Difficulty
Easy
Time
30-60 minutes
Tools Used
Screwdriver
Parts Used
Remove the starter housing
Remove the spark plug and insert a small length of rope into the cylinder
Turn the shaft until the piston contacts the rope
With a screwdriver and hammer, hit the edge of the old clutch to remove it
Install the new clutch
Reverse order to put back together
Remove the spark plug and insert a small length of rope into the cylinder
Turn the shaft until the piston contacts the rope
With a screwdriver and hammer, hit the edge of the old clutch to remove it
Install the new clutch
Reverse order to put back together
Did you find this story helpful?
Thanks for voting and helping fellow customers!
Motor ran, but the trimmer didn't
Joe - May 19, 2017
Tool Type
Trimmer
Difficulty
Easy
Time
30-60 minutes
Tools Used
Screwdriver, Pipe wrench
1. Removed the old clutch assembly.
2. Installed the new clutch assembly.
2. Installed the new clutch assembly.
Did you find this story helpful?
Thanks for voting and helping fellow customers!
Load More Install Stories
OEM stands for Original Equipment Manufacturer and means the part you’re buying is sourced directly from the manufacturer who made your product. At eReplacementParts, we sell only genuine OEM parts, guaranteeing the part you’re purchasing is of better design and of higher quality than aftermarket parts.
Our product descriptions are a combination of data sourced directly from the manufacturers who made your product as well as content researched and curated by our content & customer service teams. This content is edited and reviewed internally before being made public to customers.
Our customer service team are at the ready daily to answer your part and product questions. We have a dedicated staff with decades of collective experience in helping customers just like you purchase parts to repair their products.
All our part reviews are solicited directly from other customers who have purchased this exact part. While we moderate these reviews for profanity, offensive language or personally identifiable information, these reviews are posted exactly as submitted and no alterations are made by our team.
All our customer repair instructions are solicited directly from other customers just like you who have purchased and replaced this exact part. While we moderate these reviews for profanity, offensive language or personally identifiable information, these reviews are posted exactly as submitted and no alterations are made by our team.
Based on data from past customer purchasing behaviors, these parts are most commonly purchased together along with the part you are viewing. These parts may be necessary or helpful to replace to complete your current repair.
All our installation videos are created and produced in collaboration with our in-house repair technician, Mark Sodja, who has helped millions of eReplacementParts customers over the last 13 years repair their products. Mark has years of experience in selling and repairing both commercial and residential products with a specialty in gas-powered equipment.
This data is collected from customers who submitted a repair instruction after replacing this exact part. Customers can rate how easy the repair was to complete and how long it took. We aggregate this data to provide a repair rating that allows customers to quickly determine the difficulty and time needed to perform their own repair.