eReplacementParts.com
877-346-4815
DeWALT Parts
Repair Parts Home
  
Power Tool Parts
  
DeWALT Parts
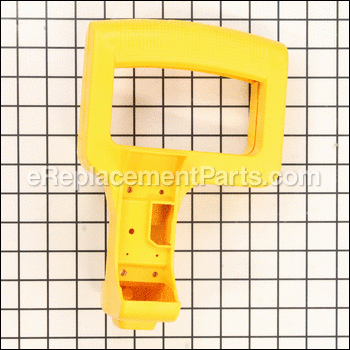
  380452-00 Clamshell Set

Clamshell Set 380452-00

OEM part for: DeWALT, Black and Decker

Part Number: 380452-00


Install
Videos!
Grid squares measure 1x1 inch
In Stock
Ships within 1 business day
Easy 15-30 minutes (44 rated repairs)?
OEM: Original Equipment Manufacturer ?
DeWALTBlack and Decker
Does this d-block d-md-none fit my product?

Product Description ?

This clamshell housing set is a genuine Dewalt replacement part, not generic or aftermarket. This handle housing is a common replacement item on popular Dewalt miter saws. Both sides of the housing are included, but mounting/assembly hardware is sold separately. The on/off trigger switch is not included. This handle is a direct replacement for a broken or missing handle on your saw.rn

rnThis clamshell set is compatible with the Dewalt tools listed in the 'Compatibility' section below. It will not fit any other power tools.

  • O.E.M. Dewalt replacement miter saw handle
  • Includes both handle halves
  • Does not include mounting hardware or on/off trigger switch
  • Classification: Part
  • Weight: 1.01 lbs.
  • Shipping: Ships Worldwide

Frequently Purchased Together ?

Compatibility

This part will fit the following 30 machines

DeWALT

DW704 Type 1 12 Inch Miter Saw View Diagrams & Manuals
DW704 Type 2 12 inch Miter Saw View Diagrams & Manuals
DW704 Type 3 12 inch Miter Saw View Diagrams & Manuals
DW704 Type 4 12 inch Miter Saw View Diagrams & Manuals
DW704 Type 4A 12 inch Miter Saw View Diagrams & Manuals
DW704 Type 5 12 inch Miter Saw View Diagrams & Manuals
DW705-220 Type 1 12 inch Miter Saw View Diagrams & Manuals
DW705-220 Type 2 12 inch Miter Saw View Diagrams & Manuals
DW705S Type 5 12 inch Compound Miter Saw View Diagrams & Manuals
DW705 Type 1 12 Inch Miter Saw View Diagrams & Manuals
DW705 Type 2 12 Inch Miter Saw View Diagrams & Manuals
DW705 Type 3 12 Inch Miter Saw View Diagrams & Manuals
DW705 Type 4 12 Inch Miter Saw View Diagrams & Manuals
DW705 Type 4A 12 Inch Miter Saw View Diagrams & Manuals
DW705 Type 5 12 Inch Miter Saw View Diagrams & Manuals
DW705-44 (Type 1) 12 Cmpd Mitersaw-Chile View Diagrams & Manuals
DW705-44 (Type 2) 12 Cmpd Mitersaw-Chile View Diagrams & Manuals
12 inch Miter Saw View Diagrams & Manuals
DW705-35 (Type 1) Mitre Saw Power Tool View Diagrams & Manuals
DW705-35 (Type 2) Mitre Saw Power Tool View Diagrams & Manuals
DW705-35 (Type 3) Mitre Saw Power Tool View Diagrams & Manuals
DW705-35 (Type 4) Mitre Saw Power Tool View Diagrams & Manuals
DW705-B2 (Type 4) Mitre Saw Power Tool View Diagrams & Manuals
DW705-B3 (Type 5) Mitre Saw Power Tool View Diagrams & Manuals

Black and Decker

3660 Type 1 12 Miter Saw View Diagrams & Manuals
3660 Type 2 12 Miter Saw View Diagrams & Manuals
3660 Type 3 12 Miter Saw View Diagrams & Manuals
3680 Type 1 12 Compound Miter Saw View Diagrams & Manuals
3680 Type 2 12 Compound Miter Saw View Diagrams & Manuals
3680 Type 3 12 Compound Miter Saw View Diagrams & Manuals
Show More Compatible Models
Don't see yours? Try searching our site for :

This item works with the following types of products:

  • Miter Saw Parts
  • Saw Parts

Customer Part Reviews ?

5
Average Rating (out of 5):
40 Reviews
Click to filter by ratings:
5 stars
38
4 stars
2
3 stars
0
2 stars
0
1 stars
0
  • Highest Rating
  • Most Recent
< PREV
  • 1
  • 2
  • 3
NEXT >
  • perfect fit easy relacement thanks
    even though the old part was smashed into small parts the new one was easy to fit s and rewire
    Guest - November 21, 2023 Verified Purchase
    Part fit perfectly
    The part was a perfect fit, no problems at all.
    Guest - November 6, 2023 Verified Purchase
    Easy repair and fast delivery
    Fast delivery
    Guest - August 30, 2023 Verified Purchase
    Perfect replacement part, service is American.
    I believe that eReplacementParts is the best and faster shopping and delivery service company we have today. I would and will recommend them to all my family up and down the East coast and to friend over the country. You have got to give this company a chance to meet your parts requirement.
    Guest - April 1, 2023 Verified Purchase
    Easy to order, quick delivery!
    Parts arrived quickly and in good condition. I appreciate the replacement instructions.
    Guest - March 29, 2023 Verified Purchase
    Easy to repair using original parts
    Clam shall handle for a Dewalt comp.saw , was an original fit
    PRESTON - March 21, 2023 Verified Purchase
    easy replacement
    fit exactly as the old part was.
    jim - March 10, 2023 Verified Purchase
    The new part was a perfect match.
    The replacement part was a perfect fit. It was easy to install and my chop saw is back in working order.
    Guest - January 30, 2023 Verified Purchase
    Happy Repeat Customer
    Finding the correct part was very easy. The part was delivered quicker than advertised, was in great shape and easy to install. Taking photos of the old, damaged part while removing it was helpful in installing the new part and assuring the wires were placed in the optimal locations.
    Guest - June 27, 2022 Verified Purchase
    Chop saw repair
    These guys are great at having the exact part, I bought 2 of these they went on perfect no problem, I will buy from this company again, Thanks for the help guys.
    Guest - May 16, 2022 Verified Purchase
    t
    t
    t - t days ago Verified Purchase
    eReplacementParts Team
    t

    Questions & Answers ?

    Our customer Service team is at the ready daily to answer your part and product questions.

    photo of team member
    Ask our Team

    We have a dedicated staff with decades of collective experience in helping customers just like you purchase parts to repair their products.

    Does this fit my product?

    Questions & Answers for Clamshell Set


    No questions have been asked yet

    Customer Repair Instructions ?

    All our customer repair instructions are solicited directly from other customers just like you who have purchased and replaced this exact part.

    Easy 15-30 minutes (44 rated repairs)?

    Clamshell handle broke

    Greg - December 10, 2015
    👍 20 of 20 people found this instruction helpful
    Tool Type

    Miter Saw

    Difficulty

    Medium

    Time

    15-30 minutes

    Tools Used

    Screwdriver, Power Drill, Nutdriver

    Removed all bolts from existing clamshell with drill and various sizes/types of head bits.
    Used phone to take snapshots of wire and trigger configuration to make it easier to reassemble properly. Removed wires from trigger switch assembly. Disconnected other wires (wrapped with wire nuts). Placed new handle bottom and fastened down. Re-routed wires and hooked up trigger assembly. Connected other wires. Placed top of handle on and fastened bolts.
    Did you find this story helpful?
    Thanks for voting and helping fellow customers!

    I hit my Dewalt Miter Saw Handle with a piece of lumber and the trigger handle cracked and split in half.

    Jonathan - October 6, 2016
    👍 6 of 7 people found this instruction helpful
    Tool Type

    Miter Saw

    Difficulty

    Medium

    Time

    15-30 minutes

    Tools Used

    Screwdriver

    1. Made sure the saw was unplugged.
    2. Remove screws and carrying handle from clamshell handle. Save handle and screws.
    3. Remove visible screws from upper half of clamshell and remove top. Save screws.
    4. It helps to take a picture of wiring configuration at trigger and inside lower half of clamshell.
    5. Unscrew trigger, remove locking washer from pivot point, remove trigger wiring from trigger and removed trigger. Save all parts.
    6. Remove remaining screws from lower half of clam shell into body of saw. Remove lower half while fishing wires out of broken lower half. Save screws.
    7. Fish wires through new lower 1/2 of clam shell, dry fit lower assembly with trigger and place wiring in the cradles.
    8. Replaced all parts and screws following steps 1-6 in reverse order.
    9. Plugged in, tested, and cut more wood! Thanks you ereplacementparts.com! You saved me $300-$400 in a new saw!!!
    Did you find this story helpful?
    Thanks for voting and helping fellow customers!

    Cracked handle on miter

    bryan - November 29, 2017
    👍 3 of 3 people found this instruction helpful
    Tool Type

    Miter Saw

    Difficulty

    Medium

    Time

    15-30 minutes

    Tools Used

    , T20 and T15 torx screwdrivers

    Remove screws to top of handle make note of wiring on inside of handle. You will need to disconnect a wire but and 4 wires hooked to the switch to get the handle off. There is also a washer like device holding the switch to the bottom of the handle you will need to reuse this metal fastener.
    Once the handle is off route the wires back through the square hole in the bottom of the handle.
    Wire nut the white wire and route the two blacks on one side and the yellow and red on the other. Hook them back to the switch and reattach the black plastic switch with the round metal fastener. Put the top on and screw down the yellow handle then add the black top handle with the two larger screws.

    Did you find this story helpful?
    Thanks for voting and helping fellow customers!

    Clamshell handle broke

    John - February 2, 2017
    👍 2 of 2 people found this instruction helpful
    Tool Type

    Miter Saw

    Difficulty

    Easy

    Time

    15-30 minutes

    Tools Used

    Screwdriver, Torx driver

    Removed all torx screws
    Disconnected all wires for the switch
    Removed the broken Clamshell handle
    Installed new Clamshell
    Reconnected wiring to the switch
    Installed torx screws
    Did you find this story helpful?
    Thanks for voting and helping fellow customers!

    Handle Broke

    John - December 21, 2015
    👍 2 of 2 people found this instruction helpful
    Tool Type

    Miter Saw

    Difficulty

    Easy

    Time

    15-30 minutes

    Tools Used

    Screwdriver, Nutdriver, none

    Fist make sure the Miter saw is unplugged. The remove the screws from the top carrying handle. And set the handle and screws aside. Then remove the screws from the top handle half, and remove the top handle half. Remove the cord clamp and the switch from the handle. Remove the bottom handle half from the miter saw. Install the new one. Reassemble everything else in reverse order.
    Did you find this story helpful?
    Thanks for voting and helping fellow customers!

    The aluminum base broke causing the saw to separate from the collapsible stand it was mounted to. This allowed the clamshell switch handle to be broken making the chop saw unusable.

    Gary - October 5, 2018
    Tool Type

    Miter Saw

    Difficulty

    Easy

    Time

    1-2 hours

    Tools Used

    Power Drill, Star bits, 3 sizes.

    I removed all screws holding the chop saw to the aluminum base, and replaced the broken base with the new base purchased from your warehouse. I then removed all screws holding the clamshell handle and switch on the saw, and then in reverse order recounted the handle and switch. I then tested the saw with repairs complete and the saw worked like new.
    Did you find this story helpful?
    Thanks for voting and helping fellow customers!

    Saw fell and cracked clamshell handle and dust duct.

    jim - September 14, 2018
    Tool Type

    Miter Saw

    Difficulty

    Easy

    Time

    30-60 minutes

    Tools Used

    Screwdriver, torx t-handles

    Clamshell replacement:1.Unplug saw. 2.remove handle and all screws holding the clamshell body together. 3.take a photo of the switch,wire locations on the switch and wire routing 4.remove switch and remove wiring. 5.there is another screw holding the bottom of the clamshell to the saw.remove this screw and the bottom of the clamshell. reverse the order to install the new clamshell.

    Dust duct replacement: 1. unplug saw. 2. with the saw unlocked and in the open position, place it securely on it's back or side exposing the rear stationary guard. 3. remove two screws holding the guard and remove noting the position of the guard. 4. the dust duct will slide from the back of the saw forward toward the blade. 5. reverse the order to install the new dust duct. 6. rotate saw blade and test for safe clearance and movement. 7. plug in your saw and test operation.
    Did you find this story helpful?
    Thanks for voting and helping fellow customers!

    Handle broke

    Tom - September 11, 2018
    Tool Type

    Miter Saw

    Difficulty

    Easy

    Time

    15-30 minutes

    Tools Used

    Screwdriver, Pliers

    Removed damaged part and replaced. Used picture to make sure of wiring placement
    Did you find this story helpful?
    Thanks for voting and helping fellow customers!

    Handle broke

    Tommy - September 8, 2018
    Tool Type

    Miter Saw

    Difficulty

    Medium

    Time

    30-60 minutes

    Tools Used

    Screwdriver, Pliers

    1. Remove old handle
    2. Remove switch and wires
    3. Install new handle
    4. Re-wire existing switch and route wires through new handle
    5. Re-assemble the top part of the clamshell handle
    Did you find this story helpful?
    Thanks for voting and helping fellow customers!

    Broken Handle

    Leif - August 1, 2018
    Tool Type

    Miter Saw

    Difficulty

    Easy

    Time

    15-30 minutes

    Tools Used

    Screwdriver, T-20 TORX

    1. Removed the carrying handle. (2 common screws)
    2 Removed 6 T-20 Torx screws and separated the clamshell halves.
    3. Removed the switch. (1 screw)
    4. Removed two screws securing the clamp for the power cord.
    5. Removed the harness and 1 screw securing the lower clamshell half to the saw.
    6. Secured the new lower clamshell and reassembled in reverse order.
    7. Tested the saw and am thrilled with the result.
    Did you find this story helpful?
    Thanks for voting and helping fellow customers!

    OEM stands for Original Equipment Manufacturer and means the part you’re buying is sourced directly from the manufacturer who made your product. At eReplacementParts, we sell only genuine OEM parts, guaranteeing the part you’re purchasing is of better design and of higher quality than aftermarket parts.

    Our product descriptions are a combination of data sourced directly from the manufacturers who made your product as well as content researched and curated by our content & customer service teams. This content is edited and reviewed internally before being made public to customers.

    Our customer service team are at the ready daily to answer your part and product questions. We have a dedicated staff with decades of collective experience in helping customers just like you purchase parts to repair their products.

    All our part reviews are solicited directly from other customers who have purchased this exact part. While we moderate these reviews for profanity, offensive language or personally identifiable information, these reviews are posted exactly as submitted and no alterations are made by our team.

    All our customer repair instructions are solicited directly from other customers just like you who have purchased and replaced this exact part. While we moderate these reviews for profanity, offensive language or personally identifiable information, these reviews are posted exactly as submitted and no alterations are made by our team.

    Based on data from past customer purchasing behaviors, these parts are most commonly purchased together along with the part you are viewing. These parts may be necessary or helpful to replace to complete your current repair.

    All our installation videos are created and produced in collaboration with our in-house repair technician, Mark Sodja, who has helped millions of eReplacementParts customers over the last 13 years repair their products. Mark has years of experience in selling and repairing both commercial and residential products with a specialty in gas-powered equipment.

    This data is collected from customers who submitted a repair instruction after replacing this exact part. Customers can rate how easy the repair was to complete and how long it took. We aggregate this data to provide a repair rating that allows customers to quickly determine the difficulty and time needed to perform their own repair.

    eReplacementParts.com
    7174 South 400 West
    Suite 5
    Midvale, UT 84047
    visa mastercard discover american express PayPal