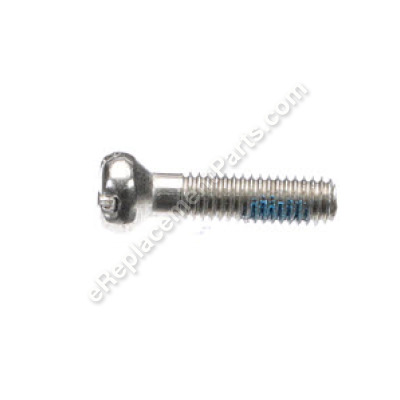
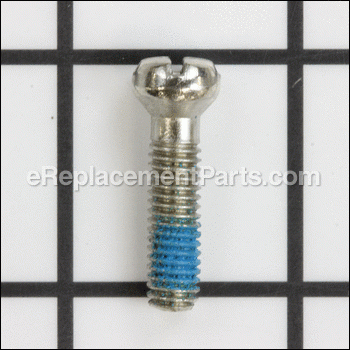


This is a genuine manufacturer-supplied part that is made for use with Milwaukee hammer drills. It is a special screw that is utilized to secure the chuck. Commonly, screws may need to be replaced due to worth threads or a head socket. It provides an identical replacement for a missing or a faulty hardware that was included with a new unit. Please make sure to refer to the appropriate diagrams of your model for the correct location and application of this screw. It is a left hand thread screw. Keep in mind this high-quality part is made of durable metal and is sold individually.
NOTE: We have an article and a video on how to remove a chuck from a drill, here is the link to it.
Chuck Screw 05-88-1500
OEM part for: Milwaukee
Part Number: 05-88-1500
$4.99
In Stock
Jump To:
Product Description ?
- Classification: Part
- Weight: 0.01 lbs.
- Also Known As: Operating Screw
- Shipping: Ships Worldwide
Frequently Purchased Together ?


Compatibility
This part will fit the following 62 machines
Milwaukee
0622-20 (SER 312A) Cordless Drill / Driver View Diagrams & Manuals
0624-20 (SER 321A) Cordless Hammer Drill View Diagrams & Manuals
0614-20 (SER 314C) Hammer Driver Drill View Diagrams & Manuals
0615-20 (SER A76A) 14.4 Volt 1/2" Lok-Tor II Driver-Drill View Diagrams & Manuals
0615-20 (SER A76B) 14.4 Volt 1/2" Lok-Tor II Driver-Drill View Diagrams & Manuals
0615-20 (SER A76C) 14.4 Volt 1/2" Lok-Tor II Driver-Drill View Diagrams & Manuals
0625-20 (SER A77A) 18 Volt 1/2" Lok-Tor II Driver-Drill View Diagrams & Manuals
2601-20 (SER B28A) 1/2" Compact Driver Drill View Diagrams & Manuals
0617-20 (SER A78A) 14.4 Volt 1/2" Lok-Tor II Hammer Drill View Diagrams & Manuals
0617-20 (SER A78B) 14.4 Volt 1/2" Lok-Tor II Hammer Drill View Diagrams & Manuals
0627-20 (SER A79A) 18 Volt 1/2" Lok-Tor II Hammer Drill View Diagrams & Manuals
0724-20 (SER A55A) Cordless 1/2" Hammer Drill View Diagrams & Manuals
0613-20 (SER 313A) 14.4V 1/2" Cordless Hammer Drill View Diagrams & Manuals
0614-20 (SER 314A and 314B) 14.4V 1/2" Cordless Hammer Drill View Diagrams & Manuals
0616-20 (SER A02A) 14.4V 1/2" Cordless Drill View Diagrams & Manuals
0624-20 (SER 321B) 18V 1/2" Cordless Hammer Drill View Diagrams & Manuals
0724-20 (SER A55B) Cordless 28V 1/2" Hammer-Drill View Diagrams & Manuals
0627-24 (SER A79A) 18 Volt 1/2" Lok-Tor II Hammer Drill View Diagrams & Manuals
0617-24 (SER A78B) 14.4 Volt 1/2" Lok-Tor II Hammer Drill View Diagrams & Manuals
0625-24 (SER A77A) 18 Volt 1/2" Lok-Tor II Driver Drill View Diagrams & Manuals
0615-24 (SER A76C) 14.4 Volt 1/2" Lok-Tor II Driver Drill View Diagrams & Manuals
0724-24 (SER A55A) Cordless 28V 1/2" Hammer-Drill View Diagrams & Manuals
2601-22 (SER B28A) 1/2" Compact Driver Drill View Diagrams & Manuals
2611-20 18 Volt Magnum 1/2" Hammer-Drill View Diagrams & Manuals
2611-24 (SER B54A) 18 Volt Magnum 1/2" Hammer-Drill View Diagrams & Manuals
2610-20 (SER B53A) 18 Volt Magnum 1/2" Driver-Drill View Diagrams & Manuals
2610-24 (SER B53A) 18 Volt Magnum 1/2" Driver-Drill View Diagrams & Manuals
0726-20 (SER C26A) 28 Volt 1/2" Hammer-Drill View Diagrams & Manuals
2615-20 (SER C60A) 18 Volt 3/8" Rad Drill View Diagrams & Manuals
2601-20 (B28B) 1/2" Compact Driver Drill View Diagrams & Manuals
2601-20 (B28C) 1/2" Compact Driver Drill View Diagrams & Manuals
2602-20 (C15B) M18 1/2" Compact Hammer-Drill View Diagrams & Manuals
2602-20 (C15C) M18 1/2" Compact Hammer-Drill View Diagrams & Manuals
5376-20 (D20A) 1/2" Single Speed Hammer-Drill View Diagrams & Manuals
5380-21 (B01B) 1/2" Hammer Drill View Diagrams & Manuals
5380-21 (B01C) 1/2" Hammer Drill View Diagrams & Manuals
2603-20 (D55A) M18 Brushless Compact 1/2" Driver-Drill View Diagrams & Manuals
2604-20 (D56A) M18 Brushless Compact 1/2" Hammer-Drill View Diagrams & Manuals
2601-20 (SER B28D) 1/2" Compact Driver Drill View Diagrams & Manuals
2601-059 (SER D36A) 1/2" Compact Driver Drill View Diagrams & Manuals
2601-059 (SER D36C) 1/2" Compact Driver Drill View Diagrams & Manuals
2403-20 M12 Brushless 1/2" 13mm Driver-Drill View Diagrams & Manuals
2403-22 M12 Brushless 1/2" 13mm Driver-Drill View Diagrams & Manuals
240420 M12 Brushless 1/2" 13mm Driver-Drill View Diagrams & Manuals
2404-22 M12 Brushless 1/2" 13mm Driver-Drill View Diagrams & Manuals
2602-20 (SER C15D) M18 1/2" Compact Hammer Drill View Diagrams & Manuals
2606-20 (F24A) 1/2" Driver-Drill View Diagrams & Manuals
0726-22 28 Volt 1/2" Hammer Drill View Diagrams & Manuals
2404-20 M12 Brushless 1/2" 13Mm Hammer Drill View Diagrams & Manuals
2601-21 1/2" Compact Driver Drill View Diagrams & Manuals
2602-22DC M18 1/2" Compact Hammer Drill View Diagrams & Manuals
2603-22 M18 Fuel Compact 1/2" Driver Drill View Diagrams & Manuals
2603-22CT M18 Fuel Compact 1/2" Driver Drill View Diagrams & Manuals
2604-22CT M18 Fuel Compact 1/2" Hammer Drill View Diagrams & Manuals
2606-22CT M18 1/2" Drill Driver View Diagrams & Manuals
2607-20 M18 1/2" Hammer Driver View Diagrams & Manuals
2607-22 M18 1/2" Hammer Driver View Diagrams & Manuals
2607-22CT M18 1/2" Hammer Driver View Diagrams & Manuals
2615-21 18 Volt 3/8" Rad Drill View Diagrams & Manuals
2615-21CT 18 Volt 3/8" Rad Drill View Diagrams & Manuals
5378-21 1/2" Hammer Drill View Diagrams & Manuals
2702-20 M18 1/2" Compact Brushless Hammer Drill/Driver View Diagrams & Manuals
Show More Compatible Models
This item works with the following types of products:
- Cordless Drill Parts
- Drill Parts
- Hammer Drill Parts
This part replaces obsolete part #: 05-88-1470, 05-80-0450
Repair Videos ?
Watch the Repair Video for
Chuck Screw

Articles:
|
This article explains steps for how to remove threaded-on chucks and taper-fit drill chucks, as well as steps for removi...
September 18, 2009
|

|
Broken gearboxes and sticky chuck screws can make removing a drill chuck difficult. This article explains the tricks you...
August 12, 2010
|

Customer Part Reviews ?
Average Rating (out of 5):
Click to filter by ratings:
5 stars
16
4 stars
0
3 stars
0
2 stars
0
1 stars
0
< PREV
- 1
- 2
worked as expected
arrived within a reasonable time
Guest -
March 29, 2023
Verified Purchase
It was the right part received in good time. Very easy!
Worked perfectly!
Guest -
August 4, 2022
Verified Purchase
worked as expected
great condition, perfect fit
Jose -
January 27, 2022
Verified Purchase
Excellent service
I ordered a replacement keyless chuck and screw for my Milwaukee flex 18 v. drill. The parts arrived sooner than expected and are top quality. Keep up the good work !
Tom Carey
Guest -
October 28, 2021
Verified Purchase
Got here on time and just the fit
Part was just as advertised
Mike -
June 10, 2021
Verified Purchase
Worked perfect
Had thread lock and ready to install
Guest -
April 28, 2021
Verified Purchase
Tried and true.
Exactly the part needed for the repair. I had watched a video on YouTube made by these guys on how to remove/replace the chuck on a cordless Milwaukee Driver. While ordering the chuck they "suggested" this screw which was a life saver because I had not selected this part before hand and it was definitely required.
Jonathan -
April 22, 2021
Verified Purchase
Perfect Match
I looked broadly for the replacement chuck screw because of a part number change, this perfect match was exactly as stated in description, reasonable price and reasonable shipping costs.
Guest -
December 7, 2020
Verified Purchase
Milwaukee Drill Parts
Right part ... quick delivery ... great place for anything you need
Guest -
September 8, 2020
Verified Purchase
Screw
Good place to order from and was correct to complete my repair
Guest -
July 23, 2020
Verified Purchase
t
t
t -
t days ago
Verified Purchase
eReplacementParts Team
t
Questions & Answers ?
Our customer Service team is at the ready daily to answer your part and product questions.

Ask our Team
We have a dedicated staff with decades of collective experience in helping customers just like you purchase parts to repair their products.
Does this fit my product?Questions & Answers for Chuck Screw
Does this screw fit my model of hammer drill 0726-22?
Jeramiah
for model number 0726-22
asked on 2022-02-21
Hello Jeramiah, Thank you for your inquiry. We have researched the model number you have provided and confirm that this part is compatible. We hope this helps and if you need help placing an order, customer service is open 7 days a week. Please feel free to give us a call. We look forward to hearing from you!
eReplacementParts Team February 21, 2022
Customer Repair Instructions ?
All our customer repair instructions are solicited directly from other customers just like you who have purchased and replaced this exact part.
The retaining screw broke off under a heavy load
Timothy - June 8, 2017
👍 5 of 6 people found this instruction helpful
Tool Type
Cordless Drill
Difficulty
Easy
Time
Less than 15 minutes
Tools Used
Screwdriver
Parts Used
Removed the broken retaining piece.
Installed the new screw
Installed the new screw
Did you find this story helpful?
Thanks for voting and helping fellow customers!
THE CHUCK ON MY MILWAUKEE DRILL WOULDN'T HOLD TIGHT ANY MORE, SO I REPLACED IT.
BRUCE - December 9, 2015
👍 4 of 4 people found this instruction helpful
Tool Type
Cordless Drill
Difficulty
Easy
Time
Less than 15 minutes
Tools Used
Screwdriver, LARGE HEX WRENCH
FIRST , I REMOVED THE SCREW INSIDE THE CHUCK, TURNING CLOCKWISE. THEN I INSERTED A LARGE HEX WRENCH IN THE CHUCK, TIGHTENED IT, THEN HIT IT WITH A HAMMER, THE CHUCK CAME LOOSE, AND I TOOK IT OFF. NEXT I SCREWED THE NEW CHUCK ON THE DRILL, INSERTED THE SCREW AND TIGHTENED IT COUNTER-CLOCKWISE, NICE AND TIGHT. THE JOB IS DONE.
Did you find this story helpful?
Thanks for voting and helping fellow customers!
The retaining screw snapped in half while I was drilling.
Thai - March 16, 2016
👍 4 of 5 people found this instruction helpful
Tool Type
Electric Drill
Difficulty
Easy
Time
Less than 15 minutes
Tools Used
Screwdriver
Parts Used
Reversed out the old half broken screw. Screw the chuck back in place and tighten Then screw in the new retaining screw. Remember it is a left hand threaded screw.
Did you find this story helpful?
Thanks for voting and helping fellow customers!
Missing chuck screw.
Juan - November 16, 2016
👍 1 of 1 people found this instruction helpful
Tool Type
Cordless Drill
Difficulty
Easy
Time
15-30 minutes
Tools Used
Screwdriver, Power Drill
Parts Used
Replaced the screw.
Did you find this story helpful?
Thanks for voting and helping fellow customers!
Defective chuck
Enrique - November 14, 2015
👍 1 of 1 people found this instruction helpful
Tool Type
Cordless Drill
Difficulty
Medium
Time
Less than 15 minutes
Tools Used
Screwdriver, Hammer
Open the chuck all the way. Remove the chuck screw in the bottom of the chuck, it is a left hand thread. Use the largest allen wrench that will fit into the chuck. Then tighten the chuck on the short end of the allen wrench. Put the drill in the low speed setting and on the drill mode. Lay the drill on a flat surface, and strike the long end of the allen wrench with a hammer. It may take a few times but the chuck will start to thread off of the spindle. Replace with the new chuck and chuck screw.
Did you find this story helpful?
Thanks for voting and helping fellow customers!
Chuck was bad
Michael - August 6, 2020
Tool Type
Cordless Drill
Difficulty
Easy
Time
Less than 15 minutes
Tools Used
Screwdriver, Allen Wrench
Parts Used
1 removed chuck screw left handed threads
2 chucked Allen wrench in chuck and broke chuck free and removed
3. Threaded new chuck on drill rechecked Allen wrench and tightens chuck on drill.
4. Installed new chuck screw.
2 chucked Allen wrench in chuck and broke chuck free and removed
3. Threaded new chuck on drill rechecked Allen wrench and tightens chuck on drill.
4. Installed new chuck screw.
Did you find this story helpful?
Thanks for voting and helping fellow customers!
Chuck retainer screw sheared off
Stephen - March 21, 2020
Tool Type
Cordless Drill
Difficulty
Easy
Time
Less than 15 minutes
Tools Used
Screwdriver
Parts Used
removed broken screw and installed new screw.
Did you find this story helpful?
Thanks for voting and helping fellow customers!
Chuck would not turn
Richard - October 9, 2019
Tool Type
Cordless Drill
Difficulty
Medium
Time
30-60 minutes
Tools Used
Screwdriver, Power Drill, Socket set, Wrench Set
Had to drill out screw that held chuck
Did you find this story helpful?
Thanks for voting and helping fellow customers!
Chuck screw broke
Michael - August 30, 2019
Tool Type
Cordless Drill
Difficulty
Easy
Time
Less than 15 minutes
Tools Used
Screwdriver
Removed old chuck screw, replaced the chuck and screw and all is well.
Did you find this story helpful?
Thanks for voting and helping fellow customers!
Chuck had froze. Could not open and close to chage bits.
James - April 1, 2019
Tool Type
Electric Drill
Difficulty
Easy
Time
Less than 15 minutes
Tools Used
Screwdriver
In my case, I had tried more than several times to get the frozen chuck to rotate in some direction. After a while, I easily rotated the chuck off the threaded shaft because the screw head had broke off. After that I used a pair of plier to get the screw threads out.
Next I rotated the new chuck to it's most open position. Then I threaded the new chuck onto the drill. After that I inserted the screw into the open chuck and onto the threaded hole. Then you turn, turn until the screw is tight (turn to the left, by the way - I forget the name for this type of thread). Next I put in my bit on and got after it. Easy, peasy. Beats buying a new drill.
Next I rotated the new chuck to it's most open position. Then I threaded the new chuck onto the drill. After that I inserted the screw into the open chuck and onto the threaded hole. Then you turn, turn until the screw is tight (turn to the left, by the way - I forget the name for this type of thread). Next I put in my bit on and got after it. Easy, peasy. Beats buying a new drill.
Did you find this story helpful?
Thanks for voting and helping fellow customers!
Load More Install Stories
OEM stands for Original Equipment Manufacturer and means the part you’re buying is sourced directly from the manufacturer who made your product. At eReplacementParts, we sell only genuine OEM parts, guaranteeing the part you’re purchasing is of better design and of higher quality than aftermarket parts.
Our product descriptions are a combination of data sourced directly from the manufacturers who made your product as well as content researched and curated by our content & customer service teams. This content is edited and reviewed internally before being made public to customers.
Our customer service team are at the ready daily to answer your part and product questions. We have a dedicated staff with decades of collective experience in helping customers just like you purchase parts to repair their products.
All our part reviews are solicited directly from other customers who have purchased this exact part. While we moderate these reviews for profanity, offensive language or personally identifiable information, these reviews are posted exactly as submitted and no alterations are made by our team.
All our customer repair instructions are solicited directly from other customers just like you who have purchased and replaced this exact part. While we moderate these reviews for profanity, offensive language or personally identifiable information, these reviews are posted exactly as submitted and no alterations are made by our team.
Based on data from past customer purchasing behaviors, these parts are most commonly purchased together along with the part you are viewing. These parts may be necessary or helpful to replace to complete your current repair.
All our installation videos are created and produced in collaboration with our in-house repair technician, Mark Sodja, who has helped millions of eReplacementParts customers over the last 13 years repair their products. Mark has years of experience in selling and repairing both commercial and residential products with a specialty in gas-powered equipment.
This data is collected from customers who submitted a repair instruction after replacing this exact part. Customers can rate how easy the repair was to complete and how long it took. We aggregate this data to provide a repair rating that allows customers to quickly determine the difficulty and time needed to perform their own repair.