


This is an Genuine OEM replacement part used on Gas-Powered Handheld Trimmers. The purpose of this part is to mix air and gas before the fuel mix goes to the engine. If the engine won't start and the tank is full of fresh fuel, test the carburetor by removing the air filter and pouring about a teaspoon of fuel into the carburetor. Pull the starter rope. If the engine starts and then quickly dies, the carburetor is likely the problem.
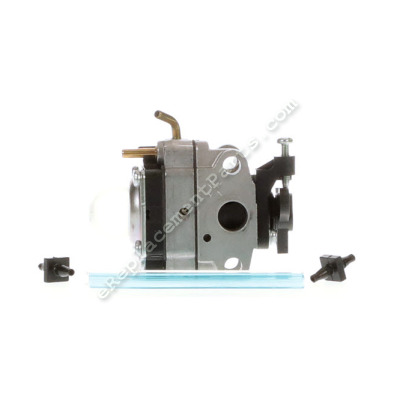
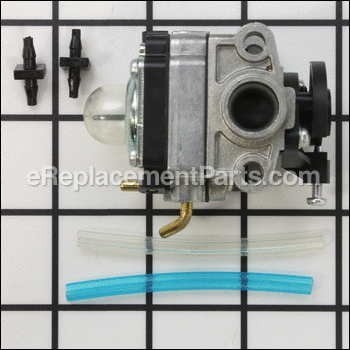
This Assembly includes a Metal Body Carburetor with Rubber Primer Bulb and Two (2) Rubber Fuel Lines. When replacing Carburetor it is advised that you also replace Carburetor Gaskets to ensure proper Air Tight Seal for optimum performance. You will need a Screwdriver to perform this repair.
Carburetor With Primer 753-1225
OEM part for: Ryobi, MTD, Troy-Bilt, Yard Man, Bolens, Cub Cadet
Part Number: 753-1225
$68.93
In Stock
Jump To:
Product Description ?
- Classification: Part
- Weight: 0.16 lbs.
- Shipping: Ships Worldwide
Frequently Purchased Together ?


Compatibility
This part will fit the following 74 machines
Ryobi
650r (41AN650G034) Handheld Trimmer View Diagrams & Manuals
825r (41AD825A734) Handheld Trimmer View Diagrams & Manuals
825r (41CD825A034) Handheld Trimmer View Diagrams & Manuals
875r (41AD875A734) Handheld Trimmer View Diagrams & Manuals
875r (41BD875A034) Handheld Trimmer View Diagrams & Manuals
875r (41CD875A034) Handheld Trimmer View Diagrams & Manuals
890 (41CD890A034) Handheld Trimmer View Diagrams & Manuals
890r (41AD890A034) Handheld Trimmer View Diagrams & Manuals
890r (41AD890A734) Handheld Trimmer View Diagrams & Manuals
890r (41BD890A034) Handheld Trimmer View Diagrams & Manuals
890r (41CD890A034) Handheld Trimmer View Diagrams & Manuals
890r (41CD890G034) Handheld Trimmer View Diagrams & Manuals
825RA (41CD825C038) 4-Cycle Gas Trimmer View Diagrams & Manuals
MTD
MP425 (41BD425C995) String Trimmer View Diagrams & Manuals
MTD14421AA144R978 (2009) Tiller View Diagrams & Manuals
21AA144R900 Walk Behind Tiller View Diagrams & Manuals
41AD26OG900 Handheld Trimmer View Diagrams & Manuals
41AD26CC900 Handheld Trimmer View Diagrams & Manuals
41AD26SC900 Handheld Trimmer View Diagrams & Manuals
41BD26SC900 Handheld Trimmer View Diagrams & Manuals
41CD26SC900 Handheld Trimmer View Diagrams & Manuals
875R (2004) Gas Trimmer 41AD875A734 View Diagrams & Manuals
650R (41AN650G034) Trimmer View Diagrams & Manuals
825R (41AD825A734 2004) Trimmer View Diagrams & Manuals
825R (41CD825A034) Trimmer View Diagrams & Manuals
875R (41CD875A034) Trimmer View Diagrams & Manuals
875R (41BD875A034) Trimmer View Diagrams & Manuals
890 (41CD890A034 2004) Trimmer View Diagrams & Manuals
890R (41AD890A034) Trimmer View Diagrams & Manuals
890R (41AD890A734 2004) Trimmer View Diagrams & Manuals
890R (41BD890A034) Trimmer View Diagrams & Manuals
890R (41CD890A034) Trimmer View Diagrams & Manuals
890R (41CD890G034) Trimmer View Diagrams & Manuals
Troy-Bilt
21BA144R966 (2007) TB144 Cultivator View Diagrams & Manuals
21BA144R966 (2008) TB144 Cultivator View Diagrams & Manuals
21CA144R966 (2009) TB144 Cultivator View Diagrams & Manuals
21AA144R966 (2006) TB144 Cultivator View Diagrams & Manuals
TB26CO (41AD26OG966) Gas Trimmer View Diagrams & Manuals
TB415CS (41ADT41C711) Gas Trimmer View Diagrams & Manuals
TB415CS (41BDT41G966) Gas Trimmer View Diagrams & Manuals
TB490BC (41ADT49C063) Gas Trimmer View Diagrams & Manuals
TB415CS (Super Bronco)(41ADT41C966) Gas Trimmer View Diagrams & Manuals
TB465SS (41ADT46C711) Gas Trimmer View Diagrams & Manuals
TB465SS (Pony)(41ADT46C966) Gas Trimmer View Diagrams & Manuals
TB475SS (41ADT47C063) Gas Trimmer View Diagrams & Manuals
21BA144R966 (TB144) (2009) Cultivator View Diagrams & Manuals
21CA144R966 (TB144) (2009) Cultivator View Diagrams & Manuals
41ADT41C966 (TB415CS) Super Bronco Super Bronco Handheld Gas Trimmer View Diagrams & Manuals
41ADT46C966 (TB465SS) Pony Pony Handheld Gas Trimmer View Diagrams & Manuals
Yard Man
YM141 (21A-141R901) Tiller View Diagrams & Manuals
YM21SS (41AD26SC701) Trimmer View Diagrams & Manuals
YM26CO (41AD26OG701) Trimmer View Diagrams & Manuals
YM26SS (41AD26SC401) Trimmer View Diagrams & Manuals
YM26SS (41AD26SC901) Trimmer View Diagrams & Manuals
YM26BC (41AD26BC401) Trimmer View Diagrams & Manuals
YM26BC (41AD26BC701) Trimmer View Diagrams & Manuals
YM26BC (41AD26BC901) Trimmer View Diagrams & Manuals
YM26CO (41AD26OG401) Trimmer View Diagrams & Manuals
YM26CO (41AD26OG901) Trimmer View Diagrams & Manuals
YM26CS (41AD26CC401) Trimmer View Diagrams & Manuals
YM26CS (41AD26CC701) Trimmer View Diagrams & Manuals
YM26CS (41AD26CC901) Trimmer View Diagrams & Manuals
YM21SS 41ad26sc701 Gas String Trimmer View Diagrams & Manuals
YM260CO 41ad26og701 Gas String Trimmer View Diagrams & Manuals
YM141 21a-141r901 Tiller View Diagrams & Manuals
Bolens
BL26BC 41AD26BC965 Gas String Trimmer View Diagrams & Manuals
BL26CO 41AD02OG965 Gas String Trimmer View Diagrams & Manuals
BL26CO 41AD26OG965 Gas String Trimmer View Diagrams & Manuals
BL26SS 41AD26SC965 Gas String Trimmer View Diagrams & Manuals
Cub Cadet
CC4065SS (41AD465C910) (2006) Gas String Trimmer View Diagrams & Manuals
CC4065SS (41AD465C910) (2007) Gas String Trimmer View Diagrams & Manuals
CC4065SS (41AD465C910) (2008) Gas String Trimmer View Diagrams & Manuals
GC145 (21BK145G912) (2010) 21BK145G Tiller View Diagrams & Manuals
GC145 (21BK145G912) (2011) 21BK145G Tiller View Diagrams & Manuals
Show More Compatible Models
This item works with the following types of products:
- Trimmer Parts
- Cultivator Parts
Repair Videos ?

Articles:
|
Replacing primer bulbs in small engines is one of the most common types of tool repairs, and this article explains profe...
June 25, 2010
|

Customer Part Reviews ?
Average Rating (out of 5):
Click to filter by ratings:
5 stars
9
4 stars
0
3 stars
0
2 stars
0
1 stars
0
< PREV
- 1
Customer service is good. Everything went great. Thanks for your help. Have a good day.
Everything was good. Everything was great. I enjoyed dealing with you. Hope to deal with you again in the future.
Guest -
March 16, 2024
Verified Purchase
Toro weedeater
The carb. I received worked perfectly compared to the off brand I purchased previously that would not function properly.
Guest -
June 2, 2022
Verified Purchase
Exact fit
Quick response, correct part, packaged well and in excellent condition.
Guest -
May 19, 2022
Verified Purchase
Exactly what my weed whacker needed.
I've ordered several items from ereplacementparts and have been pleased every time. Thanks
Gordon -
May 11, 2021
Verified Purchase
Great and fast
Fast and easy received it in 3-4 days like they said I ft took 5 minutes to put it on works perfectly
Guest -
April 30, 2020
Verified Purchase
New carb
Perfect fitment, came with exactly what I needed except a gasket (mine was still in great shape) runs perfectly.
Guest -
April 25, 2020
Verified Purchase
Received part on time. Worked first time I primed the carb.
Worked first time I primed the carb. No adjustment needed for idle RPM.
Guest -
July 8, 2019
Verified Purchase
worked as it should
weed eater running great
Guest -
June 22, 2019
Verified Purchase
Fixed the problem
Great part, easy to install (just 2 screws with a TroyBilt weed wacker.) The machined fired up after only 2 pulls and ran great! Carburetors are temper-mental devices and the small ones tend to fail after 4 or 5 years, even sooner if the lay-up maintenance for winter storage is not done. This one is an OEM replacement and I was really satisfied with it.
Guest -
June 17, 2019
Verified Purchase
t
t
t -
t days ago
Verified Purchase
eReplacementParts Team
t
Questions & Answers ?
Our customer Service team is at the ready daily to answer your part and product questions.

Ask our Team
We have a dedicated staff with decades of collective experience in helping customers just like you purchase parts to repair their products.
Does this fit my product?Questions & Answers for Carburetor With Primer
No questions have been asked yet
Customer Repair Instructions ?
All our customer repair instructions are solicited directly from other customers just like you who have purchased and replaced this exact part.
Engine would start and quickly quit
William - June 6, 2016
👍 10 of 11 people found this instruction helpful
Tool Type
Trimmer
Difficulty
Medium
Time
30-60 minutes
Tools Used
Screwdriver, Pliers, Power Drill, Socket set, Wire cutters
Parts Used
Checked spark. Good spark. Checked fuel flow into and out of carb. Good. Engine symptoms seemed to point to carb but could find no foreign debris in carb. No carb kit available so ordered new carb. New carb arrived very quickly even though I live on an island in PNW. Removed original carb. Found new carb throttle cable hole too small. Drilled out to fit with no problem. Mounted new carb with throttle cable attached with ease. Fuel lines required some sort of keeper whereas old carb was ridged to retain solid fit. Used stainless wire to compress fuel lines on carb pipes but will probably have to replace them in near future as wire cut into them. Engine started and continued to run but seemed to be a little lean with no choke. With about 1/3 choke it runs very well.I.. I'll leave the settings as they are for now. I am not a small engine mechanic. Repair was much better than just tossing what seemed to be basically a good engine. Very cost effective over the shop or a new power head. Very pleased.
Did you find this story helpful?
Thanks for voting and helping fellow customers!
Trimmer wouldn't stay running.
Jim - May 31, 2016
👍 5 of 5 people found this instruction helpful
Tool Type
Trimmer
Difficulty
Easy
Time
15-30 minutes
Tools Used
Screwdriver, Torx wrench set
Parts Used
Replaced carburetor by removing the air cleaner, then by removing the fuel lines and throttle. Then loosening two screws and removing the old carburetor. Then assembling in reverse order. Very simple.This was on a Ryobi trimmer.
Did you find this story helpful?
Thanks for voting and helping fellow customers!
Primer dried out
Walter - May 17, 2016
👍 4 of 5 people found this instruction helpful
Tool Type
Trimmer
Difficulty
Easy
Time
Less than 15 minutes
Tools Used
Screwdriver
Parts Used
Take off the filter cover and filter. Take off the gas lines and the throttle from the carburetor. Remove the two screws hold the carburetor. Take the old carburetor off and put the new one on, and screw in the screws. Put the gas lines and throttle on. Put the air filter and cover on.
Did you find this story helpful?
Thanks for voting and helping fellow customers!
Started but stalled right away
Raymond - August 2, 2017
👍 2 of 2 people found this instruction helpful
Tool Type
Trimmer
Difficulty
Medium
Time
15-30 minutes
Tools Used
Screwdriver
Parts Used
Removed the air cleaner
Removed the gas lines and throttle from the old carburetor
Removed the screws holding the old carburetor on
Installed the gas lines and throttle to the new carburetor
Secured the new carburetor with the screws
Installed the air cleaner
Removed the gas lines and throttle from the old carburetor
Removed the screws holding the old carburetor on
Installed the gas lines and throttle to the new carburetor
Secured the new carburetor with the screws
Installed the air cleaner
Did you find this story helpful?
Thanks for voting and helping fellow customers!
carburetor
Marty - July 15, 2021
Tool Type
Trimmer
Difficulty
Easy
Time
30-60 minutes
Tools Used
Screwdriver
remove old one .....replace with new one ... very straight forward.........
Did you find this story helpful?
Thanks for voting and helping fellow customers!
needed a carburetor
Randy - May 8, 2021
Tool Type
Trimmer
Difficulty
Easy
Time
15-30 minutes
Tools Used
Screwdriver, Pliers
1.Removed the old carburetor.
2.Installed the new carburetor.
3. Started it.
4.Adjusted the idle.
2.Installed the new carburetor.
3. Started it.
4.Adjusted the idle.
Did you find this story helpful?
Thanks for voting and helping fellow customers!
Intake port of carburetor broke off.
John - September 11, 2020
Tool Type
Cultivator
Difficulty
Easy
Time
30-60 minutes
Tools Used
Screwdriver, Pliers, Socket set, Nutdriver
Parts Used
Replaced the carburetor and fuel lines and filter
Did you find this story helpful?
Thanks for voting and helping fellow customers!
Gunned up carburetor
David - July 8, 2020
Tool Type
Trimmer
Difficulty
Easy
Time
Less than 15 minutes
Tools Used
Screwdriver, Pliers
Removed old carburetor. Installed new one. Performed ops check. Weed whacker ops check good!
Did you find this story helpful?
Thanks for voting and helping fellow customers!
Primer bulb cracked
Ronald - July 9, 2019
Tool Type
Cultivator
Difficulty
Easy
Time
30-60 minutes
Tools Used
Socket set
Parts Used
Removed the bad carb and installed new one. Primed carb, started on first pull. Did not have to adjust the carb.
Ron
Ron
Did you find this story helpful?
Thanks for voting and helping fellow customers!
Troybilt not starting
Christpher - June 10, 2017
Tool Type
Cultivator
Difficulty
Easy
Time
Less than 15 minutes
Tools Used
Socket set
Parts Used
1. Removed the filter that is attached to the carburetor and located 2 bolts holding the cover to the main body.
2. Loosened the nuts alternating each one so it comes off even.
3. Disconnected the throttle cable from the old carburetor and keept the cardboard seal for the replacement carburetor.
4. Reverse the order of taking off and put on the new carburetor.
5. Started up after priming.
2. Loosened the nuts alternating each one so it comes off even.
3. Disconnected the throttle cable from the old carburetor and keept the cardboard seal for the replacement carburetor.
4. Reverse the order of taking off and put on the new carburetor.
5. Started up after priming.
Did you find this story helpful?
Thanks for voting and helping fellow customers!
Load More Install Stories
OEM stands for Original Equipment Manufacturer and means the part you’re buying is sourced directly from the manufacturer who made your product. At eReplacementParts, we sell only genuine OEM parts, guaranteeing the part you’re purchasing is of better design and of higher quality than aftermarket parts.
Our product descriptions are a combination of data sourced directly from the manufacturers who made your product as well as content researched and curated by our content & customer service teams. This content is edited and reviewed internally before being made public to customers.
Our customer service team are at the ready daily to answer your part and product questions. We have a dedicated staff with decades of collective experience in helping customers just like you purchase parts to repair their products.
All our part reviews are solicited directly from other customers who have purchased this exact part. While we moderate these reviews for profanity, offensive language or personally identifiable information, these reviews are posted exactly as submitted and no alterations are made by our team.
All our customer repair instructions are solicited directly from other customers just like you who have purchased and replaced this exact part. While we moderate these reviews for profanity, offensive language or personally identifiable information, these reviews are posted exactly as submitted and no alterations are made by our team.
Based on data from past customer purchasing behaviors, these parts are most commonly purchased together along with the part you are viewing. These parts may be necessary or helpful to replace to complete your current repair.
All our installation videos are created and produced in collaboration with our in-house repair technician, Mark Sodja, who has helped millions of eReplacementParts customers over the last 13 years repair their products. Mark has years of experience in selling and repairing both commercial and residential products with a specialty in gas-powered equipment.
This data is collected from customers who submitted a repair instruction after replacing this exact part. Customers can rate how easy the repair was to complete and how long it took. We aggregate this data to provide a repair rating that allows customers to quickly determine the difficulty and time needed to perform their own repair.