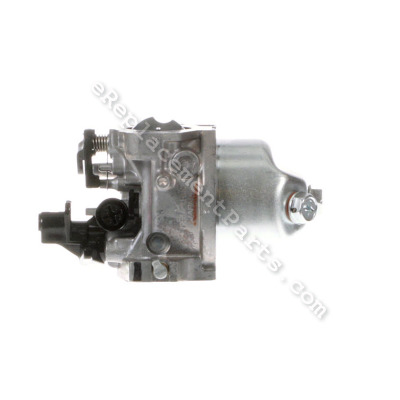


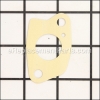
This is an authentic part that is supplied directly from the original equipment manufacturer for Honda engines. The carburetor mixes air and gas before the fuel mix goes to the engine. This part comes with the carburetor assembly, as well as the carburetor gasket. Let the engine cool and drain the gas tank before starting this repair. You may need screw drivers and pliers to aid you in this repair.
Carburetor Assembly - Be52b D 16100-ZG9-M12
OEM part for: Honda
Part Number: 16100-ZG9-M12
$64.58
In Stock
Jump To:
Frequently Purchased Together ?


Compatibility
This part will fit the following 46 machines
Honda
GXV140 (Type N2TB)(VIN# GJAB-6000001-7999999) Small Engine View Diagrams & Manuals
GXV140 (Type N2TA)(VIN# GJAB-6000001-7999999) Small Engine View Diagrams & Manuals
HR215K1 (Type HMA)(VIN# MZAM-6200001) Lawn Mower View Diagrams & Manuals
HR215K1 (Type HXA)(VIN# MZAM-6200001) Lawn Mower View Diagrams & Manuals
HR215K1 (Type SXA)(VIN# MZAM-6200001) Lawn Mower View Diagrams & Manuals
HRB215K1 (Type PXA)(VIN# MZBA-6100001 to MZBA-6199999) Lawn Mower View Diagrams & Manuals
HRB215K1 (Type SXA)(VIN# MZBA-6100001 to MZBA-6199999) Lawn Mower View Diagrams & Manuals
HRB215K2 (Type HXA)(VIN# MZBA-6200001 to MZBA-6299999) Lawn Mower View Diagrams & Manuals
HRB215K2 (Type PXA)(VIN# MZBA-6200001 to MZBA-6299999) Lawn Mower View Diagrams & Manuals
HRB215K2 (Type SDA)(VIN# MZBA-6200001 to MZBA-6299999) Lawn Mower View Diagrams & Manuals
HRB215K2 (Type SXA)(VIN# MZBA-6200001 to MZBA-6299999) Lawn Mower View Diagrams & Manuals
HRB215K3 (Type HXA)(VIN# MZBA-6300001 to MZBA-6373579) Lawn Mower View Diagrams & Manuals
HRB215K3 (Type HXA/A)(VIN# MZBA-6373580) Lawn Mower View Diagrams & Manuals
HRB215K3 (Type SDA)(VIN# MZBA-6300001 to MZBA-6399999) Lawn Mower View Diagrams & Manuals
HRB215K3 (Type SXA)(VIN# MZBA-6300001 to MZBA-6363599) Lawn Mower View Diagrams & Manuals
HRB215K3 (Type SXA/A)(VIN# MZBA-6363600) Lawn Mower View Diagrams & Manuals
HRB215K4 (Type HXA)(VIN# MZBA-6400001 to MZBA-6427366) Lawn Mower View Diagrams & Manuals
HRB215K4 (Type HXA/A)(VIN# MZBA-6427367) Lawn Mower View Diagrams & Manuals
HRB215K4 (Type SDA)(VIN# MZBA-6400001) Lawn Mower View Diagrams & Manuals
HRB215K4 (Type SXA)(VIN# MZBA-6400001 to MZBA-6424321) Lawn Mower View Diagrams & Manuals
HRB215K4 (Type SXA/A)(VIN# MZBA-6424322) Lawn Mower View Diagrams & Manuals
HRC215K1 (Type PDA)(VIN# MZAU-6100001 to MZAU-9999999) Lawn Mower View Diagrams & Manuals
HRC215K1 (Type SDA)(VIN# MZAU-6100001 to MZAU-9999999) Lawn Mower View Diagrams & Manuals
HRC215K1 (Type SXA)(VIN# MZAU-6100001 to MZAU-9999999) Lawn Mower View Diagrams & Manuals
HRM195 (Type PA)(VIN# MZBV-6000001) Lawn Mower View Diagrams & Manuals
HRM215K1 (Type PDA)(VIN# MZBB-6200001 to MZBB-6299999) Lawn Mower View Diagrams & Manuals
HRM215K1 (Type PXA)(VIN# MZBB-6200001 to MZBB-6299999) Lawn Mower View Diagrams & Manuals
HRM215K1 (Type SDA)(VIN# MZBB-6200001 to MZBB-6299999) Lawn Mower View Diagrams & Manuals
HRM215K1 (Type SXA)(VIN# MZBB-6200001 to MZBB-6299999) Lawn Mower View Diagrams & Manuals
HRM215K2 (Type HXA)(VIN# MZBB-6300001 to MZBB-6399999) Lawn Mower View Diagrams & Manuals
HRM215K2 (Type PDA)(VIN# MZBB-6300001 to MZBB-6399999) Lawn Mower View Diagrams & Manuals
HRM215K2 (Type PXA)(VIN# MZBB-6300001 to MZBB-6399999) Lawn Mower View Diagrams & Manuals
HRM215K2 (Type SDA)(VIN# MZBB-6300001 to MZBB-6399999) Lawn Mower View Diagrams & Manuals
HRM215K2 (Type SXA)(VIN# MZBB-6300001 to MZBB-6399999) Lawn Mower View Diagrams & Manuals
HRM215K3 (Type HXA)(VIN# MZBB-6400001 to MZBB-6452724) Lawn Mower View Diagrams & Manuals
HRM215K3 (Type HXA/A)(VIN# MZBB-6452725) Lawn Mower View Diagrams & Manuals
HRM215K3 (Type PDA)(VIN# MZBB-6400001 to MZBB-6499999) Lawn Mower View Diagrams & Manuals
HRM215K3 (Type SDA)(VIN# MZBB-6400001 to MZBB-6499999) Lawn Mower View Diagrams & Manuals
HRM215K3 (Type SXA)(VIN# MZBB-6400001 to MZBB-6450804) Lawn Mower View Diagrams & Manuals
HRM215K3 (Type SXA/A)(VIN# MZBB-6450805) Lawn Mower View Diagrams & Manuals
HRM215K4 (Type HXA)(VIN# MZBB-6500001 to MZBB-6507200) Lawn Mower View Diagrams & Manuals
HRM215K4 (Type HXA/A)(VIN# MZBB-6507201) Lawn Mower View Diagrams & Manuals
HRM215K4 (Type PDA)(VIN# MZBB-6500001) Lawn Mower View Diagrams & Manuals
HRM215K4 (Type SDA)(VIN# MZBB-6500001) Lawn Mower View Diagrams & Manuals
HRM215K4 (Type SXA)(VIN# MZBB-6500001 to MZBB-6507200) Lawn Mower View Diagrams & Manuals
HRM215K4 (Type SXA/A)(VIN# MZBB-6507201) Lawn Mower View Diagrams & Manuals
Show More Compatible Models
This item works with the following types of products:
- Engine Parts
- Lawn Mower Parts
This part replaces obsolete part #: 16100-ZG9-M11, 16100-ZG9-M10
Customer Part Reviews ?
Average Rating (out of 5):
Click to filter by ratings:
5 stars
0
4 stars
0
3 stars
1
2 stars
0
1 stars
0
< PREV
- 1
carb. flooded out but took apart and fixed it.
received carb and installed it, then had to remove thew carb for severely flooding fuel out of it, removed the carb then pulled bowl from carb and found the float stuck down and removed float and needle from carb body and flushed it with carb cleaner then reinstalled float and needle installed carb back on motor and it no longer flooded, started mower and it ran correctly with no flooding.
Donald -
September 3, 2019
Verified Purchase
t
t
t -
t days ago
Verified Purchase
eReplacementParts Team
t
Questions & Answers ?
Our customer Service team is at the ready daily to answer your part and product questions.

Ask our Team
We have a dedicated staff with decades of collective experience in helping customers just like you purchase parts to repair their products.
Does this fit my product?Questions & Answers for Carburetor Assembly - Be52b D
No questions have been asked yet
Customer Repair Instructions ?
All our customer repair instructions are solicited directly from other customers just like you who have purchased and replaced this exact part.
Engine would not start.
Dennis - June 2, 2018
👍 3 of 3 people found this instruction helpful
Tool Type
Engine
Difficulty
Medium
Time
15-30 minutes
Tools Used
Screwdriver, Pliers, Socket set
1. Removed air cleaner assembly to expose the carburetor and the two nuts that attach it to the engine block.
2. Removed the two nuts to allow the carburetor to be moved away from the engine.
3. Using a small pair of vise grip pliers, gently place and lock them onto the rubber fuel line to squeeze the fuel line closed. This will aid in removing the fuel line from the carburetor and won't allow any gasoline in the line or fuel tank to leak out.
4. Use a flat blade screwdriver to push the fuel line off the carburetor, while gently pulling and twisting the fuel line with the attached vise grip pliers.
5. With the fuel line now disconnected, remove the throttle and governor linkage.
6. Pull the old carburetor away from the engine and replace it with the new one, making sure that all gaskets are installed correctly and by reversing these instructions. (Attach throttle/governor linkage, slide the fuel line back onto the new carburetor, remove the vice grips, secure the carburetor to the engine with the two attachment nuts.)
7. Inspect the air cleaner element/filter and clean or replace as needed.
8. Make sure that the fuel tank has fresh, clean gasoline and you're ready to get mowing!
Did you find this story helpful?
Thanks for voting and helping fellow customers!
would not start ......only run on Starting fluid.
Steve - April 7, 2021
Tool Type
Engine
Difficulty
Medium
Time
15-30 minutes
Tools Used
Pliers, Socket set, Wrench Set
replaced old carb and gaskets. Started first pull I always replace carbs rather than try to repair........I have always had great luck with the parts you have provided whether it for lawn and garden equipment or household appliances.
Thansk
Steve
Thansk
Steve
Did you find this story helpful?
Thanks for voting and helping fellow customers!
would not start.
Donald - September 4, 2019
Tool Type
Engine
Difficulty
Easy
Time
15-30 minutes
Tools Used
Screwdriver, Pliers, Nutdriver
removed carburetor from motor and installed new one, filled mower with gas started mower run great.
Did you find this story helpful?
Thanks for voting and helping fellow customers!
Lawn mower would not start.
Ben - June 18, 2016
👍 2 of 4 people found this instruction helpful
Tool Type
Lawn Mower
Difficulty
Easy
Time
Less than 15 minutes
Tools Used
Socket set
1. Removed the air cleaner assembly from the lawn mower.
2. Removed the throttle wires and governor rod from the old carburetor.
3. Removed the old carburetor.
4. Installed the new carburetor assembly.
5. Re-attached the throttle wires and governor rod to the new carburetor assembly.
6. Attached the air cleaner assembly.
7. Started the mower.
2. Removed the throttle wires and governor rod from the old carburetor.
3. Removed the old carburetor.
4. Installed the new carburetor assembly.
5. Re-attached the throttle wires and governor rod to the new carburetor assembly.
6. Attached the air cleaner assembly.
7. Started the mower.
Did you find this story helpful?
Thanks for voting and helping fellow customers!
Carburetor had failed due to wrong fuel
David - June 2, 2017
👍 0 of 1 people found this instruction helpful
Tool Type
Engine
Difficulty
Medium
Time
15-30 minutes
Tools Used
Socket set
Remove the complete air filter, remove the throttle and spring.
Clamp the fuel line
Remove the old carburetor
Assemble in reverse order
Clamp the fuel line
Remove the old carburetor
Assemble in reverse order
Did you find this story helpful?
Thanks for voting and helping fellow customers!
OEM stands for Original Equipment Manufacturer and means the part you’re buying is sourced directly from the manufacturer who made your product. At eReplacementParts, we sell only genuine OEM parts, guaranteeing the part you’re purchasing is of better design and of higher quality than aftermarket parts.
Our product descriptions are a combination of data sourced directly from the manufacturers who made your product as well as content researched and curated by our content & customer service teams. This content is edited and reviewed internally before being made public to customers.
Our customer service team are at the ready daily to answer your part and product questions. We have a dedicated staff with decades of collective experience in helping customers just like you purchase parts to repair their products.
All our part reviews are solicited directly from other customers who have purchased this exact part. While we moderate these reviews for profanity, offensive language or personally identifiable information, these reviews are posted exactly as submitted and no alterations are made by our team.
All our customer repair instructions are solicited directly from other customers just like you who have purchased and replaced this exact part. While we moderate these reviews for profanity, offensive language or personally identifiable information, these reviews are posted exactly as submitted and no alterations are made by our team.
Based on data from past customer purchasing behaviors, these parts are most commonly purchased together along with the part you are viewing. These parts may be necessary or helpful to replace to complete your current repair.
All our installation videos are created and produced in collaboration with our in-house repair technician, Mark Sodja, who has helped millions of eReplacementParts customers over the last 13 years repair their products. Mark has years of experience in selling and repairing both commercial and residential products with a specialty in gas-powered equipment.
This data is collected from customers who submitted a repair instruction after replacing this exact part. Customers can rate how easy the repair was to complete and how long it took. We aggregate this data to provide a repair rating that allows customers to quickly determine the difficulty and time needed to perform their own repair.