
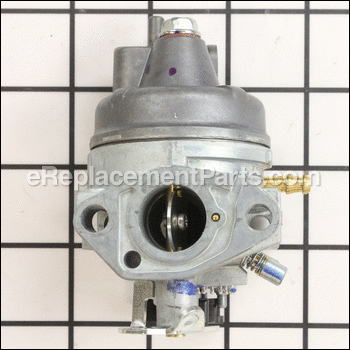
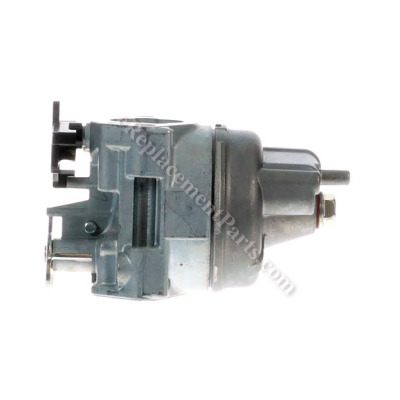


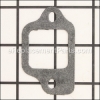
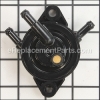
This is an Original Manufacturer Approved Carburetor Assembly used on a variety of Honda Small Engines. It has a Metal Body and it is Sold Individually. The purpose of this part is to mix air and gas before the fuel mix goes to the engine. If the engine won\\\'t start and the tank is full of fresh fuel, test the carburetor by removing the air filter and pouring about a teaspoon of fuel into the carburetor. Pull the starter rope. If the engine starts and then quickly dies, the carburetor is likely the problem.
Carburetor Assembly 16100-Z0J-013
OEM part for: Honda
Part Number: 16100-Z0J-013
$40.70
In Stock
Jump To:
Frequently Purchased Together ?


Compatibility
This part will fit the following 55 machines
Honda
GC160 (Type PHA)(VIN# GCAH-1000001-9999999) Small Engine View Diagrams & Manuals
GC160 (Type PXA)(VIN# GCAH-1000001-9999999) Small Engine View Diagrams & Manuals
GC160 (Type QBC)(VIN# GCAH-1000001-9999999) Small Engine View Diagrams & Manuals
GC160 (Type QHA)(VIN# GCAH-1000001-9999999) Small Engine View Diagrams & Manuals
GC160 (Type QHA1)(VIN# GCAH-1000001-9999999) Small Engine View Diagrams & Manuals
GC160 (Type QHA2)(VIN# GCAH-1000001-9999999) Small Engine View Diagrams & Manuals
GC160 (Type QHAJ)(VIN# GCAH-1000001-9999999) Small Engine View Diagrams & Manuals
GC160 (Type WKT2)(VIN# GCAH-1000001-9999999) Small Engine View Diagrams & Manuals
GC160 (Type WME2)(VIN# GCAH-1000001-9999999) Small Engine View Diagrams & Manuals
GC160A (Type DEAF)(VIN# GCAHA-8000001) Small Engine View Diagrams & Manuals
GC160A (Type DHAF)(VIN# GCAHA-1000001-3599749) Small Engine View Diagrams & Manuals
GC160A (Type MEA2)(VIN# GCAHA-8000001-9999999) Small Engine View Diagrams & Manuals
GC160A (Type MHA2)(VIN# GCAHA-1000001-3599749) Small Engine View Diagrams & Manuals
GC160A (Type PHA)(VIN# GCAHA-1000001-3599749) Small Engine View Diagrams & Manuals
GC160A (Type QBC)(VIN# GCAHA-1000001-3599749) Small Engine View Diagrams & Manuals
GC160A (Type QDE)(VIN# GCAHA-1000001-3599749) Small Engine View Diagrams & Manuals
GC160A (Type QEA)(VIN# GCAHA-8000001) Small Engine View Diagrams & Manuals
GC160A (Type QHA)(VIN# GCAHA-1000001-3599749) Small Engine View Diagrams & Manuals
GC160A (Type QHA1)(VIN# GCAHA-1000001-3599749) Small Engine View Diagrams & Manuals
GC160A (Type QHA2)(VIN# GCAHA-1000001-3599749) Small Engine View Diagrams & Manuals
GC160A (Type QHAF)(VIN# GCAHA-1000001-3599749) Small Engine View Diagrams & Manuals
GC160A (Type QHAJ)(VIN# GCAHA-1000001-3599749) Small Engine View Diagrams & Manuals
GC160A (Type VHA)(VIN# GCAHA-1000001-3599749) Small Engine View Diagrams & Manuals
GC160A (Type VXA)(VIN# GCAHA-1000001-3599749) Small Engine View Diagrams & Manuals
GC160LA (Type DHAF)(VIN# GCAHA-3599750-8000000) Small Engine View Diagrams & Manuals
GC160LA (Type MHA2)(VIN# GCAHA-3599750-8000000) Small Engine View Diagrams & Manuals
GC160LA (Type MHAB)(VIN# GCAHA-3599750-8000000) Small Engine View Diagrams & Manuals
GC160LA (Type QHA1)(VIN# GCAHA-3599750-8000000) Small Engine View Diagrams & Manuals
GC160LA (Type QHA2)(VIN# GCAHA-3599750-8000000) Small Engine View Diagrams & Manuals
GC160LA (Type QHAF)(VIN# GCAHA-3599750-8000000) Small Engine View Diagrams & Manuals
GC160LA (Type QHAJ)(VIN# GCAHA-3599750-8000000) Small Engine View Diagrams & Manuals
GC160LA (Type QHC)(VIN# GCAHA-3599750-8000000) Small Engine View Diagrams & Manuals
GC160LA (Type VHA)(VIN# GCAHA-3599750-8000000) Small Engine View Diagrams & Manuals
GC160LA (Type VXA)(VIN# GCAHA-3599750-8000000) Small Engine View Diagrams & Manuals
GC160LE (Type VXA)(VIN# GCABE-1000001) Small Engine View Diagrams & Manuals
GC160 (Type VHA)(VIN# GCAH-1000001-9999999) Small Engine View Diagrams & Manuals
GC160 (Type VXA)(VIN# GCAH-1000001-9999999) Small Engine View Diagrams & Manuals
GC160A (Type QEA2)(VIN# GCAHA-8000001-9999999) Small Engine View Diagrams & Manuals
GC160A (Type QEAF)(VIN# GCAHA-8000001-9999999) Small Engine View Diagrams & Manuals
GC160LA (Type QBC)(VIN# GCAHA-3599750-8000000) Small Engine View Diagrams & Manuals
GC160LA (Type QDE)(VIN# GCAHA-3599750-8000000) Small Engine View Diagrams & Manuals
GC160LA (Type QHA)(VIN# GCAHA-3599750-8000000) Small Engine View Diagrams & Manuals
GC160LA (Type PHA)(VIN# GCAHA-3599750-9999999) Engine View Diagrams & Manuals
GC160LA (Type QHG)(VIN# GCAHA-3599750-9999999) Engine View Diagrams & Manuals
FG400 (Type A1)(VIN# GCAJ-1000001-9999999) Tiller View Diagrams & Manuals
FG500 (Type A1)(VIN# GCAH-1000001-9999999) Tiller View Diagrams & Manuals
FG500 (Type A2)(VIN# GCAH-1000001-9999999) Tiller View Diagrams & Manuals
WN20 (Type AX1)(VIN# GCAJ-1000001-9999999) Water Pump View Diagrams & Manuals
WN30 (Type AX1)(VIN# GCAH-1000001-9999999) Water Pump View Diagrams & Manuals
EN2000 (Type A)(VIN# GCAH-1000001-9999999) Generator View Diagrams & Manuals
EN2000 (Type AL)(VIN# GCAH-1000001-9999999) Generator View Diagrams & Manuals
EN2500 (Type A)(VIN# GCAH-1000001-9999999) Generator View Diagrams & Manuals
EN2500 (Type AL)(VIN# GCAH-1000001-9999999) Generator View Diagrams & Manuals
EN2500 (Type AL/A)(VIN# GCAHA-1000001-9999999) Generator View Diagrams & Manuals
EN2500 (Type AN)(VIN# GCAHA-1000001-9999999) Generator View Diagrams & Manuals
Show More Compatible Models
This item works with the following types of products:
- Engine Parts
This part replaces obsolete part #: 16100-Z0J-003, 16100-ZL8-803, 16100-ZL8-802
Customer Part Reviews ?
Average Rating (out of 5):
Click to filter by ratings:
5 stars
5
4 stars
0
3 stars
0
2 stars
0
1 stars
0
< PREV
- 1
Easy replacement
Part worked great
Guest -
May 7, 2020
Verified Purchase
easy fix, works good as new.
received my order quickly, and now my rotor tiller works just like new
Guest -
April 20, 2020
Verified Purchase
easy fix
With the help of the companies staff they were able to determine which carburetor was need for my 2002 Honda GC160 pressure washer engine. Installed easily and after about three pulls, it was running like new. Thanks to the staff for the help!
Guest -
September 24, 2019
Verified Purchase
Great!
Perfect fit, works great, shipping very good!
Colleen -
September 4, 2019
Verified Purchase
great part
this arrived very fast and in good shape.
Guest -
April 30, 2019
Verified Purchase
t
t
t -
t days ago
Verified Purchase
eReplacementParts Team
t
Questions & Answers ?
Our customer Service team is at the ready daily to answer your part and product questions.

Ask our Team
We have a dedicated staff with decades of collective experience in helping customers just like you purchase parts to repair their products.
Does this fit my product?Questions & Answers for Carburetor Assembly
No questions have been asked yet
Customer Repair Instructions ?
All our customer repair instructions are solicited directly from other customers just like you who have purchased and replaced this exact part.
Honda GC160, would ONLY run when CHOKE was on,
ROBERT - April 16, 2016
👍 49 of 51 people found this instruction helpful
Tool Type
Engine
Difficulty
Easy
Time
15-30 minutes
Tools Used
Screwdriver, Socket set, 1/4 drive socket set, 10mm socket
My Honda GC160 5hp for my pressure washer was left outside under a deck all winter.
When I went to start it , it took a while, but once stared would only run whit the choke on, as soon as I pushed the choke back in , it would die. Main Carb circuit/jet plugged, or gas problem from sitting all winter. I pulled the fuel bowl, a little gunk in it , cleaned, flushed, air pressure dried, reassembled. Still same problem ! I did this 4 times, even unscrewing and blowing out the main jet with compressed air from my compressor. Still the same !!! a little better ,It would run until the choke was 1/2 way back in. BUT , still not good enough for pressure washing. So I did a search ,I found others had this problem, they changed the carburetor and problem gone. So I then ordered the carburetor , and gaskets and plastic insulator form ereplacements. Good Price ! Quick Shipping !
Once it arrived I pulled the parts out , well wrapped, No bent gaskets !!! , You will have to remove the fuel tank, drain it into a container, not into the gravel or drive and have it run down the sewer. I then replaced the carburetor on the motor, making sure to replace the gaskets, all it takes is a 10mm socket and a long screwdriver to hold the Plastic Insulator and gaskets in place, as you install the bolts that hold it all together. it took about 20 minutes for me, but like I said I had done it 4 times the week before. After it was installed it started on the 5th pull and has been a 1 or 2 pull motor ever since. Don't mess around trying to clean the old carb, the passages are just too small, The price and quality of the new was great.
Hats off to you guys ! Thank You
RJH
Did you find this story helpful?
Thanks for voting and helping fellow customers!
Honda Excell Pressure Washer - Gummed Up Carb
Mike - June 20, 2016
👍 8 of 10 people found this instruction helpful
Tool Type
Engine
Difficulty
Medium
Time
30-60 minutes
Tools Used
Pliers, Socket set, Wrench Set
After purchasing a new pump for my old Honda Excell pressure washer, I was bummed to find out that my carb had apparently fouled/gummed over the winter. I spent a few hours and bucks on trying to clean the carb, but to no avail. After testing the fuel pump to see if was functioning perfectly I was very pleased to see that for only $28 I could get the carb, gaskets, and a new air cleaner from here!! Having already taken the old carb on/off a few times I was plenty familiar with the myriad of items that have to be held up and go through two bolts for this engine/carb setup. After 4-5 pulls(cause the fuel bowl was dry), the engine started right up. I was finally able to pressure wash my driveway this past weekend and the engine fired on the first pull and ran for 7 hours without fault. Love the great price for parts, and fast shipping here, and will certainly return if anything else should fail on my small engines!!
Did you find this story helpful?
Thanks for voting and helping fellow customers!
Engine submerged under water from hurricane. Water in oil.
joseph - April 16, 2017
👍 6 of 8 people found this instruction helpful
Tool Type
Engine
Difficulty
Medium
Time
1-2 hours
Tools Used
Screwdriver, Pliers, Socket set, Wrench Set
Drain water from fuel and oil system. Remove all items to access and remove carburetor. Replace with new carburetor, gaskets, hoses etc.
Flush oil system with mineral spirits or other solvent. Compressed air to flush out fumes . May have to change oil 4x before oil starts to loose "milky" appearance.
Flush oil system with mineral spirits or other solvent. Compressed air to flush out fumes . May have to change oil 4x before oil starts to loose "milky" appearance.
Did you find this story helpful?
Thanks for voting and helping fellow customers!
Surging, unstable RPM.
Jeffrey - April 5, 2016
👍 4 of 5 people found this instruction helpful
Tool Type
Generator
Difficulty
Easy
Time
15-30 minutes
Tools Used
Screwdriver, Pliers, Socket set
This repair was performed on a pressure washer with a Honda motor. This model has no fuel filter so some dirt had gotten in the carb, and the governor spring was damaged. Also the mixture adjustment screw was damaged on the carb. I see a kit is available to install a filter, may do that next. For the price of a complete carb ($20) no reason to mess with fixing the old one. Remove the gas tank, 3 bolts, then the air filter and carb. two bolts. Hardest part is getting the linkage assembled before re-assembly of the carb/air cleaner. Pretty easy.
Did you find this story helpful?
Thanks for voting and helping fellow customers!
Dead Carburetor on Old Tiller
Glory - January 19, 2016
👍 5 of 7 people found this instruction helpful
Tool Type
Engine
Difficulty
Medium
Time
30-60 minutes
Tools Used
Socket set
The carburetor on my 10+ year old tiller finally stopped working correctly. I took the old one off and put the new one on. It wasn't as hard as I'd envisioned. I had my husband check my work when he came home as I'd never done this before. It took a few pulls and my old tiller works great. Actually, it hasn't run that smoothly in a good many years.
Even for a total newbie like me there really aren't any special instructions. I just took everything off that I needed to while noting their position and how they were in there in the first place. Then replaced the parts and put it back together. The nice thing is that the only socket I needed was a 10mm. There were two short screws and two very long bolts holding it on and that's all. Really not a bad repair. I think my time is higher because it was my first ever engine repair. It would probably take a person who knows what they are doing far less time.
Even for a total newbie like me there really aren't any special instructions. I just took everything off that I needed to while noting their position and how they were in there in the first place. Then replaced the parts and put it back together. The nice thing is that the only socket I needed was a 10mm. There were two short screws and two very long bolts holding it on and that's all. Really not a bad repair. I think my time is higher because it was my first ever engine repair. It would probably take a person who knows what they are doing far less time.
Did you find this story helpful?
Thanks for voting and helping fellow customers!
carburetor malfunction.
Stephen - January 25, 2019
Tool Type
Engine
Difficulty
Easy
Time
15-30 minutes
Tools Used
Pliers, Socket set
Parts Used
Removed original carb. Installed inline filter. Mounted replacement carb. Runs fine.
Did you find this story helpful?
Thanks for voting and helping fellow customers!
Honda GC160 carb too gummed up.
Lee - June 30, 2018
Tool Type
Engine
Difficulty
Medium
Time
30-60 minutes
Tools Used
Screwdriver, Pliers, Socket set, Wrench Set, Mat and magnet (small needlenose pliers for clips).
CHEAPER and FASTER to replace carburetor assembly and gaskets than to disassemble and clean/replace parts. Had already determined carb problem(s). Started 2nd pull after reassembly and after warmed up adjusted idle speed. Now my pressure washer is ready when I need it.
Did you find this story helpful?
Thanks for voting and helping fellow customers!
Needed new parts.
Bruce - August 9, 2017
👍 2 of 4 people found this instruction helpful
Tool Type
Engine
Difficulty
Easy
Time
30-60 minutes
Tools Used
Pliers, Socket set
1. Removed two 10mm bolts.
2. Removed the air cleaner, the fuel hose, the throttle and the choke linkage as well as the tension spring.
3. Installed the new carburetor and the fuel pump.
4. Installed the linkage, the spring, the fuel hoses and the bolts.
5. Started the engine and made a small adjustment on the air/fuel mixture screw.
Did you find this story helpful?
Thanks for voting and helping fellow customers!
XR2625 Pressure washer hasn't run for 2 years. Left untreated gas in it. OOPS!
Jeff - August 1, 2017
👍 2 of 4 people found this instruction helpful
Tool Type
Engine
Difficulty
Medium
Time
30-60 minutes
Tools Used
Screwdriver, Pliers, Socket set, Wrench Set
1. Removed air cleaner assembly.
2. Disconnected carburetor linkage.
3. Removed carburetor.
4. Installed new carburetor and gasket.
5. Changed engine oil.
6. Installed new spark plug.
7. Blew out nearly new air cleaner element.
8. Filled gas tank with Stabil treated gasoline.
9. Started engine (took a few pulls) and was very surprised at how strong the engine ran.
I don't think this guy has run this well even when new. It now starts on the first pull! I use a 15" surface cleaner in addition to the wand that didn't work very well either, but now it does a great job! So well, in fact, that my wife & I spent 10 hours over the week-end cleaning all of the concrete around our house as well as anything else that got in the way! (Pots, planters, lawn furniture, walls, motorcycle, lawn mower, edger, mailbox, trailer, wheel barrows, trash cans, neighbor's wife, etc) What a pleasure to have this 2005 power washer run so well!
Did you find this story helpful?
Thanks for voting and helping fellow customers!
Xc2600 pressure washer would not start; had sat with gas in it
Wallace - May 19, 2017
👍 2 of 4 people found this instruction helpful
Tool Type
Engine
Difficulty
Medium
Time
1-2 hours
Tools Used
Pliers, Socket set, Wrench Set
Tried cleaning original gummed-up carb. Still wouldn't start.
Ordered/installed replacement carb and gaskets for the Honda engine.
Started up after a few pulls. Just washed down front bricks. Worked fine!
Tip: printed off copies of the parts diagrams to help with getting all the parts re-installed.
Ordered/installed replacement carb and gaskets for the Honda engine.
Started up after a few pulls. Just washed down front bricks. Worked fine!
Tip: printed off copies of the parts diagrams to help with getting all the parts re-installed.
Did you find this story helpful?
Thanks for voting and helping fellow customers!
Load More Install Stories
OEM stands for Original Equipment Manufacturer and means the part you’re buying is sourced directly from the manufacturer who made your product. At eReplacementParts, we sell only genuine OEM parts, guaranteeing the part you’re purchasing is of better design and of higher quality than aftermarket parts.
Our product descriptions are a combination of data sourced directly from the manufacturers who made your product as well as content researched and curated by our content & customer service teams. This content is edited and reviewed internally before being made public to customers.
Our customer service team are at the ready daily to answer your part and product questions. We have a dedicated staff with decades of collective experience in helping customers just like you purchase parts to repair their products.
All our part reviews are solicited directly from other customers who have purchased this exact part. While we moderate these reviews for profanity, offensive language or personally identifiable information, these reviews are posted exactly as submitted and no alterations are made by our team.
All our customer repair instructions are solicited directly from other customers just like you who have purchased and replaced this exact part. While we moderate these reviews for profanity, offensive language or personally identifiable information, these reviews are posted exactly as submitted and no alterations are made by our team.
Based on data from past customer purchasing behaviors, these parts are most commonly purchased together along with the part you are viewing. These parts may be necessary or helpful to replace to complete your current repair.
All our installation videos are created and produced in collaboration with our in-house repair technician, Mark Sodja, who has helped millions of eReplacementParts customers over the last 13 years repair their products. Mark has years of experience in selling and repairing both commercial and residential products with a specialty in gas-powered equipment.
This data is collected from customers who submitted a repair instruction after replacing this exact part. Customers can rate how easy the repair was to complete and how long it took. We aggregate this data to provide a repair rating that allows customers to quickly determine the difficulty and time needed to perform their own repair.