eReplacementParts.com
877-346-4815
Bosch Parts
Repair Parts Home
  
Power Tool Parts
  
Bosch Parts
  1617014127 Carbon Brush Set

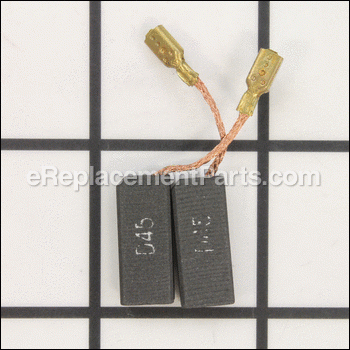
Carbon Brush Set 1617014127

OEM part for: Bosch

Part Number: 1617014127


Install
Videos!
Carbon Brush Set - 1617014127:Bosch 360 View
Carbon Brush Set - 1617014127:BoschCarbon Brush Set - 1617014127:BoschCarbon Brush Set - 1617014127:Bosch 360 View
Usually ships in 7 - 12 business days
Leaves our warehouse within
7 - 12 business days
Easy 15-30 minutes (12 rated repairs)?
OEM: Original Equipment Manufacturer ?
Bosch
Does this d-block d-md-none fit my product?

Product Description ?

Genuine Bosch replacement part
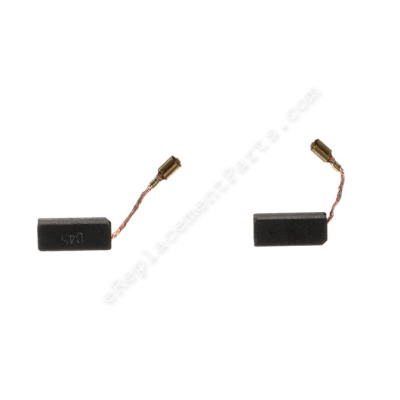
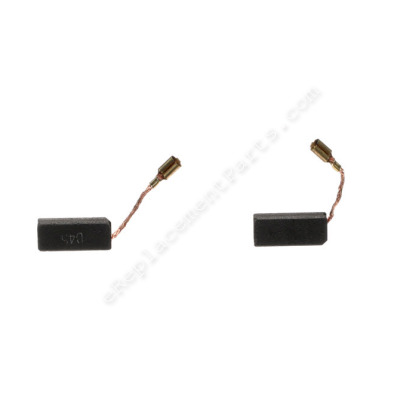
Set of 2 Carbon Brushes with wire lead attached.

• Worn brushes frequently are the cause behind a motor running poorly.
• Replacing brushes can fix a motor that’s operating intermittently.
• New brushes can restore a motor’s electric braking.


Carbon brushes are one of the most commonly replaced power tool parts. This is because carbon brushes are wear items, meaning that through friction and use they will gradually wear away until they need replacing. Worn brushes are a common causes of intermittent motor function, reduced electric braking and reduced motor power. A worn-out brush will often be worn down near to the wire lead and can be cracked, pitted, or burned. When replacing carbon brushes, be sure to inspect your armature for burns, cracks, or other damage which can indicate larger motor problems.

  • Classification: Part
  • Weight: 0.01 lbs.
  • Shipping: Ships Worldwide

Frequently Purchased Together ?

Compatibility

This part will fit the following 9 machines

Bosch

11224VSR (0611224739) Hammer Drill View Diagrams & Manuals
GBH2SR (0611226839) Hammer Drill View Diagrams & Manuals
11228VS (0611228639) Hammer Drill View Diagrams & Manuals
11228VSR (0611228739) Hammer Drill View Diagrams & Manuals
11224VSRC (0611259310) Rotary Hammer View Diagrams & Manuals
11226 (0611226039) Rotary Hammer View Diagrams & Manuals
GBH2-24DS (0611228039) Rotary Hammer View Diagrams & Manuals
11224VSR (3611B247A0) Corded Rotary Hammer Drill View Diagrams & Manuals
11224VSR (3611B24739) 11224 Bare Tool 120v Sds Rot.Hammer Us View Diagrams & Manuals
Show More Compatible Models
Don't see yours? Try searching our site for :

This item works with the following types of products:

  • Drill Parts
  • Hammer Drill Parts
  • Rotary Hammer Parts

This part replaces obsolete part #: 1617014134

Customer Part Reviews ?

5
Average Rating (out of 5):
4 Reviews
Click to filter by ratings:
5 stars
4
4 stars
0
3 stars
0
2 stars
0
1 stars
0
  • Highest Rating
  • Most Recent
< PREV
  • 1
NEXT >
  • Tedious replacement but was expected
    Amazon delivers much quicker. Tool functions wonderfully.
    Guest - February 26, 2023 Verified Purchase
    Easy repair. Item was good quality.
    Items were as ordered and arrived as promised.
    Mark - November 17, 2021 Verified Purchase
    Easy repair
    Parts arrived quickly, and fit perfectly. Hammer drill like new again.
    Rodney - May 6, 2021 Verified Purchase
    Great part
    Very nice and clean part. Right size that i needed.
    Richard - September 16, 2019 Verified Purchase
    t
    t
    t - t days ago Verified Purchase
    eReplacementParts Team
    t

    Questions & Answers ?

    Our customer Service team is at the ready daily to answer your part and product questions.

    photo of team member
    Ask our Team

    We have a dedicated staff with decades of collective experience in helping customers just like you purchase parts to repair their products.

    Does this fit my product?

    Questions & Answers for Carbon Brush Set


    No questions have been asked yet

    Customer Repair Instructions ?

    All our customer repair instructions are solicited directly from other customers just like you who have purchased and replaced this exact part.

    Easy 15-30 minutes (12 rated repairs)?

    The bearing on the brushes end of the armature went out casing the brushes to fail

    David - April 3, 2016
    👍 6 of 6 people found this instruction helpful
    Tool Type

    Hammer Drill

    Difficulty

    Easy

    Time

    15-30 minutes

    Tools Used

    Screwdriver, Pliers, a small hand held grinder

    Remove handle from housing, remove brushes and their keepers from the housing, remove the housing from armature grind old bearing off be careful not to grind to deep leave a little their the heat from grinding will stretch it enough to remove it, install the new one gently taping with a small brass hammer it onto the same spot the old one was resting, resemble armature housing, then install the new brushes, and the hand all. take pictures so you can get all the wires back wear they belong
    Did you find this story helpful?
    Thanks for voting and helping fellow customers!

    Brushes needed replacing

    Alfonso - June 20, 2017
    👍 4 of 4 people found this instruction helpful
    Tool Type

    Rotary Hammer

    Difficulty

    Easy

    Time

    15-30 minutes

    Tools Used

    Screwdriver, Power Drill, Nutdriver, T25 torx bit.

    Removed screws that hold handle / trigger switch, 2 piece unit. remove 2 torx head screws on same side where the handle screws go in. pull apart one side of handle. know you see the switch, at this time you test the switch to see that it's working okay, you will need a multi-tester. plug unit to wall plug and test for power. v a/c. test leads that go to motor, press trigger switch if it reads 124 volts then switch is okay. unplug unit and remove the other 2 torx t 25 screws that hold the other part of the handle and slowly lift handle off from the rest of the body. (note, take pictures) on the center of the motor section you have left and right wires that lead to the brushes from the switch and are being held by screws. take this screws of and use some needle nose pliers to help you lift out the brush holders, one copper wire will lead to each brush, remove and replace with new brush make sure to put brushes so that holder spring has tension on them pass wire on brushes true to other end and connect to holder. hold brushes with finger as you put it back in place. put the 2 screws back on that came of the holder, put the one half of the handle back on the body and check all the wires are in place and then the other handle part and all the screws. good luck.
    Did you find this story helpful?
    Thanks for voting and helping fellow customers!

    Motor stopped

    Rick - February 1, 2018
    👍 1 of 1 people found this instruction helpful
    Tool Type

    Hammer Drill

    Difficulty

    Easy

    Time

    15-30 minutes

    Tools Used

    Screwdriver, Screw gun with torx15 or t20 bits.

    Opened up the handle, noticed it ran if I pushed the old brush against the rotor, took out the old brushes and saw they were worn waaay down. Put in new ones, works great.
    Did you find this story helpful?
    Thanks for voting and helping fellow customers!

    low power

    Kevin - January 29, 2023
    Tool Type

    Hammer Drill

    Difficulty

    Medium

    Time

    15-30 minutes

    Tools Used

    Screwdriver

    replaced the brushes
    Did you find this story helpful?
    Thanks for voting and helping fellow customers!

    brushes worn

    Rodney - May 7, 2021
    Tool Type

    Hammer Drill

    Difficulty

    Easy

    Time

    15-30 minutes

    Tools Used

    Screwdriver, Pliers

    Removed and replaced brushes and it’s holders.
    Did you find this story helpful?
    Thanks for voting and helping fellow customers!

    Drill would not run unless you hit it

    Scott - March 12, 2020
    Tool Type

    Hammer Drill

    Difficulty

    Easy

    Time

    Less than 15 minutes

    Tools Used

    Screwdriver

    Remove rear handle and split it with the screws on the sides. Removed brush holders and unplug the wire on each. The small wire on the brush unplugs from the holder. Look at how the brush is in the brush holder, pull the coil spring back and take out the old brush. Put the new brush in like the old one came out and put it all back together
    Did you find this story helpful?
    Thanks for voting and helping fellow customers!

    The brushes were worn out, so the rotary hammer drill would not run

    Douglas - October 25, 2019
    Tool Type

    Rotary Hammer

    Difficulty

    Easy

    Time

    15-30 minutes

    Tools Used

    Screwdriver, Needle nose pliers

    Removed the screws from the drill handle
    removed the screw for each brush.
    removed the brushes, using the needle nose pliers to move the brush spring
    replaced the brushes, using the needle nose pliers to reinstall the brush spring.
    Replaced the handle, and replaced the screws.

    Tested the drill.
    Did you find this story helpful?
    Thanks for voting and helping fellow customers!

    The drill would start and stop erratically and could see a lot of arching through the vent holes

    Ron - April 18, 2018
    Tool Type

    Rotary Hammer

    Difficulty

    Easy

    Time

    15-30 minutes

    Tools Used

    Screwdriver, Pliers, Power Drill

    1-Remove the handle assembly
    2- Remove the brush holder and old brushes
    3- Install new brushes in the holder and place back in the drill motor.
    4- Plug wires back to the brush holder and tuck wires out of the way to be sure not pinch them in the handle assembly.
    5- Mount the handle assembly back to the drill body. Works great.
    Did you find this story helpful?
    Thanks for voting and helping fellow customers!

    Brushes burnt and worn

    Michael - December 13, 2017
    Tool Type

    Rotary Hammer

    Difficulty

    Medium

    Time

    30-60 minutes

    Tools Used

    Screwdriver

    Removed switch cover and handle assembly. Removed old brushes and replace. Reassembled all and tested good. Just have to make sure all wires get into same spots when disassembling which all have small retainers molded in housing.
    Did you find this story helpful?
    Thanks for voting and helping fellow customers!

    Brushes were worn out.

    Daniel - June 21, 2017
    Tool Type

    Hammer Drill

    Difficulty

    Easy

    Time

    Less than 15 minutes

    Tools Used

    Pliers, Power Drill

    1. Removed the handle assembly. (Power drill)
    2. Replaced the brushes one at a time. (Screwdriver, pliers)
    3. Reinstalled the handle assembly. (Power drill)
    4. "Be careful not to punch wires"
    Did you find this story helpful?
    Thanks for voting and helping fellow customers!

    OEM stands for Original Equipment Manufacturer and means the part you’re buying is sourced directly from the manufacturer who made your product. At eReplacementParts, we sell only genuine OEM parts, guaranteeing the part you’re purchasing is of better design and of higher quality than aftermarket parts.

    Our product descriptions are a combination of data sourced directly from the manufacturers who made your product as well as content researched and curated by our content & customer service teams. This content is edited and reviewed internally before being made public to customers.

    Our customer service team are at the ready daily to answer your part and product questions. We have a dedicated staff with decades of collective experience in helping customers just like you purchase parts to repair their products.

    All our part reviews are solicited directly from other customers who have purchased this exact part. While we moderate these reviews for profanity, offensive language or personally identifiable information, these reviews are posted exactly as submitted and no alterations are made by our team.

    All our customer repair instructions are solicited directly from other customers just like you who have purchased and replaced this exact part. While we moderate these reviews for profanity, offensive language or personally identifiable information, these reviews are posted exactly as submitted and no alterations are made by our team.

    Based on data from past customer purchasing behaviors, these parts are most commonly purchased together along with the part you are viewing. These parts may be necessary or helpful to replace to complete your current repair.

    All our installation videos are created and produced in collaboration with our in-house repair technician, Mark Sodja, who has helped millions of eReplacementParts customers over the last 13 years repair their products. Mark has years of experience in selling and repairing both commercial and residential products with a specialty in gas-powered equipment.

    This data is collected from customers who submitted a repair instruction after replacing this exact part. Customers can rate how easy the repair was to complete and how long it took. We aggregate this data to provide a repair rating that allows customers to quickly determine the difficulty and time needed to perform their own repair.

    eReplacementParts.com
    7174 South 400 West
    Suite 5
    Midvale, UT 84047
    visa mastercard discover american express PayPal