
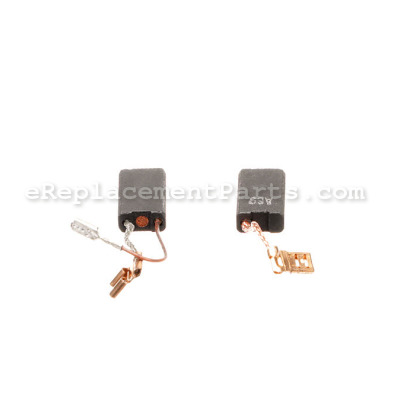


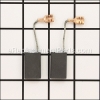
This is a Genuine Manufacturer Sourced replacement part used on certain Bosch Rotary Hammers. This item includes Two (2) Carbon Brushes with Lead Wires Attached.
Carbon brushes are one of the most commonly replaced power tool parts. This is because carbon brushes are wear items, meaning that through friction and use they will gradually wear away until they need replacing. Worn brushes are a common causes of intermittent motor function, reduced electric braking and reduced motor power. A worn-out brush will often be worn down near to the wire lead and can be cracked, pitted, or burned. When replacing carbon brushes, be sure to inspect your armature for burns, cracks, or other damage which can indicate larger motor problems.
Carbon Brush Set 1617014144
OEM part for: Bosch
Part Number: 1617014144
$8.35
Usually ships in 7 - 12 business days
7 - 12 business days
Jump To:
Product Description ?
- Classification: Part
- Weight: 0.03 lbs.
- Shipping: Ships Worldwide
Frequently Purchased Together ?


Compatibility
This part will fit the following 6 machines
Bosch
11264EVS (3611B64010) 1-5/8 in. SDS-Max Rotary Hammer View Diagrams & Manuals
11265EVS (3611B64110) 1-5/8 in. Spline Rotary Hammer View Diagrams & Manuals
11321EVS (3611C21010) 12 Lb. SDS-Max Demo Hammer View Diagrams & Manuals
11264EVS (3611B64011) 11264evs View Diagrams & Manuals
11264EVS (3611B64012) 11264evs View Diagrams & Manuals
11321EVS (3611C21012) Demolition Hammer 11321evs View Diagrams & Manuals
Show More Compatible Models
This item works with the following types of products:
- Rotary Hammer Parts
- Demolition Hammer Parts
Customer Part Reviews ?
Average Rating (out of 5):
Click to filter by ratings:
5 stars
4
4 stars
0
3 stars
0
2 stars
0
1 stars
0
< PREV
- 1
Found item that was needed and ordered
Parts came in as expected and great shape. Will order parts that will need in the future.
John -
April 26, 2023
Verified Purchase
Easy order
It’s always easy and convenient when ordering replacement parts for my power tools Ereplacment never fails to come thru.
David -
April 3, 2023
Verified Purchase
Great part easier to reper may rotary Homer
Thanks for the fast delivery 👍
Guest -
July 10, 2020
Verified Purchase
Easy to find parts
They have pictures of the parts I needed. My number was worn off of the part i took out of my hammer drill. Once i saw the picture of the parts i took out of my hammer drill i ordered them, received them, put them in my hammer drill, worked right away, saved me a thousand dollars for not having to buy a new hammer drill. They have a very good collection of of whatever you might need. Thanks Girls and guys.
rick -
May 9, 2020
Verified Purchase
t
t
t -
t days ago
Verified Purchase
eReplacementParts Team
t
Questions & Answers ?
Our customer Service team is at the ready daily to answer your part and product questions.

Ask our Team
We have a dedicated staff with decades of collective experience in helping customers just like you purchase parts to repair their products.
Does this fit my product?Questions & Answers for Carbon Brush Set
No questions have been asked yet
Customer Repair Instructions ?
All our customer repair instructions are solicited directly from other customers just like you who have purchased and replaced this exact part.
Brushes on the rotary hammer were worn out.
Alan - March 2, 2018
👍 4 of 4 people found this instruction helpful
Tool Type
Demolition Hammer
Difficulty
Easy
Time
15-30 minutes
Tools Used
Screwdriver, Pliers, Allen wrench
Parts Used
1. Removed cover at the bottom of the hammer with an allen wrench.
2. Disconnect the electrical connections coming out of the brushes with pliers.
3. Push back the coiled spring with the screwdriver and brush should slide out of it's compartment. Do not remove the coiled spring.
4. Do the steps in reverse order.
2. Disconnect the electrical connections coming out of the brushes with pliers.
3. Push back the coiled spring with the screwdriver and brush should slide out of it's compartment. Do not remove the coiled spring.
4. Do the steps in reverse order.
Did you find this story helpful?
Thanks for voting and helping fellow customers!
Service light
William - February 16, 2024
👍 2 of 2 people found this instruction helpful
Tool Type
Rotary Hammer
Difficulty
Easy
Time
Less than 15 minutes
Tools Used
, Allen wrench
Parts Used
Took off and cap replace brushes
Did you find this story helpful?
Thanks for voting and helping fellow customers!
Brushes worn, lack of power.
Steve - January 14, 2021
👍 2 of 2 people found this instruction helpful
Tool Type
Rotary Hammer
Difficulty
Easy
Time
Less than 15 minutes
Tools Used
, T20 toes and small right angle pick
Parts Used
Unplugged Bosch RH540M
Unscrewed two torx screws at bottom. Removed cap
Took small pick to pull back the spring holding the brush in, verified brush number, then ordered brushes.
Installed new brushes one at a time and removed spade connectors one at a time.
Unscrewed two torx screws at bottom. Removed cap
Took small pick to pull back the spring holding the brush in, verified brush number, then ordered brushes.
Installed new brushes one at a time and removed spade connectors one at a time.
Did you find this story helpful?
Thanks for voting and helping fellow customers!
no
marian - June 30, 2020
👍 2 of 2 people found this instruction helpful
Tool Type
Demolition Hammer
Difficulty
Easy
Time
1-2 hours
Tools Used
Screwdriver, Pliers, Socket set, Wrench Set
very good
Did you find this story helpful?
Thanks for voting and helping fellow customers!
Brushes wore out and switch replacement
Jeff - October 8, 2017
👍 3 of 4 people found this instruction helpful
Tool Type
Demolition Hammer
Difficulty
Easy
Time
15-30 minutes
Tools Used
Screwdriver
Removed outer casing released brushes from spring and wire terminal, inserted new brushes and hooked wire back up. New switch unplugged wires and took out old then put new one in and hooked wires to same wire sequence. Pretty easy install for the person who understands tools.
Did you find this story helpful?
Thanks for voting and helping fellow customers!
OEM stands for Original Equipment Manufacturer and means the part you’re buying is sourced directly from the manufacturer who made your product. At eReplacementParts, we sell only genuine OEM parts, guaranteeing the part you’re purchasing is of better design and of higher quality than aftermarket parts.
Our product descriptions are a combination of data sourced directly from the manufacturers who made your product as well as content researched and curated by our content & customer service teams. This content is edited and reviewed internally before being made public to customers.
Our customer service team are at the ready daily to answer your part and product questions. We have a dedicated staff with decades of collective experience in helping customers just like you purchase parts to repair their products.
All our part reviews are solicited directly from other customers who have purchased this exact part. While we moderate these reviews for profanity, offensive language or personally identifiable information, these reviews are posted exactly as submitted and no alterations are made by our team.
All our customer repair instructions are solicited directly from other customers just like you who have purchased and replaced this exact part. While we moderate these reviews for profanity, offensive language or personally identifiable information, these reviews are posted exactly as submitted and no alterations are made by our team.
Based on data from past customer purchasing behaviors, these parts are most commonly purchased together along with the part you are viewing. These parts may be necessary or helpful to replace to complete your current repair.
All our installation videos are created and produced in collaboration with our in-house repair technician, Mark Sodja, who has helped millions of eReplacementParts customers over the last 13 years repair their products. Mark has years of experience in selling and repairing both commercial and residential products with a specialty in gas-powered equipment.
This data is collected from customers who submitted a repair instruction after replacing this exact part. Customers can rate how easy the repair was to complete and how long it took. We aggregate this data to provide a repair rating that allows customers to quickly determine the difficulty and time needed to perform their own repair.