
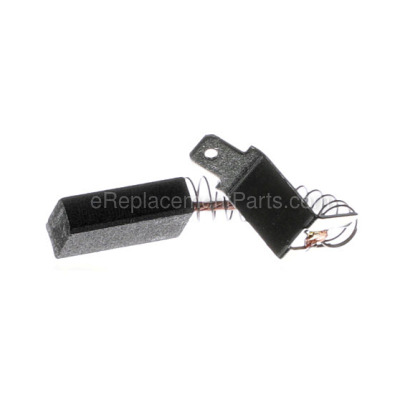


This is a genuine OEM sourced replacement part designed for use with Ryobi saws. This assembly includes one (1) carbon brush with a lead wire and a spring attached. Please note brush holder is sold separately.
Carbon brushes are a commonly replaced part on power tools. Due to normal use and friction brushes will gradually wear down and will require replacement. It is advised to replace both brushes at the same type.
You would need a screwdriver to complete this job.
• Make sure the unit is unplugged
• First remove the cover
• Take our old brushes and replace them with the new ones
• Secure the cover and test the tool
Carbon Brush 080015001641
OEM part for: Ryobi, Craftsman, Ridgid
Part Number: 080015001641
$5.19
In Stock
Jump To:
Product Description ?
- Classification: Part
- Weight: 0.01 lbs.
- Shipping: Ships Worldwide
Frequently Purchased Together ?


Compatibility
This part will fit the following 16 machines
Ryobi
RTS10 10" Table Saw View Diagrams & Manuals
RTS21 10 in. Table Saw View Diagrams & Manuals
RTS21G RTS21G 10-In. Table Saw View Diagrams & Manuals
RTS10G 10-Inch Table Saw View Diagrams & Manuals
RTS22 10-Inch Table Saw View Diagrams & Manuals
RTS22T 10-Inch Table Saw View Diagrams & Manuals
RTS10NS 10-Inch Table Saw View Diagrams & Manuals
RTS11 10-Inch Table Saw View Diagrams & Manuals
RTS12 Rts12 10 In. Table Saw 2-24-21 (Rev:04) View Diagrams & Manuals
RTS12T Rts12t 10 In. Table Saw 2-24-21 (Rev:04) View Diagrams & Manuals
RTS23 Rts23 10 In. Table Saw 2-24-21 (Rev:04) View Diagrams & Manuals
RTS23T Rts23t 10 In. Table Saw 2-24-21 (Rev:04) View Diagrams & Manuals
Craftsman
315353450 10-In. Table Saw View Diagrams & Manuals
315CM27831TS Saw Table View Diagrams & Manuals
Ridgid
RTS10G 10 In. Tile Saw 3-8-17 (Rev:04) View Diagrams & Manuals
RTS10 10-Inch Tile Saw View Diagrams & Manuals
Show More Compatible Models
This item works with the following types of products:
- Saw Parts
- Table Saw Parts
This part replaces obsolete part #: 0301025006
Repair Videos ?
Articles:
|
This article is a troubleshooting guide for problems and malfunctions common to most electric power tools....
September 25, 2009
|
|
This article defines the basic parts of most power tools, explains how they work, and what to look for when they stop wo...
September 25, 2009
|

Customer Part Reviews ?
Average Rating (out of 5):
Click to filter by ratings:
5 stars
7
4 stars
0
3 stars
0
2 stars
0
1 stars
0
< PREV
- 1
Fast arrival
Fixed my problem easily
Guest -
November 29, 2022
Verified Purchase
Just what the doctor ordered
It was just what I needed
Guest -
December 31, 2021
Verified Purchase
Good quick service, parts work!
Arrived quickly, everything good.
Guest -
July 13, 2021
Verified Purchase
ALIVE!
My Ryobi RTS21 table saw suddenly stopped working. Checked the switch with a multimeter on ohms (all good). Ripped apart the saw and my carbon brushes were toast. Replaced them with these, and she runs like a top! Saved me hundreds of dollars.
Guest -
February 1, 2021
Verified Purchase
Great Experience
Great Condition, My saw is working like new again.
Guest -
September 28, 2020
Verified Purchase
Parts arrived in the time frame promised.
Parts fit exactly. Repair was completed and saw is working like new.
Charles -
June 29, 2020
Verified Purchase
got it here when nobody else had it
new part works great
Guest -
June 27, 2020
Verified Purchase
t
t
t -
t days ago
Verified Purchase
eReplacementParts Team
t
Questions & Answers ?
Our customer Service team is at the ready daily to answer your part and product questions.

Ask our Team
We have a dedicated staff with decades of collective experience in helping customers just like you purchase parts to repair their products.
Does this fit my product?Questions & Answers for Carbon Brush
Where on my table saw is the model number. Ryobi 10 table saw
Paul
asked on 2022-10-11
Hello Paul, Thank you for your inquiry. Ryobi model numbers are usually found on the data plate or data label on the machine, located on the back or bottom of the unit. Your model number will either begin with a RY or a P or AC (accessory). We hope this helps and if you need a part in the future and need help placing an order, customer service is open 7 days a week. Please feel free to give us a call. We look forward to hearing from you!
eReplacementParts Team October 11, 2022
Customer Repair Instructions ?
All our customer repair instructions are solicited directly from other customers just like you who have purchased and replaced this exact part.
One if the brush holders was damaged and the brush would not make contact.
EDWARD - June 4, 2017
👍 4 of 4 people found this instruction helpful
Tool Type
Table Saw
Difficulty
Easy
Time
15-30 minutes
Tools Used
Screwdriver
1. Make sure the saw is unplugged.
2. Retract the blade all the way down.
3. Tilt the blade as far as it can go.
4. Detach the saw from the legs and flip over onto the work surface.
5. Remove 3 Philips head screws from the end of the motor. You will see two wires, each attached to a brush/holder assembly by a spade connector.
6. One at a time, detach the spade connector and remove the brush holder. It is only held in place by friction. You might need to use a flat head screwdriver to pry it up. Note the orientation of the brush holder.
7. Slide a new brush into a new brush holder and insert into the brush holder slot on the motor making sure it's oriented the same way as the old one.
8. Repeat for the other brush holder.
9. Reassemble the motor. Flip the saw over and test.
Did you find this story helpful?
Thanks for voting and helping fellow customers!
Electric motor needed new brushes
Vernon - April 2, 2017
👍 2 of 2 people found this instruction helpful
Tool Type
Table Saw
Difficulty
Easy
Time
30-60 minutes
Tools Used
Screwdriver, Nutdriver
Parts Used
1 Removed the motor from the table saw
2 Ordered parts
3 After parts arrived opened up motor
4 Replaced the brushes
5 Reassembled motor
6 Reassembled table saw with motor
7 Replaced saw blade
2 Ordered parts
3 After parts arrived opened up motor
4 Replaced the brushes
5 Reassembled motor
6 Reassembled table saw with motor
7 Replaced saw blade
Did you find this story helpful?
Thanks for voting and helping fellow customers!
Carbon Brush were already used, needed replacement
rafal - October 17, 2018
👍 2 of 3 people found this instruction helpful
Tool Type
Table Saw
Difficulty
Easy
Time
15-30 minutes
Tools Used
Screwdriver, Wrench Set
Parts Used
I unscrewed the electric motor, unscrewed the cover and replaced the Carbon Brush, very simply and quickly done.
Did you find this story helpful?
Thanks for voting and helping fellow customers!
Motor runs poorly if at all, Elv. Shaft damaged. Trash picked, therefore previous owned caused issues.
Wayne - January 21, 2023
Tool Type
Table Saw
Difficulty
Medium
Time
1-2 hours
Tools Used
Screwdriver, Pliers, Socket set, Wrench Set, Small file to clean brush holder.
Brush
1. Removed the motor from the saw and disassembled the brush area of the motor.
2. Determined the sticking brush and removed it from the motor.
3. Determined why the brush was sticking (not or poorly contacting the armature). The brush guide was slightly damaged and needed to be cleaned (small file to remove rough edge). Likey dirty and overheated to start to distort the plastic brush guide.
4. Inspected armature for excessive wear, it was generally clean and didn't need work.
5. Reasembled brush and brush guide, checked for free movement and reassembled motor.
6. Reinstall motor and tested, working just fine now.
Elv. Shaft
1. Much easier, just removed retaining clip at end of shaft and unscrewed shaft from saw.
2. Installed new Elv. Shaft by screwing back into place.
3. Installed a new retaining clip. Replacing all washers in their correct order.
4. 3D printed a new handle and installed on to the Elv. shaft.
5. Works just fine now.
Miter Gauge Assembly
1. Just slid it into the track on the saw bed.
Did you find this story helpful?
Thanks for voting and helping fellow customers!
Failed bearing and brushes
Charles - June 29, 2020
Tool Type
Table Saw
Difficulty
Medium
Time
1-2 hours
Tools Used
Screwdriver, Pliers, Wrench Set, Dremel cutoff wheel
Removed and disassembled motor.
Cleaned parts.
Verified no damage to armature and field windings.
Cut off failed bearing.
Pressed new bearing onto armature.
Reassembled with new washer and brushes.
Cleaned parts.
Verified no damage to armature and field windings.
Cut off failed bearing.
Pressed new bearing onto armature.
Reassembled with new washer and brushes.
Did you find this story helpful?
Thanks for voting and helping fellow customers!
The brushes and holders were missing, but I also had to repair the Open Stator
Eugene - February 16, 2019
Tool Type
Table Saw
Difficulty
Medium
Time
1-2 hours
Tools Used
Screwdriver, Pliers, Socket set, Crimping tool, Soldering iron
Parts Used
After originally opening the motor I found the brushes and brush holders missing. Installed them and found the Stator to have an open circuit. Removed old connections to the stator and repaired same. Using a crimping tool, wire connectors, soldering gun, solder and shrink tubing.
Did you find this story helpful?
Thanks for voting and helping fellow customers!
OEM stands for Original Equipment Manufacturer and means the part you’re buying is sourced directly from the manufacturer who made your product. At eReplacementParts, we sell only genuine OEM parts, guaranteeing the part you’re purchasing is of better design and of higher quality than aftermarket parts.
Our product descriptions are a combination of data sourced directly from the manufacturers who made your product as well as content researched and curated by our content & customer service teams. This content is edited and reviewed internally before being made public to customers.
Our customer service team are at the ready daily to answer your part and product questions. We have a dedicated staff with decades of collective experience in helping customers just like you purchase parts to repair their products.
All our part reviews are solicited directly from other customers who have purchased this exact part. While we moderate these reviews for profanity, offensive language or personally identifiable information, these reviews are posted exactly as submitted and no alterations are made by our team.
All our customer repair instructions are solicited directly from other customers just like you who have purchased and replaced this exact part. While we moderate these reviews for profanity, offensive language or personally identifiable information, these reviews are posted exactly as submitted and no alterations are made by our team.
Based on data from past customer purchasing behaviors, these parts are most commonly purchased together along with the part you are viewing. These parts may be necessary or helpful to replace to complete your current repair.
All our installation videos are created and produced in collaboration with our in-house repair technician, Mark Sodja, who has helped millions of eReplacementParts customers over the last 13 years repair their products. Mark has years of experience in selling and repairing both commercial and residential products with a specialty in gas-powered equipment.
This data is collected from customers who submitted a repair instruction after replacing this exact part. Customers can rate how easy the repair was to complete and how long it took. We aggregate this data to provide a repair rating that allows customers to quickly determine the difficulty and time needed to perform their own repair.