
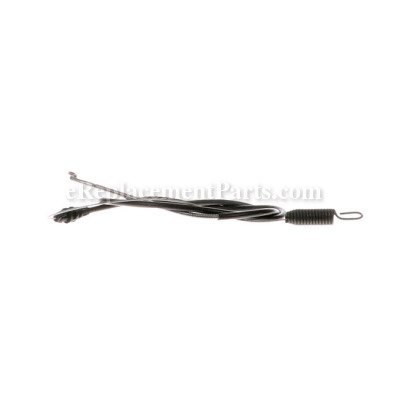


This is a genuine manufacturer-sourced replacement part which is specially designed for use with Toro and Lawn Boy lawn mowers. The traction cable engages the drive wheels, please make sure to refer to the appropriate diagrams of your model for the correct location and application of this component. Keep in mind this high-quality rubber insulated part is sold individually.
Cable-traction 112-8817
OEM part for: Toro, Lawn Boy
Part Number: 112-8817
$37.00
In Stock
Jump To:
Frequently Purchased Together ?


Compatibility
This part will fit the following 44 machines
Toro
29639 (310000001-310999999)(2010) Lawn Mower View Diagrams & Manuals
29641 (290000001-290999999)(2009) Lawn Mower View Diagrams & Manuals
29642 (310000001-310999999)(2010) Lawn Mower View Diagrams & Manuals
20314 (311000001-311999999) 20in Recycling/rear Bagging Lawn Mower, 2011 View Diagrams & Manuals
20316 (311000001-311999999) 20in Recycler/rear Bagging Lawn Mower, 2011 View Diagrams & Manuals
29639 (311000001-311999999) Lawn Mower View Diagrams & Manuals
29639 (312000001-312999999) Lawn Mower View Diagrams & Manuals
29639 (313000001-313999999) Lawn Mower View Diagrams & Manuals
29639 (314000001-314999999) Lawn Mower View Diagrams & Manuals
29639 (315000001-315999999) Lawn Mower View Diagrams & Manuals
29639 (316000001-316999999) Lawn Mower View Diagrams & Manuals
29642 (311000001-311999999) Lawn Mower View Diagrams & Manuals
29642 (312000001-312999999) Lawn Mower View Diagrams & Manuals
29643 (313000001-313999999) 50cm Mulching/side Discharge/rear Bagging Lawn Mower, 2013 View Diagrams & Manuals
29643 (314000001-314999999) 50cm Mulching/side Discharge/rear Bagging Lawn Mower, 2014 View Diagrams & Manuals
Lawn Boy
10604 (312000001-312999999)(2012) 20In Mulching/Rear Bagging Lawn Mower View Diagrams & Manuals
10604 (311000001-311999999)(2011) 20In Mulching/Rear Bagging Lawn Mower View Diagrams & Manuals
10605 (311000001-311999999)(2011) 20In Mulching/Rear Bagging Lawn Mower View Diagrams & Manuals
10606 (312000001-312999999)(2012) 20In Mulching/Rear Bagging Lawn Mower View Diagrams & Manuals
10606 (311000001-311999999)(2011) 20In Mulching/Rear Bagging Lawn Mower View Diagrams & Manuals
10624 (312000001-312999999)(2012) 20In Mulching/Rear Bagging Lawn Mower View Diagrams & Manuals
10624 (311000001-311999999)(2011) 20In Mulching/Rear Bagging Lawn Mower View Diagrams & Manuals
10625 (311000001-311999999)(2011) 20In Mulching/Rear Bagging Lawn Mower View Diagrams & Manuals
10641 (310000001-310999999)(2010) 20In Mulching/Rear Bagging Lawn Mower View Diagrams & Manuals
10641 (290000001-290999999)(2009) 20In Mulching/Rear Bagging Lawn Mower View Diagrams & Manuals
10641C (310000001-310999999)(2010) 20In Mulching/Rear Bagging Lawn Mower View Diagrams & Manuals
10641C (290000001-290999999)(2009) 20In Mulching/Rear Bagging Lawn Mower View Diagrams & Manuals
10642 (310000001-310999999)(2010) 20In Mulching/Rear Bagging Lawn Mower View Diagrams & Manuals
10642 (290000001-290999999)(2009) 20In Mulching/Rear Bagging Lawn Mower View Diagrams & Manuals
10642C (310000001-310999999)(2010) 20In Mulching/Rear Bagging Lawn Mower View Diagrams & Manuals
10642C (290000001-290999999)(2009) 20In Mulching/Rear Bagging Lawn Mower View Diagrams & Manuals
10644C (310000001-310999999)(2010) 20In Mulching/Rear Bagging Lawn Mower View Diagrams & Manuals
10644C (290000001-290999999)(2009) 20In Mulching/Rear Bagging Lawn Mower View Diagrams & Manuals
10646 (310000001-310999999)(2010) 20In Mulching/Rear Bagging Lawn Mower View Diagrams & Manuals
10646 (290000001-290999999)(2009) 20In Mulching/Rear Bagging Lawn Mower View Diagrams & Manuals
10647 (310000001-310999999)(2010) 20In Mulching/Rear Bagging Lawn Mower View Diagrams & Manuals
10647 (290000001-290999999)(2009) 20In Mulching/Rear Bagging Lawn Mower View Diagrams & Manuals
10649C (310000001-310999999)(2010) 20In Mulching/Rear Bagging Lawn Mower View Diagrams & Manuals
10650C (310000001-310999999)(2010) 20In Mulching/Rear Bagging Lawn Mower View Diagrams & Manuals
10658 (310000001-310999999)(2010) 20In Mulching/Rear Bagging Lawn Mower View Diagrams & Manuals
10632 20" Mulching/Rear Bagging Lawn Mower View Diagrams & Manuals
10634 20" Mulching/Rear Bagging Lawn Mower View Diagrams & Manuals
10634 (313000001 - 313999999) )(2013) 20 Inch Walk-Behind Mower View Diagrams & Manuals
10605 (312000001-312999999)(2012) 20in Mulching Rear Bagging Lawn Mower View Diagrams & Manuals
Show More Compatible Models
This item works with the following types of products:
- Lawn Mower Parts
Customer Part Reviews ?
Average Rating (out of 5):
Click to filter by ratings:
5 stars
9
4 stars
0
3 stars
1
2 stars
0
1 stars
0
< PREV
- 1
Prompt shipping, received as advertised.
Received as advertised. Perfect fit. Shipped in 1 day
Guest -
April 24, 2023
Verified Purchase
Mower part
The part arrived quickly and back working
Guest -
May 21, 2022
Verified Purchase
Great!
Got it in good time and works like it should!
James -
November 10, 2021
Verified Purchase
Mower repair
Arrived in reasonable amount of time - replaced and back to mowing!!! Thanks for the great service!
Guest -
October 21, 2021
Verified Purchase
Easy repair
Order was shipped right away and also received email on how to install which was very helpful for me. Mower is working great again. Customer service was very helpful.
Guest -
August 11, 2021
Verified Purchase
Helpful Part Info, Fast Reliable Service
I will remember your service when my next replacement part is needed. Keep up the good work.
Guest -
May 22, 2021
Verified Purchase
My lawn mower is fixed
My third order after talking to a customer service person was correct. I ordered the wrong cable using the web site by myself. My returns were credited and I received the correct part promptly.
Pat -
December 23, 2020
Verified Purchase
Great
Grear
Guest -
June 20, 2020
Verified Purchase
Right Part
Easily able to order the right part, shipped fast and was simple to install.
Stephen -
August 26, 2019
Verified Purchase
Not sure if wrong part was pulled. I was looking for a adjustment but didn't see one. The cable was too long not right part.
Wrong part I think the cable was too long, from back wheel to upper handlebar
Guest -
May 20, 2019
Verified Purchase
t
t
t -
t days ago
Verified Purchase
eReplacementParts Team
t
Questions & Answers ?
Our customer Service team is at the ready daily to answer your part and product questions.

Ask our Team
We have a dedicated staff with decades of collective experience in helping customers just like you purchase parts to repair their products.
Does this fit my product?Questions & Answers for Cable-traction
No questions have been asked yet
Customer Repair Instructions ?
All our customer repair instructions are solicited directly from other customers just like you who have purchased and replaced this exact part.
Traction cable broke
Robert - October 27, 2016
👍 8 of 12 people found this instruction helpful
Tool Type
Lawn Mower
Difficulty
Medium
Time
15-30 minutes
Tools Used
Nutdriver, Long nose pliers, wire cutter
Parts Used
1. Cut cable off on top of mower deck
2. Drained gas out of tank
3. Turned mower on its side and unhooked cable
4. Pushed cable thru mower deck and attached new cable to bracket
5. Turned mower over and undid bracket holding cable and removed old one
6. Installed new one and attached it to control bar before reinstalling bolt to hold it to mower handle.
6. Put a small amount of gas and started the mower and checked out the self-propelled option.
Did you find this story helpful?
Thanks for voting and helping fellow customers!
Self propelled mower would not move
Henry - March 24, 2016
👍 4 of 7 people found this instruction helpful
Tool Type
Lawn Mower
Difficulty
Easy
Time
15-30 minutes
Tools Used
Pliers, Socket set, Wrench Set
Parts Used
Remove spark plug wire drain fuel from mower. Remove baffle cover there were five 10mm bolts holding mine. On disconnect spring end of cable from drive belt assembly remove hold down bolt for cable at top of control handle. Unclip cable from mower deck with pliers, its plastic just squeeze it. Remove cable reinstall new one reversing removal instructions, adjust cable for proper motion speed by moving it up or down through the hold down bracket at top of control handle, and your done test mower for proper operation after you finish
Did you find this story helpful?
Thanks for voting and helping fellow customers!
Lawn mower rear drive cable broke.
Thomas - October 5, 2022
Tool Type
Lawn Mower
Difficulty
Medium
Time
Less than 15 minutes
Tools Used
Screwdriver, Pliers
Parts Used
1. Removed lawn mower rear drive cable.
2. Connected new cable to the rear drive motor and the starter handle.
2. Connected new cable to the rear drive motor and the starter handle.
Did you find this story helpful?
Thanks for voting and helping fellow customers!
Nothing
david - May 30, 2021
Tool Type
Lawn Mower
Difficulty
Easy
Time
Less than 15 minutes
Tools Used
Pliers
Parts Used
Put the cable on and it worked great
Did you find this story helpful?
Thanks for voting and helping fellow customers!
broken traction cable
Denis - July 13, 2020
Tool Type
Lawn Mower
Difficulty
Medium
Time
30-60 minutes
Tools Used
Nutdriver
Parts Used
Removed and replaced traction cable, it was a bit of a pain but figured it out then adjusted the cable length. All is well thank you.
Did you find this story helpful?
Thanks for voting and helping fellow customers!
Cables broke
Raymond - September 7, 2019
Tool Type
Lawn Mower
Difficulty
Medium
Time
1-2 hours
Tools Used
Pliers, Socket set, Wrench Set
Parts Used
Removed old cables and installed new.
Did you find this story helpful?
Thanks for voting and helping fellow customers!
Traction cable snapped
Joan - August 5, 2018
Tool Type
Lawn Mower
Difficulty
Easy
Time
15-30 minutes
Tools Used
Screwdriver, Pliers, None
Parts Used
Removed the broken cable and attached the new. Had trouble getting the broken one off but took about 10 minutes to replace it. Thank you E replacement parts. Saved me about $60.00.
Did you find this story helpful?
Thanks for voting and helping fellow customers!
The traction cable snapped after 5 years of residential use
Daniel - September 4, 2016
👍 1 of 2 people found this instruction helpful
Tool Type
Lawn Mower
Difficulty
Medium
Time
15-30 minutes
Tools Used
Screwdriver, Socket set, Adjustable Wrench
Parts Used
1. Remove the right rear wheel, a deep socket required
2. Remove two screws from the plastic shroud nearest the traction cable connection, inside & under
mower deck.
3. Loosen the traction cable clamp located on the left side of the mower handle to make room for
the replacement cable.
4. Work loose the old traction cable from the mower deck, may require a screwdriver to "snap loose"
the plastic plug holding it in place.
5. Remove the old traction spring from the traction lever.
6. Thread the new traction cable through the mower deck, pull back the plastic shroud to make room
to connect the traction cable spring into the traction lever. (The most difficult task involved)
7. Replace all screws, wheel
8. Tighten the traction cable clamp located on the left side of the mower handle, check cable length.
9. Inspect, reinspect, rejoice.
10. Pay the next door neighbor kid to mow your lawn with your newly repaired Lawn Boy knowing you saved $100 in repair costs and two-three weeks in the repair shop.
Did you find this story helpful?
Thanks for voting and helping fellow customers!
Broken cable.
BOB - June 4, 2017
👍 0 of 2 people found this instruction helpful
Tool Type
Lawn Mower
Difficulty
Easy
Time
Less than 15 minutes
Tools Used
Screwdriver, Pliers
Parts Used
1. Removed the broken cable.
2. Attached the new cable.
2. Attached the new cable.
Did you find this story helpful?
Thanks for voting and helping fellow customers!
Cable broke
Arthur - March 15, 2017
👍 0 of 3 people found this instruction helpful
Tool Type
Lawn Mower
Difficulty
Medium
Time
15-30 minutes
Tools Used
Screwdriver, Pliers
Parts Used
1. Took old cable out
2. Put new cable in place
3 Difficult to get spring headed in correct direction
4. Put cable in holder clasp
2. Put new cable in place
3 Difficult to get spring headed in correct direction
4. Put cable in holder clasp
Did you find this story helpful?
Thanks for voting and helping fellow customers!
OEM stands for Original Equipment Manufacturer and means the part you’re buying is sourced directly from the manufacturer who made your product. At eReplacementParts, we sell only genuine OEM parts, guaranteeing the part you’re purchasing is of better design and of higher quality than aftermarket parts.
Our product descriptions are a combination of data sourced directly from the manufacturers who made your product as well as content researched and curated by our content & customer service teams. This content is edited and reviewed internally before being made public to customers.
Our customer service team are at the ready daily to answer your part and product questions. We have a dedicated staff with decades of collective experience in helping customers just like you purchase parts to repair their products.
All our part reviews are solicited directly from other customers who have purchased this exact part. While we moderate these reviews for profanity, offensive language or personally identifiable information, these reviews are posted exactly as submitted and no alterations are made by our team.
All our customer repair instructions are solicited directly from other customers just like you who have purchased and replaced this exact part. While we moderate these reviews for profanity, offensive language or personally identifiable information, these reviews are posted exactly as submitted and no alterations are made by our team.
Based on data from past customer purchasing behaviors, these parts are most commonly purchased together along with the part you are viewing. These parts may be necessary or helpful to replace to complete your current repair.
All our installation videos are created and produced in collaboration with our in-house repair technician, Mark Sodja, who has helped millions of eReplacementParts customers over the last 13 years repair their products. Mark has years of experience in selling and repairing both commercial and residential products with a specialty in gas-powered equipment.
This data is collected from customers who submitted a repair instruction after replacing this exact part. Customers can rate how easy the repair was to complete and how long it took. We aggregate this data to provide a repair rating that allows customers to quickly determine the difficulty and time needed to perform their own repair.