
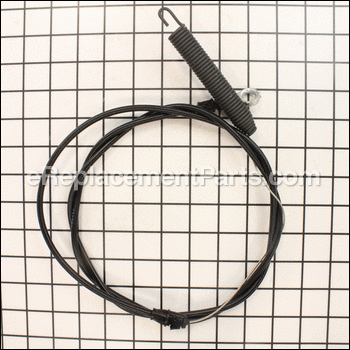
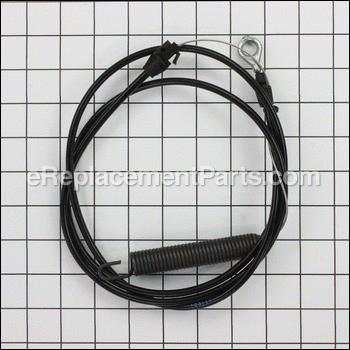
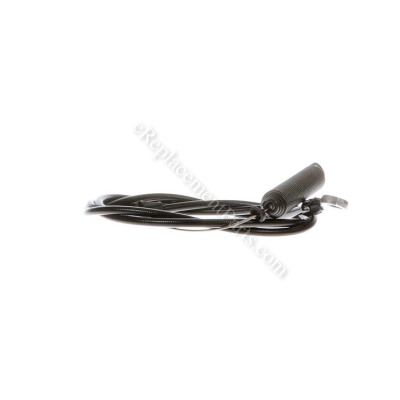


This is a genuine manufacturer-sourced part which is designed for use with Toro snowblowers. The clutch cable engages the blades. It is an identical replacement for a faulty or a missing cable that was installed on a new unit. Please make sure to check the appropriate diagrams for your model for the correct repair procedure of this part. Keep in mind this high-quality rubber insulated clutch cable is sold individually. You may need pliers to replace this component.
Cable Clutch Manual W/spr. 21547599
OEM part for: Ariens
Part Number: 21547599
$49.77
In Stock
Compatibility
This part will fit the following 32 machines
Ariens
936001 (000101) 46" Hydro Tractor View Diagrams & Manuals
936037 (000101) 42" Lawn Tractor View Diagrams & Manuals
936038 (000101) 42" Hydro Tractor View Diagrams & Manuals
936039 (000101) A20K46TY Precision Hydro 46" Lawn Tractor View Diagrams & Manuals
936041 (000101) 42" Hydro Tractor View Diagrams & Manuals
936042 (000101) Hydro Tractor 42" Lawn Tractor View Diagrams & Manuals
936045 (000101) Hydro Tractor View Diagrams & Manuals
936048 (000101) Hydro Tractor 42" Lawn Tractor View Diagrams & Manuals
936049 (000101) Hydro Tractor 42" Lawn Tractor View Diagrams & Manuals
936050 (000101) Precision Hydro 46" Lawn Tractor View Diagrams & Manuals
936056 (000101) Hydro Tractor 46" Lawn Tractor View Diagrams & Manuals
936072 (000000-999999) 30-In. Gear Tractor View Diagrams & Manuals
936048 (960460010-00) 42-Inch Hydro Tractor View Diagrams & Manuals
936048 (960460010-01) 42-Inch Hydro Tractor View Diagrams & Manuals
936049 (960460015-00) 42-Inch Hydro Tractor View Diagrams & Manuals
936050 (960460019-00) 46-Inch Precision Hydro Tractor View Diagrams & Manuals
936037 (960460001-00) 42-Inch Gear Tractor View Diagrams & Manuals
936038 (960460002-00) 42-Inch Hydro Tractor View Diagrams & Manuals
936039 (960460003-00) 46-Inch Precision Hydro Tractor View Diagrams & Manuals
936039 (960460003-01) 46-Inch Precision Hydro Tractor View Diagrams & Manuals
936041 (960460005-00) 42-Inch Hydro Tractor View Diagrams & Manuals
936042 (960460011-00) 42-Inch Hydro Tractor View Diagrams & Manuals
936045 (960460016-00) 42-Inch Hydro Tractor View Diagrams & Manuals
936001 (960460031-00) Hydro Tractor View Diagrams & Manuals
936074 (960460055-00) 42-Inch Automatic Tractor View Diagrams & Manuals
936056 (960460023-00) 46-Inch Hydro Tractor View Diagrams & Manuals
936056 (960460023-01) 46-Inch Hydro Tractor View Diagrams & Manuals
936079 (960480045-00) 42-Inch Gear Tractor View Diagrams & Manuals
936080 (960480046-00) 42-Inch Gear Tractor View Diagrams & Manuals
936072 (960460053-00) 30-Inch Gear Tractor View Diagrams & Manuals
936073 (960460054-01) 42-Inch Automatic Tractor View Diagrams & Manuals
936073 (960460054-02) 42-Inch Automatic Tractor View Diagrams & Manuals
Show More Compatible Models
This item works with the following types of products:
- Lawn Tractor Parts
This part replaces obsolete part #: 21546635
Customer Part Reviews ?
Average Rating (out of 5):
Click to filter by ratings:
5 stars
2
4 stars
0
3 stars
0
2 stars
0
1 stars
0
< PREV
- 1
Easy repair, minimal tools needed.
The part was an exact replacement and was easily installed.
Guest -
September 29, 2021
Verified Purchase
Clutch Cable, Arien Riding Lawnmower
I am very pleased with your prompt service. I received my replacement clutch cable in just a couple days after I orded. I installed it and our mower is back on line. Thanks again
J.M.
Jerome -
August 15, 2019
Verified Purchase
t
t
t -
t days ago
Verified Purchase
eReplacementParts Team
t
Questions & Answers ?
Our customer Service team is at the ready daily to answer your part and product questions.

Ask our Team
We have a dedicated staff with decades of collective experience in helping customers just like you purchase parts to repair their products.
Does this fit my product?Questions & Answers for Cable Clutch Manual W/spr.
No questions have been asked yet
Customer Repair Instructions ?
All our customer repair instructions are solicited directly from other customers just like you who have purchased and replaced this exact part.
Clutch Cable Broke
ANTHONY - August 29, 2016
👍 2 of 2 people found this instruction helpful
Tool Type
Lawn Tractor
Difficulty
Easy
Time
15-30 minutes
Tools Used
Pliers
Parts Used
1. Removed steering wheel and cover over gas tank
2. Removed the clutch cable
3. Put the new clutch cable in
4. Put the cover back over gas tank and replaced steering
5. Went and cut the grass
2. Removed the clutch cable
3. Put the new clutch cable in
4. Put the cover back over gas tank and replaced steering
5. Went and cut the grass
Did you find this story helpful?
Thanks for voting and helping fellow customers!
Mower clutch cable broke under the hood for blade engagement, belt was old and stretched, steering bushing wore alot of slack in steering wheel.
Kurt - June 5, 2018
👍 0 of 1 people found this instruction helpful
Tool Type
Lawn Tractor
Difficulty
Medium
Time
1-2 hours
Tools Used
Screwdriver, Pliers, Socket set, Pvc pipe
Too much to list but will say steering bushing was hard to set. Needed to be pressed in at an angle. After pulling steering wheel and shaft cover and extended shaft. Used long spade screw driver popped old bushing out from under mower by pushing it up thru,( not a lot of room). Once loose slide it up the shaft. Before running new bushing down, most likely there will be a layer of rust, use emery cloth to remove most of it, also doesn't hurt to apply silicone grease on shaft where the bushing rides on shaft and inside the bushing, don't need a lot (makes for easier steering). Also will not harm plastic bushing. Next slide it down, position it where the notch is facing front, only going in one way. Now get a pvc pipe long enough to reach bushing from top, being at an angle the pvc pipe will need an angle to match the bushing. I used bench grinder to make to this happen lol. Just take a little off then ran it down check angle, kept doing this until fits flush with bushing and deck where bushing is pressed in. Time to press in or really bump it in using a hard rubber maul or hammer on the other end of pvc pipe. May take few times, just make sure bushing is lined up by notch facing front. Good luck.
Did you find this story helpful?
Thanks for voting and helping fellow customers!
OEM stands for Original Equipment Manufacturer and means the part you’re buying is sourced directly from the manufacturer who made your product. At eReplacementParts, we sell only genuine OEM parts, guaranteeing the part you’re purchasing is of better design and of higher quality than aftermarket parts.
Our product descriptions are a combination of data sourced directly from the manufacturers who made your product as well as content researched and curated by our content & customer service teams. This content is edited and reviewed internally before being made public to customers.
Our customer service team are at the ready daily to answer your part and product questions. We have a dedicated staff with decades of collective experience in helping customers just like you purchase parts to repair their products.
All our part reviews are solicited directly from other customers who have purchased this exact part. While we moderate these reviews for profanity, offensive language or personally identifiable information, these reviews are posted exactly as submitted and no alterations are made by our team.
All our customer repair instructions are solicited directly from other customers just like you who have purchased and replaced this exact part. While we moderate these reviews for profanity, offensive language or personally identifiable information, these reviews are posted exactly as submitted and no alterations are made by our team.
Based on data from past customer purchasing behaviors, these parts are most commonly purchased together along with the part you are viewing. These parts may be necessary or helpful to replace to complete your current repair.
All our installation videos are created and produced in collaboration with our in-house repair technician, Mark Sodja, who has helped millions of eReplacementParts customers over the last 13 years repair their products. Mark has years of experience in selling and repairing both commercial and residential products with a specialty in gas-powered equipment.
This data is collected from customers who submitted a repair instruction after replacing this exact part. Customers can rate how easy the repair was to complete and how long it took. We aggregate this data to provide a repair rating that allows customers to quickly determine the difficulty and time needed to perform their own repair.